Highlights
- Unlocking the bootloader on your Google Pixel handset is a key step in taking control of your Android device.
- If you want to install a custom ROM, root your device, or flash a custom recovery, unlocking the bootloader of the smartphone is one of the most essential things to do.
- This guide has detailed instructions on how to unlock the bootloader on any Google Pixel device.

You can do anything you want with your Google Pixel once you unlock the bootloader. Whether you are a developer, ROM interest user, or even a normal user, this is what you can use to root your Device, install a custom ROM, or just change your system settings.
In this guide, we’ll show you how to unlock the bootloader of your Google Pixel using easy-to-follow steps.
Don’t want to miss the best from TechLatest ? Set us as a preferred source in Google Search and make sure you never miss our latest.
We’ll also discuss about the mods’ benefits, risks, requirements, and post-unlock procedure so that you can complete it safely.
Content Table
What Is Bootloader Unlocking?
The bootloader is the little bit of code that loads the operating system on your Pixel.
It’s locked by Google by default to ensure that no unauthorized software has been tampered with or otherwise replaced. Unlocking it allows you to:
- Flash custom ROMs like LineageOS or Pixel Experience
- Install custom recoveries such as TWRP
- Gain root access using Magisk
- Modify system partitions
Risks of Unlocking the Bootloader
Although it brings you flexibility, unlocking the bootloader does have some drawbacks:
- Your data will be wiped completely (factory reset)
- Security is reduced , making your Device more vulnerable
- OTA updates may stop working
- Warranty could be void in some regions (check with Google or carrier)
What You Need Before Unlocking
Fully Charged Google Pixel : Ensure your battery is at least 50%.
USB Cable : For best compatibility, we suggest you use the original USB-C cable.
PC with Internet Access : This guide works on Windows, macOS, and Linux.
Platform Tools (ADB & Fastboot) : Download Google’s official Android SDK Platform Tools: Android SDK Platform-Tools

- Backup Your Data
Unlocking erases your entire Device:
- Backup photos via Google Photos or Google Drive
- Save SMS, call logs, app data, and WhatsApp chats
- Copy personal files to your PC or cloud
Enable Developer Options on Pixel
- Open the Pixel’s Settings app.
- Scroll down and select About Phone .
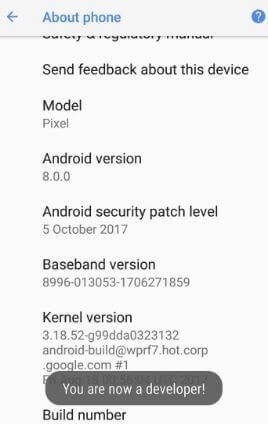
- Find Build Number , and then click it seven times .
- If asked, type your device password or PIN.
- You’ll get a message: “ You are now a developer! “
Enable OEM Unlocking and USB Debugging
- Return to Settings > System > Developer options .
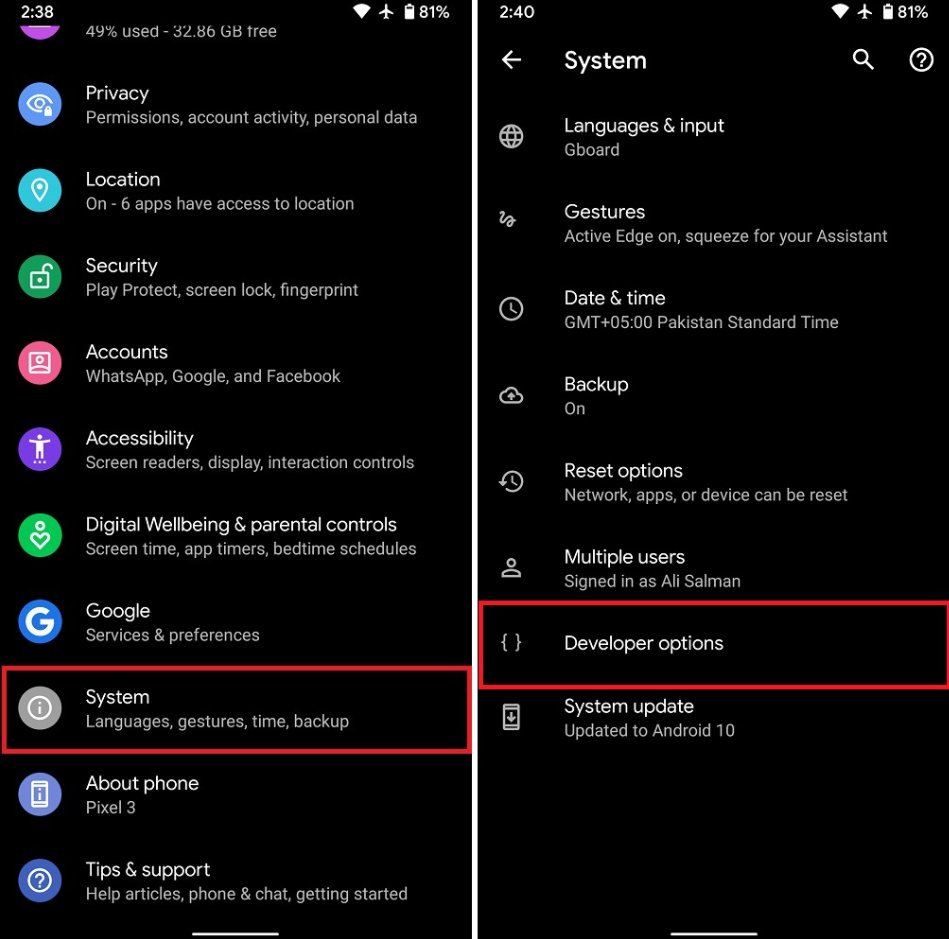
- Enable OEM unlocking .

- Turn on USB debugging (this is useful for terminal commands and other tasks).
Step-by-Step: Unlocking Bootloader on Pixel
Step 1: Power Off Your Pixel
Turn off your Device completely.
Step 2: Boot into Fastboot Mode
Hold down the Power + Volume Down buttons simultaneously until you see the Fastboot Mode screen.
Step 3: Connect to Your PC
Plug your Pixel into your PC with the USB-C cable.
Step 4: Set Up Platform Tools
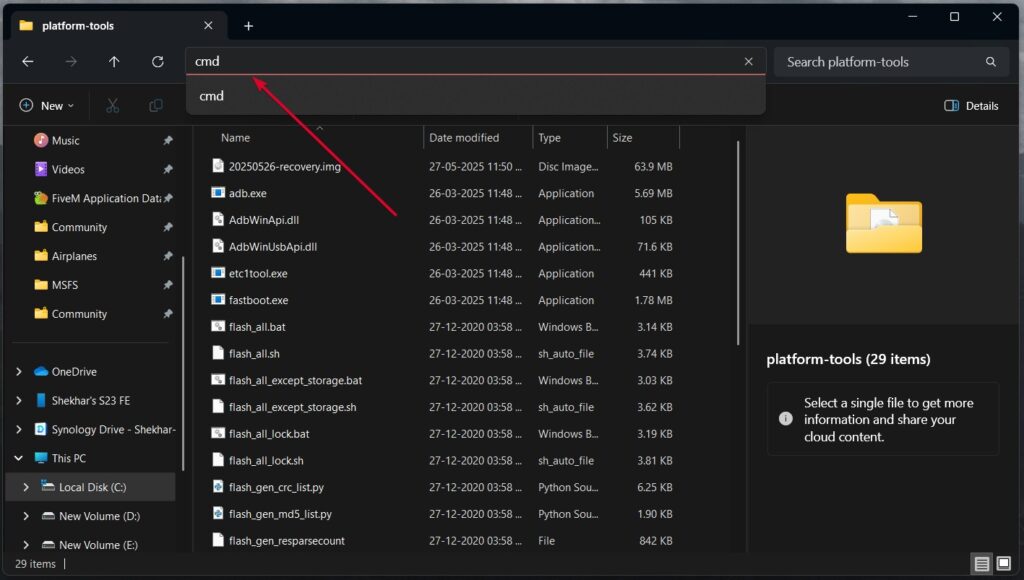
- Unzip the downloaded platform-tools ZIP file.
- For Windows, type cmd in the address bar and press Enter.
- On Mac/Linux , right-click on the folder and select “ New Terminal at Folder ” or open Terminal and cd.
Step 5: Verify Device Connection
To check if your Device is recognized:
- Windows: fastboot devices
- Mac/Linux: ./fastboot devices
If you see your device ID, you are good to go. If not:
- Reinstall USB drivers (Windows)
- Use a different port/cable
- Reboot PC and Phone
Step 6: Unlock the Bootloader
Now enter this command:
- Windows: fastboot flashing unlock
- Mac/Linux: ./fastboot flashing unlock
A confirmation screen will be shown on your Pixel’s display.
Scroll to “ Unlock the bootloader ” using the volume keys, and press Power to select.
- This will erase everything and permanently unlock the bootloader (it will stay unlocked until re-locked manually).
Step 7: Reboot the System
Once the bootloader is unlocked, you can restart your Phone with the following command:
- Windows: fastboot reboot
- Mac/Linux: ./fastboot reboot
Your Pixel will reboot, and it may take longer than usual to restart.
Bootloader Successfully Unlocked! What Next?
Once the setup is done, your Pixel will now have an unlocked bootloader. Here’s what you can do now:
Install Custom Recovery (TWRP)
Flash TWRP to get access to full device backups, ROM flashing, etc.
fastboot flash recovery twrp.img
Read : 5 Best Custom Recovery for Android Phone
Root Your Device with Magisk
- Patch the boot image in the Magisk app.
- Flash it via fastboot.
fastboot flash boot magisk_patched.img
Read : What is Magisk | Root Android Device using Magisk
Install Custom ROMs
Flash custom ROMs that can help enhance speed, privacy, or add features.
Read : How to Flash Custom ROM on Android Device
How to Re-Lock the Bootloader
To go back to stock (for resale or warranty):
- Flash a complete (stock) factory image.
- Boot into fastboot mode.
- Run the command: fastboot flashing lock
Confirm on your phone screen. This will erase your data again and re-lock the bootloader.
Does unlocking the bootloader void the warranty?
In most cases, yes. Google still could cover warranty for hardware issues, but don’t bet on it. Be sure to double-check your local laws or carrier contract for confirmation.
Will I still get OTA updates?
Yes, system partitions could be edited, but OTA updates would not be possible. In this case, use manual sideloading.
Can I back up my data before unlocking?
Yes, but if you modify system partitions, there is a chance for OTAs to error. This is where a tool like manual sideloading comes into play.
Conclusion
Unlocking the bootloader of your Google Pixel is the most essential step you need to take to gain full control of your Device.
If you want to have a rooted phone or install custom ROMs, then you need to unlock your device’s bootloader.
But, be careful: Unlocking will erase all of your data, may void your warranty, and if performed improperly, could render your Device inoperable or make it vulnerable to security threats.
With that, by closely following the steps in this walkthrough, as well as taking the necessary precautions and risks into account, you can unlock your Pixel’s bootloader with a plan to give your Device a little bit more customization.
Enjoyed this article?
If TechLatest has helped you, consider supporting us with a one-time tip on Ko-fi. Every contribution keeps our work free and independent.
Highlights
- Unlocking the bootloader on your Google Pixel handset is a key step in taking control of your Android device.
- If you want to install a custom ROM, root your device, or flash a custom recovery, unlocking the bootloader of the smartphone is one of the most essential things to do.
- This guide has detailed instructions on how to unlock the bootloader on any Google Pixel device.
You can do anything you want with your Google Pixel once you unlock the bootloader. Whether you are a developer, ROM interest user, or even a normal user, this is what you can use to root your Device, install a custom ROM, or just change your system settings.
In this guide, we’ll show you how to unlock the bootloader of your Google Pixel using easy-to-follow steps.
Don’t want to miss the best from TechLatest ? Set us as a preferred source in Google Search and make sure you never miss our latest.
We’ll also discuss about the mods’ benefits, risks, requirements, and post-unlock procedure so that you can complete it safely.
Content Table
What Is Bootloader Unlocking?
The bootloader is the little bit of code that loads the operating system on your Pixel.
It’s locked by Google by default to ensure that no unauthorized software has been tampered with or otherwise replaced. Unlocking it allows you to:
- Flash custom ROMs like LineageOS or Pixel Experience
- Install custom recoveries such as TWRP
- Gain root access using Magisk
- Modify system partitions
Risks of Unlocking the Bootloader
Although it brings you flexibility, unlocking the bootloader does have some drawbacks:
- Your data will be wiped completely (factory reset)
- Security is reduced , making your Device more vulnerable
- OTA updates may stop working
- Warranty could be void in some regions (check with Google or carrier)
What You Need Before Unlocking
Fully Charged Google Pixel : Ensure your battery is at least 50%.
USB Cable : For best compatibility, we suggest you use the original USB-C cable.
PC with Internet Access : This guide works on Windows, macOS, and Linux.
Platform Tools (ADB & Fastboot) : Download Google’s official Android SDK Platform Tools: Android SDK Platform-Tools
- Backup Your Data
Unlocking erases your entire Device:
- Backup photos via Google Photos or Google Drive
- Save SMS, call logs, app data, and WhatsApp chats
- Copy personal files to your PC or cloud
Enable Developer Options on Pixel
- Open the Pixel’s Settings app.
- Scroll down and select About Phone .
- Find Build Number , and then click it seven times .
- If asked, type your device password or PIN.
- You’ll get a message: “ You are now a developer! “
Enable OEM Unlocking and USB Debugging
- Return to Settings > System > Developer options .
- Enable OEM unlocking .
- Turn on USB debugging (this is useful for terminal commands and other tasks).
Step-by-Step: Unlocking Bootloader on Pixel
Step 1: Power Off Your Pixel
Turn off your Device completely.
Step 2: Boot into Fastboot Mode
Hold down the Power + Volume Down buttons simultaneously until you see the Fastboot Mode screen.
Step 3: Connect to Your PC
Plug your Pixel into your PC with the USB-C cable.
Step 4: Set Up Platform Tools
- Unzip the downloaded platform-tools ZIP file.
- For Windows, type cmd in the address bar and press Enter.
- On Mac/Linux , right-click on the folder and select “ New Terminal at Folder ” or open Terminal and cd.
Step 5: Verify Device Connection
To check if your Device is recognized:
- Windows: fastboot devices
- Mac/Linux: ./fastboot devices
If you see your device ID, you are good to go. If not:
- Reinstall USB drivers (Windows)
- Use a different port/cable
- Reboot PC and Phone
Step 6: Unlock the Bootloader
Now enter this command:
- Windows: fastboot flashing unlock
- Mac/Linux: ./fastboot flashing unlock
A confirmation screen will be shown on your Pixel’s display.
Scroll to “ Unlock the bootloader ” using the volume keys, and press Power to select.
- This will erase everything and permanently unlock the bootloader (it will stay unlocked until re-locked manually).
Step 7: Reboot the System
Once the bootloader is unlocked, you can restart your Phone with the following command:
- Windows: fastboot reboot
- Mac/Linux: ./fastboot reboot
Your Pixel will reboot, and it may take longer than usual to restart.
Bootloader Successfully Unlocked! What Next?
Once the setup is done, your Pixel will now have an unlocked bootloader. Here’s what you can do now:
Install Custom Recovery (TWRP)
Flash TWRP to get access to full device backups, ROM flashing, etc.
fastboot flash recovery twrp.img
Read : 5 Best Custom Recovery for Android Phone
Root Your Device with Magisk
- Patch the boot image in the Magisk app.
- Flash it via fastboot.
fastboot flash boot magisk_patched.img
Read : What is Magisk | Root Android Device using Magisk
Install Custom ROMs
Flash custom ROMs that can help enhance speed, privacy, or add features.
Read : How to Flash Custom ROM on Android Device
How to Re-Lock the Bootloader
To go back to stock (for resale or warranty):
- Flash a complete (stock) factory image.
- Boot into fastboot mode.
- Run the command: fastboot flashing lock
Confirm on your phone screen. This will erase your data again and re-lock the bootloader.
Does unlocking the bootloader void the warranty?
In most cases, yes. Google still could cover warranty for hardware issues, but don’t bet on it. Be sure to double-check your local laws or carrier contract for confirmation.
Will I still get OTA updates?
Yes, system partitions could be edited, but OTA updates would not be possible. In this case, use manual sideloading.
Can I back up my data before unlocking?
Yes, but if you modify system partitions, there is a chance for OTAs to error. This is where a tool like manual sideloading comes into play.
Conclusion
Unlocking the bootloader of your Google Pixel is the most essential step you need to take to gain full control of your Device.
If you want to have a rooted phone or install custom ROMs, then you need to unlock your device’s bootloader.
But, be careful: Unlocking will erase all of your data, may void your warranty, and if performed improperly, could render your Device inoperable or make it vulnerable to security threats.
With that, by closely following the steps in this walkthrough, as well as taking the necessary precautions and risks into account, you can unlock your Pixel’s bootloader with a plan to give your Device a little bit more customization.
Enjoyed this article?
If TechLatest has helped you, consider supporting us with a one-time tip on Ko-fi. Every contribution keeps our work free and independent.
