PDFs are not editable by default. Sometimes, to fix the typos, signature, or any other errors in the invoice, you need to edit the PDFs. For this purpose, you can follow any of the methods suggested in this guide to edit the PDF on your Mac.
Based on the version of the Mac you are using, there are inbuilt PDF editing tools like Quick Look, which shows the preview of the PDF document when you hit on the spacebar. By using this tool, you can also add or remove pages in the PDF file.

Don’t want to miss the best from TechLatest ? Set us as a preferred source in Google Search and make sure you never miss our latest.
Content Table
How to Edit a PDF on Mac Using Quick Look?
Quick Look is one of the best-inbuilt tools for Mac that helps to see the preview of any file without opening it in the actual software. For this, you need to just click on the file and press the spacebar to see the preview.
To edit the PDF using Quick Look on Mac, follow the steps given below:
- Firstly, find the PDF you want to edit.
- Select the file and then hit on the spacebar.
- Now, you will be able to see the preview of the PDF file.
- When the preview appears, click on the pencil-like icon that appears on the top-right.
- Once you click on the icon, you can find all the tools that are needed to edit the PDF file.
- In order to add text to your PDF file, click on the text tool and place it where you want to add the text.
- You can change the color of the text by clicking on the dropdown box beside the icon ‘A’.
- Once the changes have been made to the PDF file, click on ‘Done’ to save the changes.
How to Edit PDF on Mac using the Preview Tool?
In case you haven’t updated to the latest version of the Mac, you can still edit the PDF files using the free preview tool.
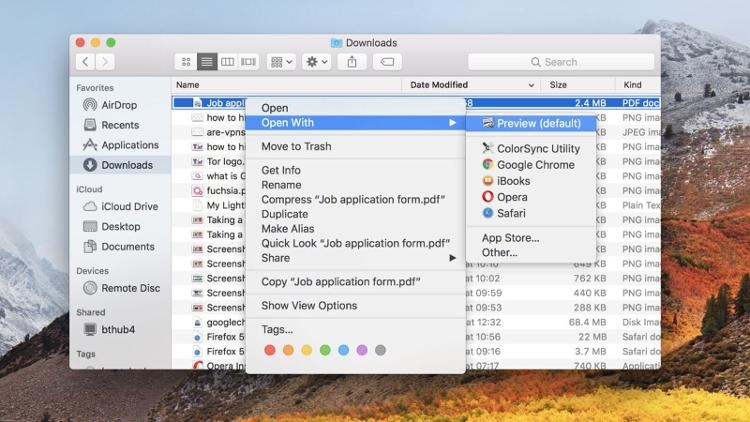
- Firstly, if you don’t have any third-party tools installed to open the PDF file, by default it opens in the ‘Preview’ app. If not, you can right-click on the PDF file and choose the ‘Open with → Preview’ option.
- Now, if you see any icon that appears like a pencil inside the circle, it will open the Markup tools for text editing, sketching, drawing, etc.

- Depending on your requirement, you can add the text, highlight, or add a signature to the PDF.
How to Add Text to PDF on Mac?
If the text is properly aligned, the ‘Preview’ app can easily display where you need to add text in the PDF file. If that is not the case, you need to create the text boxes manually and then add text to the PDF file.
Here is how you can do that:
- Firstly, navigate to the ‘Tools’ section and click on ‘Annotate → Text’ from the menu.
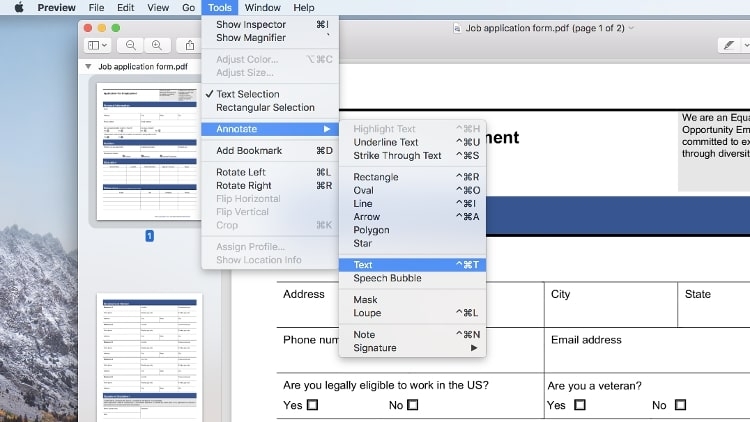
- Now, a small box with ‘Text’ appears at the place you have put the cursor. You can drag and drop the text box anywhere in the PDF file. If required, you can also resize the text box.

- In case you want the font color and size, click on the ‘A’ icon as shown in the image below. You can see the formatting options and also alignment options.
Best Third-Party PDF Editors for Mac
If you have not updated your Mac version and would like to use the third-party PDF tools, you can use any of the apps mentioned below:
Adobe Acrobat
Adobe is one of the reputed companies that has launched dedicated products for PDF editing and viewing. Based on the version of Adobe Acrobat you choose, you can add the documents into PDF, split them into multiple files, and also add e-signatures.
Skim
Foxit Editor
Foxit is a PDF editor that helps you to manipulate PDF files directly. In other PDF editors, if you find typos, you cannot edit them directly. On the other hand, you can open the PDF directly in Foxit and edit the typos.
You can also change the position and alignment of the text in the PDF document. You can also export the file in another format within a few seconds. Though Foxit is not a free PDF editor, it comes with a 14-day free trial.
Conclusion
If you want to perform basic edits to your PDF file, you can use Preview or Quick Look. On the other hand, if you are looking for advanced editing features like exporting the PDF in different formats, adding or deleting pages, etc., then you can download and use any of the above-mentioned third-party PDF software.
Further Reading:
- 5 Best Open-Source PDF Editors
- How to Print to PDF on iPhone?
- How to Edit PDF on iPhone? (3 Methods)
Enjoyed this article?
If TechLatest has helped you, consider supporting us with a one-time tip on Ko-fi. Every contribution keeps our work free and independent.
Phones are used to print nearly anything, whether it be a professional document or a personal document like recipes, posters, etc. One of the key advantages of printing to PDF is that the original structure of the file remains the same without losing the format.
In this article, we will show you how to print to PDF on iPhone by following simple steps.
Don’t want to miss the best from TechLatest ? Set us as a preferred source in Google Search and make sure you never miss our latest.
- How to Edit PDF on iPhone? (3 Methods)
- How Do I Transfer PDF Files to My iPad
- How to use Microsoft Office for Mac Free?
Content Table
How to Print to PDF on iPhone?
To print the PDF on iPhone, follow the steps given below:
Step 1: Click on the Share Icon
You will see an icon with an arrow pointing upwards. These icons are present at the bottom of the screen.
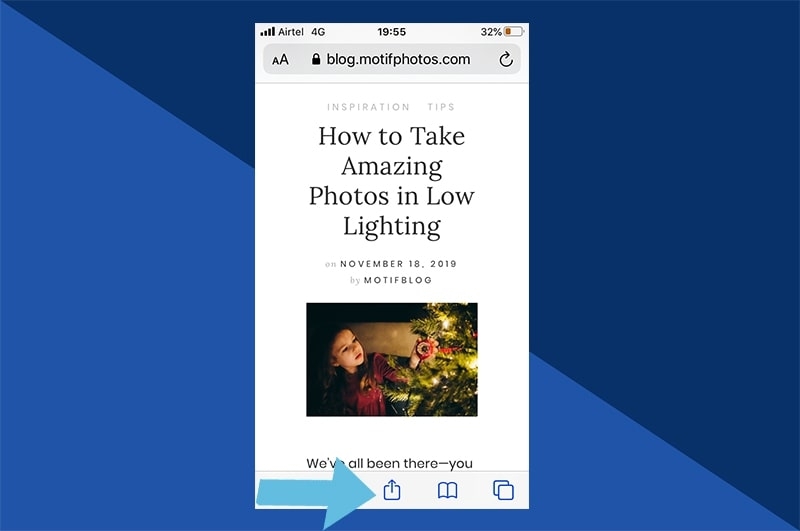
Now click on the print option. You will be navigated to the preview page.
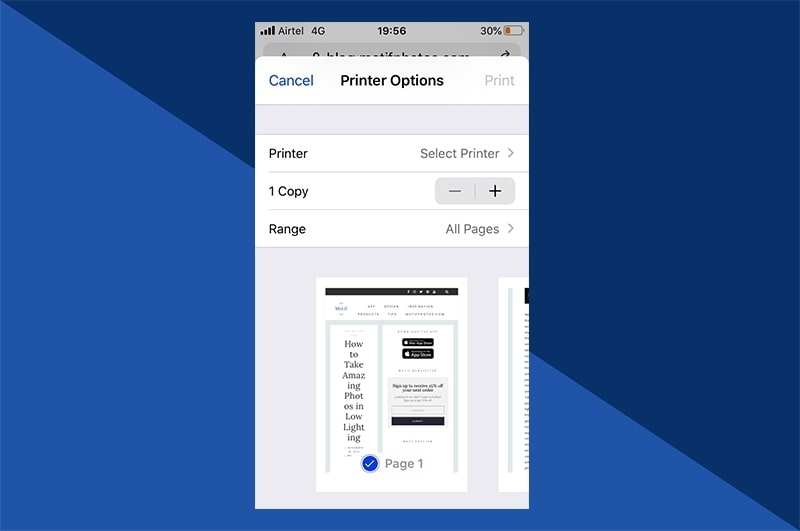
Step 2: View Preview
Once you are on the preview page, you will find a small preview of the page. You can also zoom in and zoom out to see if the print looks fine or not. If you are using iPhone 6 and above version, you can tap and hold the finger to use the pinch-out gesture.
Step 3: Tap on the Share icon and Save the PDF
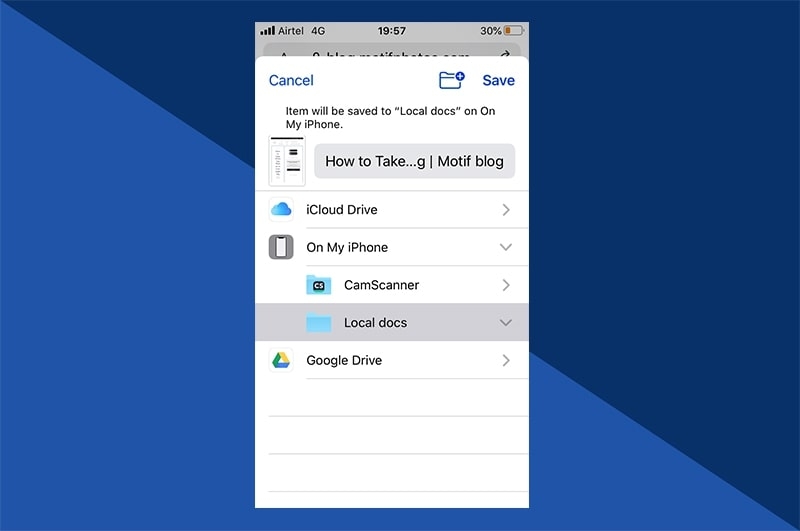
Once you see the full preview mode, you can tap on the share icon present in the top-right corner of the screen, as shown in the image below.
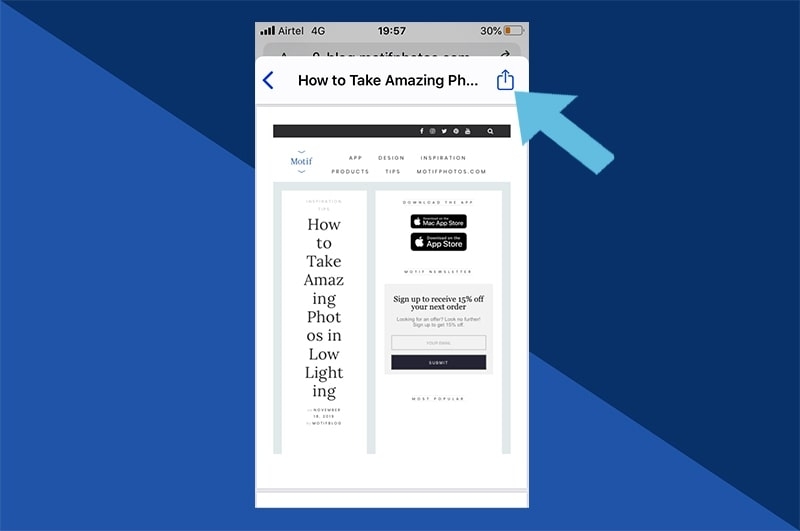
Once you select the format to save (save as PDF), choose where you would like to save the file. You can either save it on your iPhone, send it over email, or choose to use it with a PDF-compatible app.
How to Print email as a PDF on an iPhone?
To print the email as a PDF on iPhone, you need to first open the Apple Mail application and then scroll down and click on the option ‘print conversation’. If you are using Gmail, then you can find 3 dots beside the email. Tap on it and select the ‘Print’ option. The same process can be applied to print an email as a PDF on outlook as well.
Once you click on the ‘Print’ option in any of the respective email applications, the rest of the printing steps are common:
- Tap on the ‘Print’ option in the top-right corner and choose your desired print settings.
- In case you want to save the email as a PDF, you can long-press on the document preview to zoom it.
- Now, press on the bottom left corner and click on the ‘Share’ icon.
- Now, press the ‘Save to Files’ option to save the email as a PDF on your iPhone.
Things to Consider When Creating PDF in Different Browsers
Though the above steps are more inclined towards the Safari browser, you can follow similar steps to print PDF on other browsers as well. In case you don’t find the browser supporting the printing option, then we recommend you take a screenshot of the file and then send it to the ‘Share’ option after printing.
What can you ‘Print to PDF’ on your iPhone?
The latest ‘print to PDF’ feature on iPhone allows you to print any file, document, mail, photos, etc. You are not restricted to any file type for printing. Also, the print to PDF feature is not restricted to use only for Apple apps but also can be used for any third-party apps like Google Sheets, Gmail, and other browsers.
Conclusion
We hope this article has provided clear insights on how to use the ‘print to PDF’ feature on iPhone. If you are not using Safari on your phone, you can still print to PDF on other browsers as well because this feature supports even non-Apple apps.
Enjoyed this article?
If TechLatest has helped you, consider supporting us with a one-time tip on Ko-fi. Every contribution keeps our work free and independent.
