
Windows 10 is a weird OS when it comes to updates, the updates are too frequent, and you do not have a choice of stopping them by yourself. Well, the 0x80070020 error is an update error that you might face, and it becomes important to fix 0x80070020 error in Windows 10 for a seamless experience.
Well, you will likely see this error whenever Microsoft rolls out a new Windows 10 update. And you can easily fix 0x80070020 error in Windows 10 by following these methods.
Don’t want to miss the best from TechLatest ? Set us as a preferred source in Google Search and make sure you never miss our latest.
Content Table
How to Fix 0x80070020 Error in Windows 10
Well, there are some methods that you can use and fix 0x80070020 error in Windows 10 and we have listed them here. You can try these ones to solve your problem.
Disable the Antivirus
The third-party antivirus is the tricky spot. These are not the best thing to be installed on your Windows computer. The Windows defender with regular updates and Internet safety rules is more than enough. So, you must try to disable your third-party antivirus software as it might hinder Windows updates.
Restarting the BITS
This is also the potential solution to fixing the 0x80070020 error. The Background Intelligent Transfer Services (BITS) process is the one that delivers the Windows updates to the computer. So, it is really essential that you restart the process if you are facing such an issue. To do that follow these steps:
Step 1: Type ‘Services’ in the Windows Search bar.

Step 2: In the services navigate to Background Intelligent Transfer Services and right click on it and click on ‘Properties’.
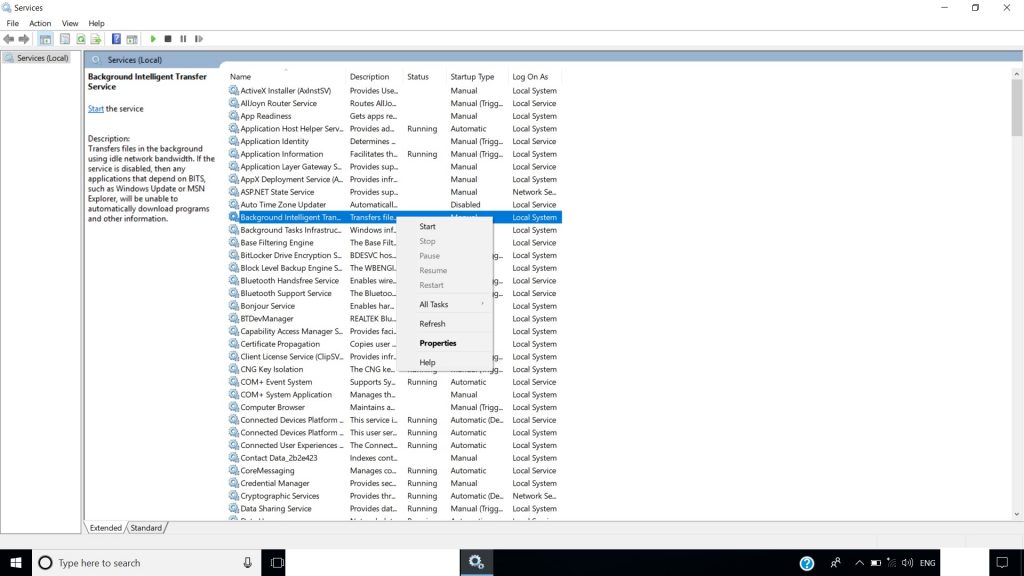
Step 3: In the ‘General’ tab you will see ‘Startup type:’ make sure that it is ‘Automatic(Delayed Start)’, and see the ‘Service status’ and if it shows ‘Running’, it is okay otherwise click on ‘Start’ and press ‘OK’.

That is it and this should probably fix your problem.
Corrupted Windows System Files
If you are facing a very slow performance and face driver errors, blue screen, black screen, and other stupid and irritating stuff, then chances are that you have some corrupted files on your system and these files are causing the system to be slow.
You can fix this issue very easily, just follow these steps:
Step 1: Go to Windows Search Bar and type ‘PowerShell’, right click on it and click on ‘Run as administrator’.

Step 2: You will see a command line where you have to type the code,
dism.exe/Online/Cleanup-image/Restorehealth
and press enter.

That is it the DISM tool will find the corrupted files and fix them for you.
You can also try the SFC tool, just open the PowerShell as you did in Step 1 above and then type
sfc/scannow
and press enter. The tool will find corrupted files and fix them and after the completion, you have to start your device again. And you are all set.

Troubleshooting
So, if these solutions do not work and you are still facing the error then you should try troubleshooting for that that you can use Windows Update Troubleshooter. Follow these simple steps:
Step 1: Download Windows Update Troubleshooter from Microsoft.
Step 2: Launch the tool, follow the instructions, and update the Windows again.
- How to Fix Slow Windows 10 Performance Issues
- How to Fix 0x0000007f Blue Screen Error in Windows 10
- How to Fix ‘File Too Large for Destination File System’ Error in Windows 10
- How To Fix ‘Your PC Ran Into a Problem and Needs to Restart’ in Windows 10
Enjoyed this article?
If TechLatest has helped you, consider supporting us with a one-time tip on Ko-fi. Every contribution keeps our work free and independent.
