If you are using Windows 10, you must have noticed that your encrypted folders are grayed out. Let’s have a glance over how to fix the issue!
- How to Fix Broken Registry Items in Windows 10?
- How to Enable Group Policy Editor (gpedit.msc) in Windows 10 Home
- How to Change Public Network to Private Network in Windows 10/11?
Don’t want to miss the best from TechLatest ? Set us as a preferred source in Google Search and make sure you never miss our latest.
Content Table
Which Windows 10 Edition are you Using?
If you want to encrypt files and folders, you are trying to access the Encrypted File System (popularly known as EFS). But the file encryption system is unavailable in the Windows 10 standard version known as Windows 10 Home OS.
However, it is a possibility that you might not know about the Windows OS that you are using. But, we have a rescue for the same.
- Press the Windows Button and the S key simultaneously.
- You will get options to select System Information .
- Afterward, it opens, and you will see your Windows Operating System and the version that you use
- However, if you use the Windows Home version , you cannot perform the file encryption process .
You can use the Windows 10 Pro version, but you have to buy it. You cannot update your OS from Windows Home to the Windows Pro version.
Which Drive are you Using?
For using the Encrypt Files function, you need to ensure the drive you are using. Once you use the Windows 10 Pro version, you can quickly check your drive.
You should be using an NTFS drive; else, the EFS function won’t work. If you are not using FAT32, you need to convert your drive into an NTFS drive.
You can convert your drive using the Microsoft Windows Command Prompt (cmd) software. The following are steps to convert your drive using Command Prompt:
- Input the command: convert X:/ fs:ntfs
- Now replace the letter X with the given drive’s letter
Once you implement the steps mentioned above, you have successfully converted your drive from FAT32 to NTFS . Now, you can use the file encryption feature.
However, if you’re using Windows Pro, Education, or Enterprise version with NTFS drive and you still cannot use either feature, then follow the steps mentioned below!
How to Fix “Encrypt Contents to Secure Data Grayed Out” Issue?
The following are some of the solutions that can be used to resolve the issue:
Solution 1: Change the EFS System to Automatic
You can follow this solution guide, but read it well before implementing the strategy:
- Press a combination of Windows and R buttons together.
- A dialog box will appear, and you will see a search bar near the Open option. In that input:
services.msc
- Now, press the Enter key or choose the OK option given.
- Then search Encrypt File System, navigate it, and double-click on the option.
- You will see the Encrypt File System Properties dialog box as it pops up.
- Then, amongst the given four tabs, navigate to the General tab.
- Now, scroll a little to navigate to the startup Type.
- You will get a menu select Automatic from it. Press the Enter key or click the OK button.

After you’ve implemented all the steps mentioned above, you need to check if it worked or not. For that, log off your PC and then check.
Solution 2: Enable Encrypting File System using Registry Editor
You don’t need to be upset if the above method didn’t work and has not resolved the issue. You can follow the procedure prescribed below to fix it using Windows Registry Editor.
- Press the Windows and R buttons together to get the RUN dialog box.
- Then in the search bar, input regedit.
- Now, after searching it, press the Enter key.
- Now Windows Registry Editor appears.
- Enter HKEY_LOCAL_MACHINE\System\CurrentControlSet\Control\FileSystem , and you can locate the File System. After you find it from its menu, navigate to the NtfsDisableEncryption. After navigation, double-click on the option.

- You will see the Edit DWORD (32-BIT) Value pop-up dialog box. Now, below Value data, you will see a section to edit the same. Now enter 0 after implementing press the Enter key.
Again, to check whether the guide has fixed your issue or not, you will have to reboot your PC. If it has not been solved, you can check another alternative given below!
Solution 3: Fix the Error using Windows Command Prompt
This is the easiest solution to fix the error as you have to use Microsoft Windows Command Prompt (cmd). Follow the steps below to resolve Encrypting File System error using cmd. Please read them carefully and then implement them.
- Click on the Start button. You will see the search bar. In the bar, input cmd and press the Enter key; right-click on cmd and choose the Run as administrator option.
- Now, in the workspace, input the following command:
fsutil behavior set disableencryption 0

The command should be inputted as given.
After successfully implementing the steps mentioned above, you would fix the EFS error. Alternatively, you can even go for an application software KakaSoft that does the EFS work on your system. However, it is always preferred not to use third-party software.
Why the EFS error occurs commonly?
The issue generally arises when you are using the Windows 10 Home version. It can also occur if you use drives like FAT32 instead of NTFS drives. Further, if your EFS System by default will not be set to Automatic, the issue may occur.
How can I tackle the issue using KakaSoft?
KakaSoft is an easy software with a simple GUI. You can reach out to its Help Center to learn about it. However, for the detailed procedure, if you can tune into a YouTube video, that will let you know about it.
Why is it preferred not to use third-party software to tackle the issue?
Third-party software is easy to use. But it would be best if you avoided it because such software can access the data stored on your device.
Moreover, these issues often arise due to System errors that need to be resolved for efficient functioning. Troubleshooting without other software will help you understand and fix the problem well.
The Conclusion
By following any of the three solutions mentioned above, you will be able to successfully use the Encrypting File System feature on your Windows 10.
It is of utmost essential to read the guide thoroughly before implementing it. Moreover, you should proceed only if you are sure that you will be able to follow the manual well.
But, if you are not good at troubleshooting or you are unsure, then you can use application software like KakaSoft. It makes EFS implementation relatively more straightforward.
Enjoyed this article?
If TechLatest has helped you, consider supporting us with a one-time tip on Ko-fi. Every contribution keeps our work free and independent.
Highlights
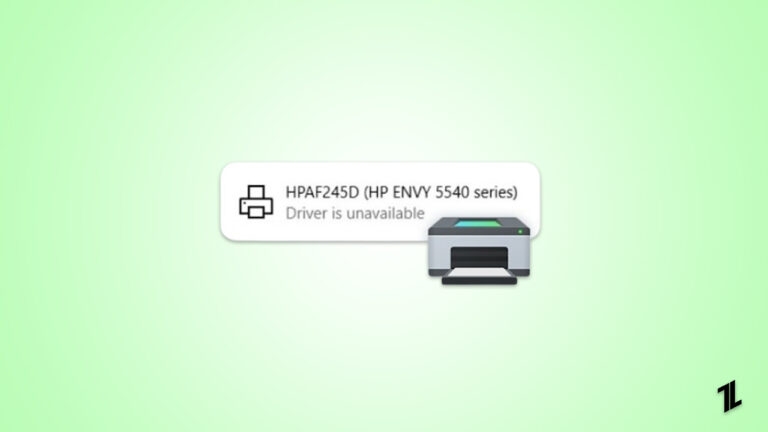
- “Driver is unavailable” is a common issue people face with their printer on a Windows PC.
- The issue occurs due to various reasons like the driver is not properly installed or is corrupted, etc.
- We’ve given a number of solutions that can help you resolve the issue in no time and you can get back to your daily chores.
Printing is one of the most common tasks people do on a daily basis. Nowadays there are a ton of printers available on the market, and every one of them requires a different driver to operate.
Hence, you might see a very common error while you try to print any document or photo, i.e., Driver is Unavailable. Since it is a common issue, solutions are also very easy to implement.
Don’t want to miss the best from TechLatest ? Set us as a preferred source in Google Search and make sure you never miss our latest.
“Driver is unavailable” simply means that your system is trying to find the right driver for your printer to operate but can’t find any and halts the printing of any document or photo.
As mentioned earlier, the solutions are simple but before that, we would like to tell you the reason why you get the “Printer Driver is unavailable” error on Windows.
Content Table
Why do you get the “Printer Driver is unavailable” error on Windows?
This is a very common error among Windows 10 users as so many have complained to us that they get the Driver is Unavailable on their Printer devices.
Talking about why you get this error, there is no single reason why this error could pop up on your PC. There are multiple reasons why this error could occur on your PC, and we have listed them down below. You could be facing an error due to any of them.
Here are the reasons:
- Your Printer’s driver is missing or not installed properly
- Your Printer’s driver is corrupted
- Your Printer’s driver is not compatible with your PC
- Your Printer’s driver is outdated
- Windows Update needs to be installed
Now that we have told you about the possible reasons you are getting the “Printer Driver is unavailable” error, we will talk about how to fix the “Printer Driver is unavailable” error.
How do we fix the “Driver is unavailable” error on Windows?
These are some of the ways to fix the “Printer Driver is unavailable” error on Windows, and they are as follows:
1. Reconnect the Printer Device
The first thing you need to do is simply reconnect the Printer Device so that you can check if it works or not. It is quite possible that this could fix all the things, and you don’t need to do anything else to fix the issue.
To reconnect your Printer device, follow these steps:
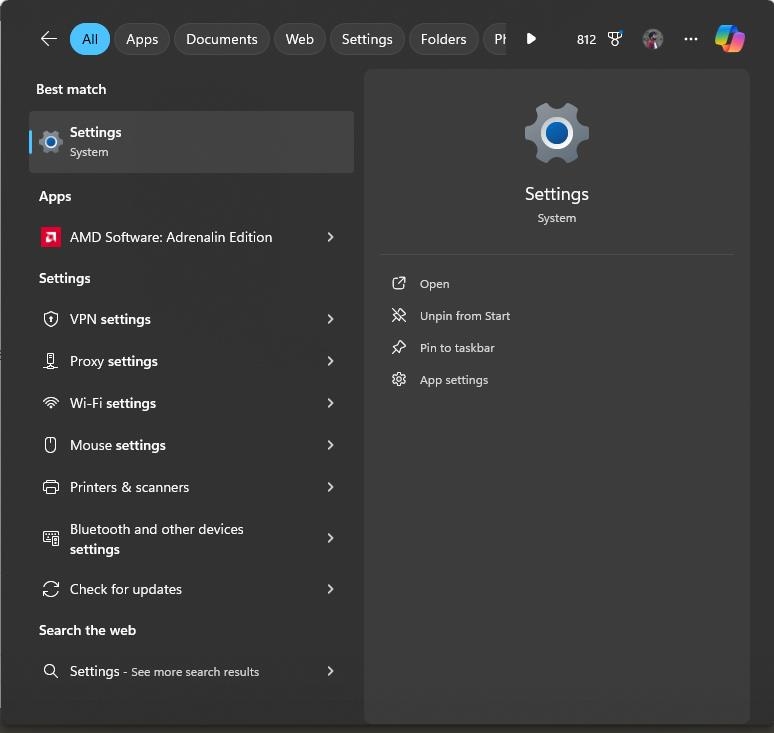
- Press the Windows + S key on your keyboard and then type Settings in the window that opens.
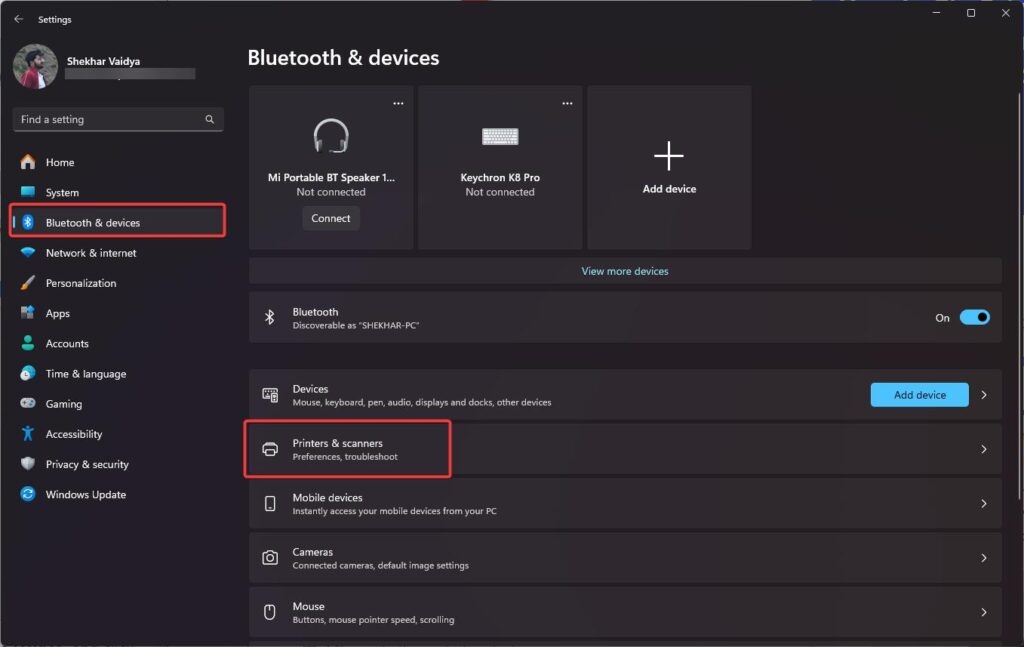
- Launch the Settings window, click on Bluetooth & devices , and then Printers & scanners .
- Click on the Printer that is troubling you, select Remove Device, and click Yes if you are prompted.

- After this, your Printer will be removed from your PC, and then you can reconnect your Printer as you would normally do.
If this doesn’t work, you can try the other troubleshooting methods mentioned below.
2. Update your Printer Driver via Device Manager
If your method of reconnecting the Printer did not work, then you can try to update your Printer’s drivers because outdated drivers could also cause problems with the functioning of any device.
To update your Printer’s drivers inside Windows, follow these steps:
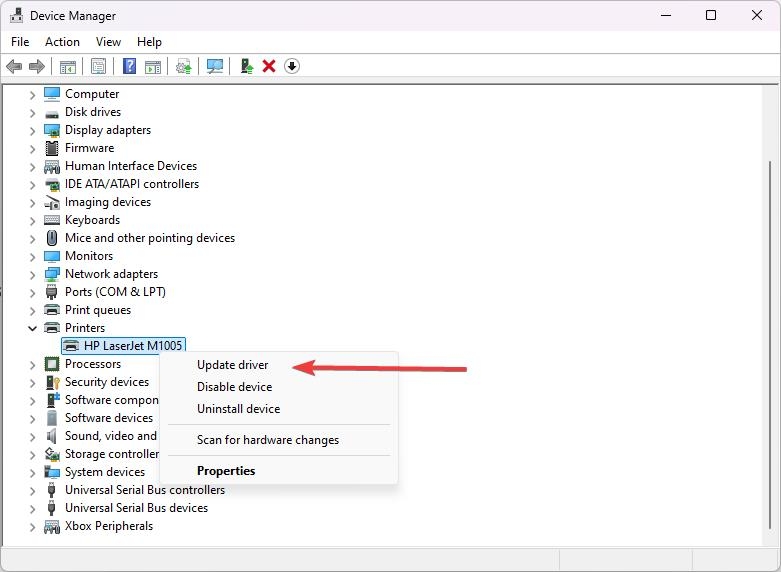
- Press the Windows + X key, click on Device Manager , and then expand the Printers menu.
- Right-click on the Printer listed in the menu and then click on Update Driver to update its drivers.
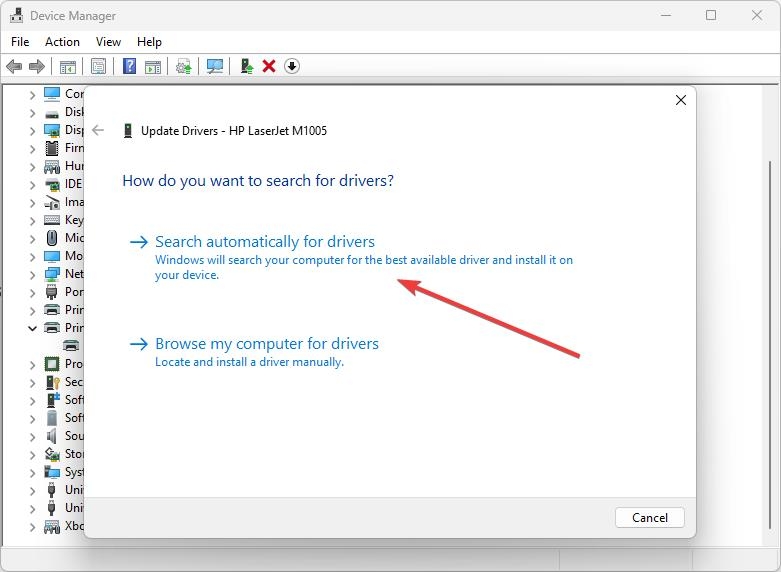
- Select the Search Automatically for drivers option and allow Windows to search for existing drivers inside the system as well as online.
- Wait for the driver installation to complete, and then restart your PC for changes to take effect.
3. Install Printer Drivers manually
It is quite possible that Windows cannot find the Printer Drivers, so you may need to install them manually.
- For this, you need to go to Device Manager once again by clicking Windows + X.
- After that, you need to go to Printers and Expand the list, right-click on your Printer, and click on Update Driver .
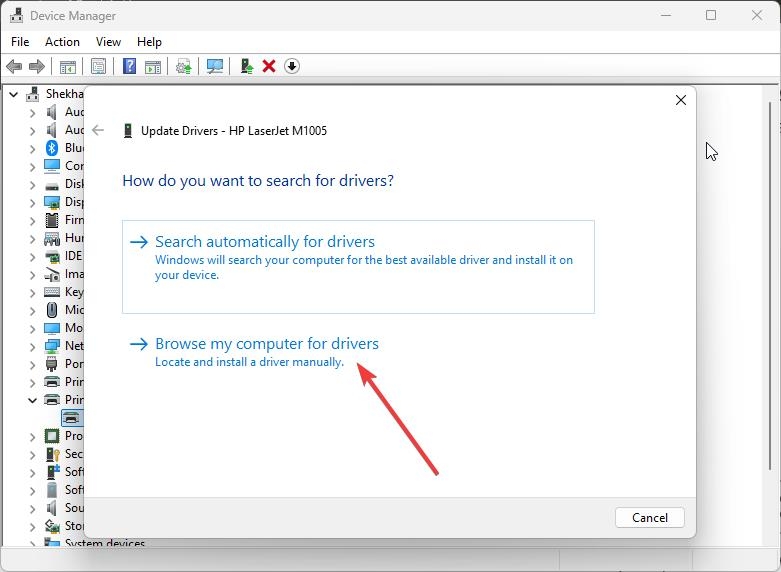
- Now comes the part where you need to concentrate because you will need to click on Browse my computer for drivers.
- Download the Printer Driver for your respective printer, depending upon its manufacturer. We have given links to some of the top printer manufacturers down below: Canon Driver Download HP Software and Driver Downloads Epson Downloads Brother Driver Downloads Sharp Driver Downloads Samsung Printer Software Installer
- Download the correct driver, remember the file path where you have downloaded the drivers, and then select and install them on your PC.
4. Install Generic Printer Driver
Users say installing generic printer drivers instead of those specific to their device manufacturers has also done the job for them. This could be because generic drivers are compatible with each and every printer out there unless there is something specific that needs to be changed.
So, we will try and install a generic driver on our Printer and see if it works.
- To do that, go to Device Manager by pressing the Win + X key once again.
- Expand the Printers menu, right-click on your Printer, and click on Update Driver .
- Then click on Browse my computer for drivers and then click on Let me pick from a list of available drivers on my computer .
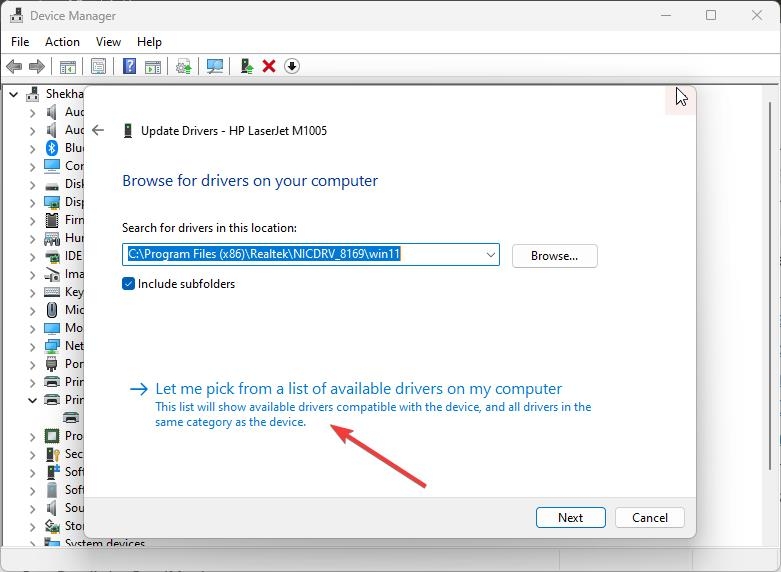
- Click on Generic Software Device as seen above and then click on Next.
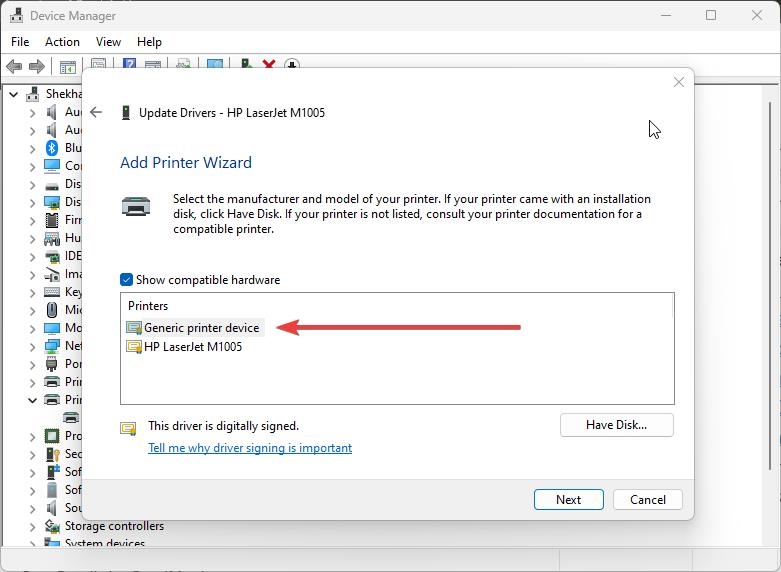
- Now, your Generic drivers will be installed, and you can restart your PC after that.
5. Update Windows 10
While we know that the problem of the Printer Driver being unavailable is related to the drivers of your Printer, it is possible that your Windows being outdated could also be the issue.
We have noticed this issue in users who did not update their Windows 10 and were running an outdated version.
So, make sure to check and update your Windows if you have an update pending because it could bring bug fixes that could fix the “Printer Driver is unavailable” issue.
- To check for Windows updates, press Win + I simultaneously to open Settings .
- Now, click on Windows Update .
- Click on the Check for Updates button and then wait for Windows to check if any update is available.
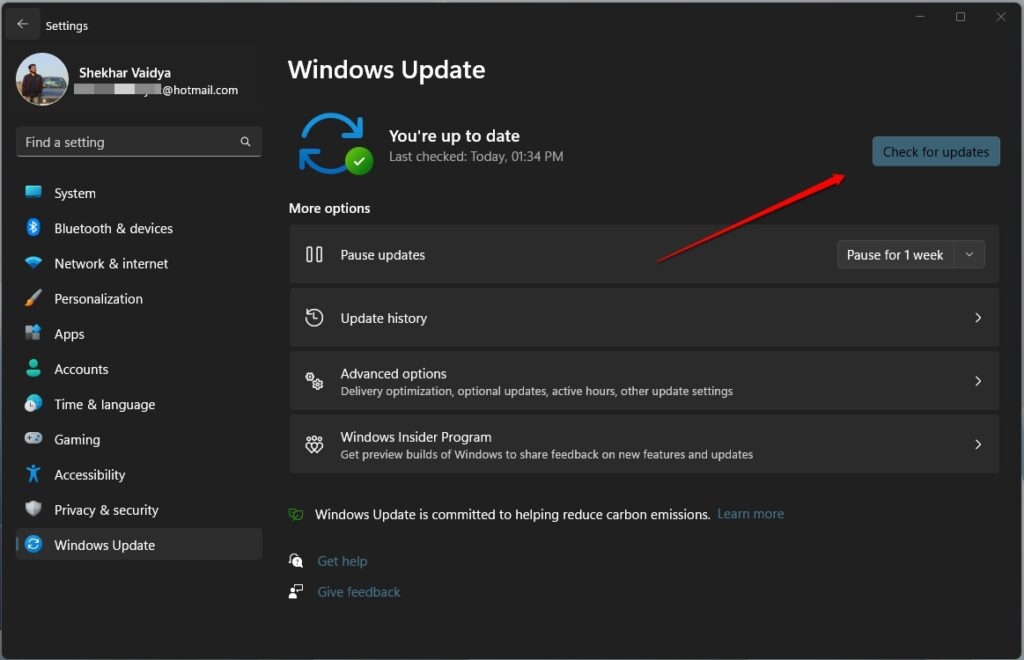
- If any update is available, click on the Download and Install Now button and then wait for it to be installed on your PC.
6. Fix Corrupt Windows Files
There can be errors related to “Driver is unavailable” when system files are corrupted.
You can make these files work again with the System File Checker (SFC) and Deployment Imaging Service and Management Tool (DISM).
Run SFC
- Run Command Prompt as an administrator.
- Then type sfc /scannow and hit Enter.
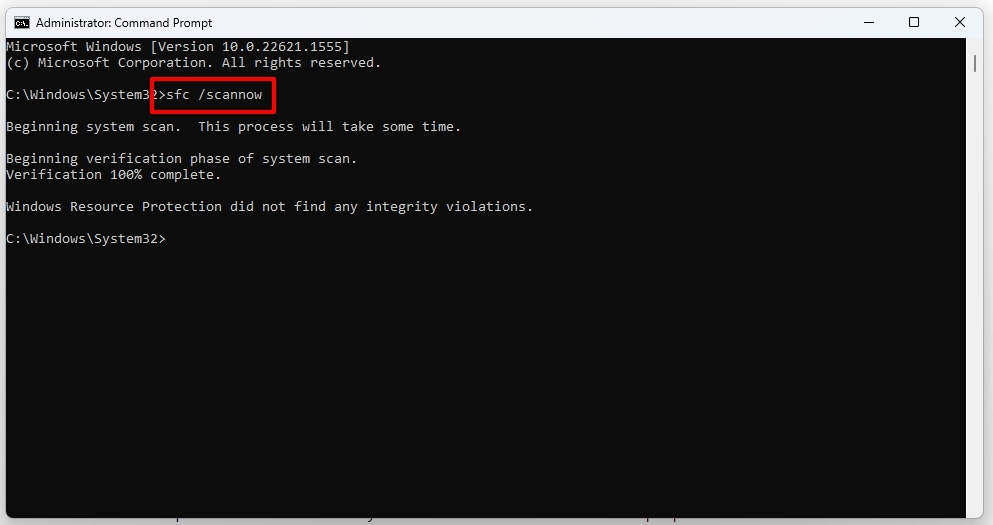
- Wait until the Scan is complete. Whenever it finds corrupted system files, it automatically fixes them.
Run DISM
- You will need to open Command Prompt as an administrator.
- Enter DISM /Online /Cleanup-Image /RestoreHealth .
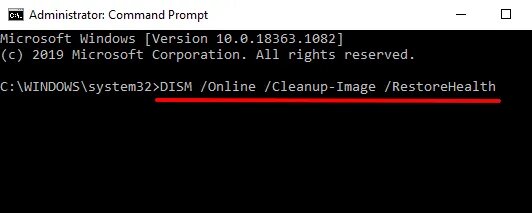
- Let the process run its course. Be patient; it may take some time.
7. Don’t Let Faulty Drivers Install
Sometimes the issue of “Driver is unavailable” is because of the driver’s latest update. Usually in the latest Windows editions like 10 or 11, Windows tends to update the driver automatically when available.
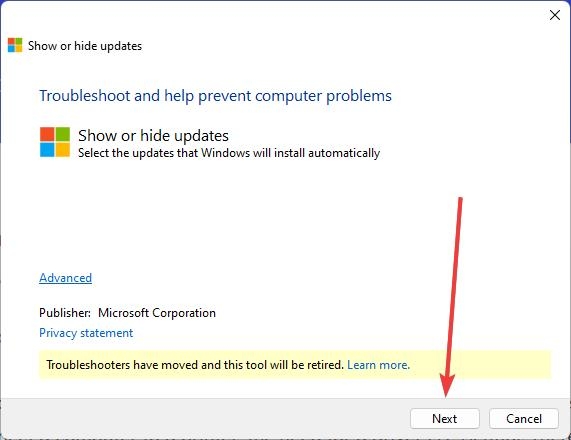
We can stop this phenomenon by using Microsoft’s Show or hide updates tool. Follow the below instructions step-by-step to do so,
- Download the Microsoft Show or hide updates tool using this link .
- Open the app by single/double clicking the wushowhide.diagcab file.
- Click on the Next button located in the down section of welcome windows.
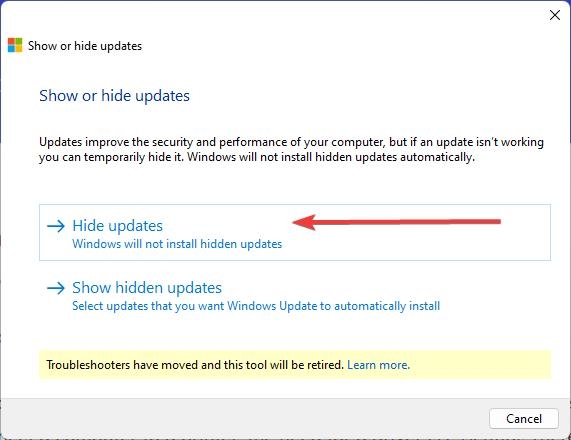
- From the two options available, click on the Hide updates option.
- Check the boxes of the faulty printer and click on the Next button.
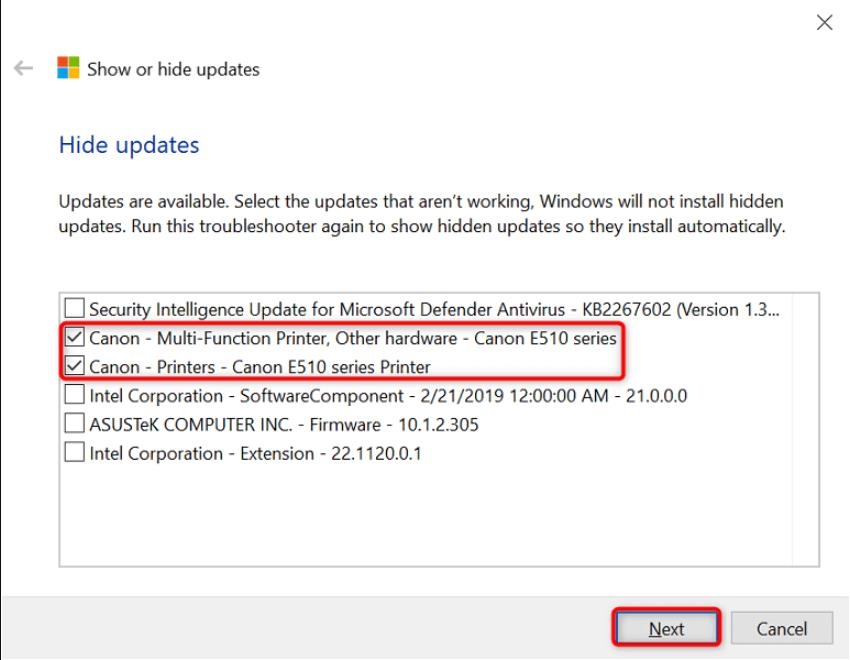
- Finally, select Close the troubleshooter .
By doing this, Windows will ignore any updates available and prevent installing any faulty drivers.
Conclusion
There you go. We have mentioned everything there is to know about the “Printer Driver is unavailable” error, from how it is caused to knowing how you can fix it.
Some part of this article is contributed by Abhishek Jariwala .
Further Reading:
- Why is My Computer Slow All of a Sudden?
- Windows was Dominant, But Now It’s Not: What Happened?
- Winpilot (BloatyNosy): Debloat Your Windows 11 PC (Remove Bloatware)
Enjoyed this article?
If TechLatest has helped you, consider supporting us with a one-time tip on Ko-fi. Every contribution keeps our work free and independent.
