
Oftentimes when you have something stored in very deep directories of your computer, and you wish to delete it, you get an error that reads “Source path too long to delete”. Well, it becomes important to fix source path too long to delete error when you wish to delete something from a folder, or delete a folder itself.
In this article, we are going to show you how to fix source path too long to delete error in Windows 10 in a very simple manner.
Don’t want to miss the best from TechLatest ? Set us as a preferred source in Google Search and make sure you never miss our latest.
Content Table
Fix Source Path Too Long to Delete Error
By Changing The Location of The Folder
This one requires some time but it is one of the simplest way to fix source path too long to delete error.
Step 1: Go to the folder that you want to delete, select it, right-click on it and click on select ‘Cut’.

Step 2: Now bring it to a location that actually has a shorter path by pasting the selected folder to a new and shorter path.

Now try deleting the folder or file and that should work out for you.
Using Command Prompt
Step 1: Go to the Windows search bar, type “cmd”, right-click to Run as administrator.
Step 2: Now we have to go to the disk in which the folder that we want to delete is present. By default the Command prompt is in your C: drive and to switch to another drive, you just have to type the drive letter and hit enter.
For example, the folder that I want to delete is in G: drive so I will have to type
G:
and hit enter.
Now I am in the G: directory.

Step 3: To see the list of all the folders and files in the drive just type
dir
and hit enter
Step 4: Now you can just go to the folder that you want to delete by typing
cd “folder_name”
You will have to repeat steps 3 and 4 until you reach the final location of the folder that they want to delete.
I just did the same thing to show you, I created a folder inside folder chain and named them 1, 2, 3, 4 and in folder ‘4’ I created a folder named “folder” and a text file named “file”. And below I have shown how to delete both the file and the folder using cmd.
First of all, make sure that you have come to the right path coz the folder deleted using the cmd command can’t be retrieved.
As you can see in the image below, I am on G:\1\2\3\4 and as soon as I entered the command dir, it showed me the folder named ‘folder’ and a text file named ‘file.txt’.


Step 5: Now to delete the folder, type
rmdir folder_name
, which in my case was ‘folder’ so I typed
rmdir folder

and hit enter.
That’s it and your folder is deleted.
You can’t delete a file using rmdir command, it is only for deleting folders, if you want to delete a file then you have to type the following command
del file_name.format
, which in my case was
del file.txt

So those were the two ways by which you can fix source path too long to delete error in Windows 10 . If you face any problem reach us out.
Are you facing any other problems and issues with Windows 10? Then there is nothing to worry about, we have an article dedicated to Windows 10’s issues and guides, visit Windows 10 Troubleshooting Guide , moreover, you can search the error in your site’s search bar, you will get the desired solution. I hope you would like this content if you have some more suggestions let us know in the comment section.
- How to Fix USB Drive Not Showing In Windows 10
- How to Fix Gdi32full.dll is Missing or Not Found Error in Windows 10
- How to Partition an External Hard Disk in Windows 10
- How to Fix Windows KB3126036 Silverlight Update Error in Windows 10
Enjoyed this article?
If TechLatest has helped you, consider supporting us with a one-time tip on Ko-fi. Every contribution keeps our work free and independent.
Highlights
- Microsoft Windows 10 offers a new print-to-PDF feature that lets you print anything on your computer as a PDF.
- Many users, however, complained that Print to PDF did not work on their Windows machines.
- If the Microsoft Print to PDF feature is missing on Windows 11/10, we have some fixes for you that you can easily implement
With Microsoft Print to PDF, users can convert any application that supports printing into PDF files.
However, reports have been received that Windows 11 and Windows 10 users are unable to print to PDF because the Microsoft Print to PDF option is missing from the available printer list.
Don’t want to miss the best from TechLatest ? Set us as a preferred source in Google Search and make sure you never miss our latest.
Particularly if you utilize this feature regularly for work or personal purposes, this can be frustrating.
In this article, we will explain a step-by-step guide to help you fix if Microsoft Print to PDF Missing on Windows 11/10 issue. So, let’s check out the steps.
Content Table
Why is Microsoft Print to PDF Missing?
There are several reasons why you may not be able to print to PDF on a Windows 11 or Windows 10 computer.
In order to troubleshoot and resolve the problem effectively, it is important to understand these reasons. Some of the leading causes are as follows:
- Corrupted system files
- Outdated or incompatible printer drivers
- Disabled or missing the Microsoft Print to PDF feature
- Windows update issues
How to Fix Microsoft Print to PDF Missing on Windows 11/10
So, here are some fixes that will help you fix Microsoft Print to PDF missing on Windows 11 or 11 PC:
Fix 1:Using Windows PowerShell, Reinstall Microsoft Print to PDF
Microsoft Windows Powershell can be used to complete the reinstallation process as well. Microsoft Print to PDF mission Windows 11 can be resolved with the same set of two commands.
- In Search, type powershell , right-click Windows PowerShell, and choose Run as administrator .
- After each command, press Enter .
Disable-WindowsOptionalFeature -online -FeatureName Printing-PrintToPDFServices-Features
Enable-WindowsOptionalFeature -online -FeatureName Printing-PrintToPDFServices-Features
Fix 2: Add Print to PDF Via Windows Features Dialog
There are additional features available in both Windows 11 and 10 called Optional Features. You can opt to have some of these features pre-installed, while others are available as a download or installation on demand.
If Print to PDF has been disabled on your computer, you can enable it in the Windows Features dialog. Here are a few easy steps for adding or removing Optional Features in Windows.
- Initially, open the Search box.
- Enter Optional Features and click OK to open the Dialog for Optional Features . Alternatively, you can access it through Settings > Apps > Optional Features > More Windows features .
- Find Microsoft Print to PDF in the Turn Windows features on or off dialog box.
- To install Microsoft Print to PDF, select it and click OK .
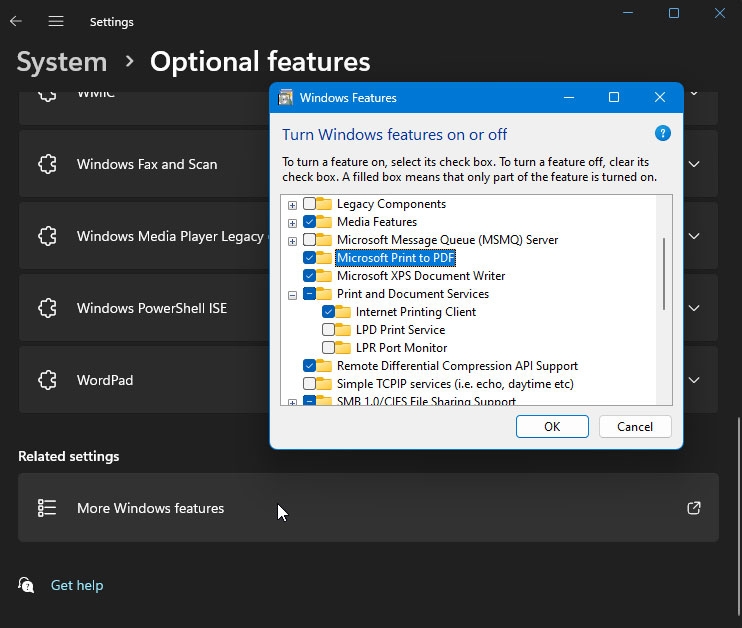
- Once the installation has been completed, click Close . In the Printer interface, check whether the Print to PDF option is restored.
Ensure that the Microsoft Print to PDF option is not already selected and uncheck it. In this way, the OS will be prompted to uninstall the feature correctly.
Once the driver has been uninstalled, launch the Windows Features dialog and enable the Print to PDF option.
You can solve the problem by turning off the feature in the Windows Features dialog box and restarting your computer.
If the Print to PDF option is not restored after the restart, try enabling the feature again in Optional Features.
Fix 3: Disable/Enable the Print to PDF Feature Via Command Prompt
You can disable or enable optional Windows features with the Deployment Image Service Management (DISM) command-line tool if you prefer.
To install Print to PDF using the Command Prompt, follow these steps:
- To open Run , press Win + R .
- Enter cmd, then press and hold the Ctrl + Shift keys and click OK. This opens the Command Prompt as an administrator .
- To stop the spooler service, type the following command at the Command Prompt. net stop spooler

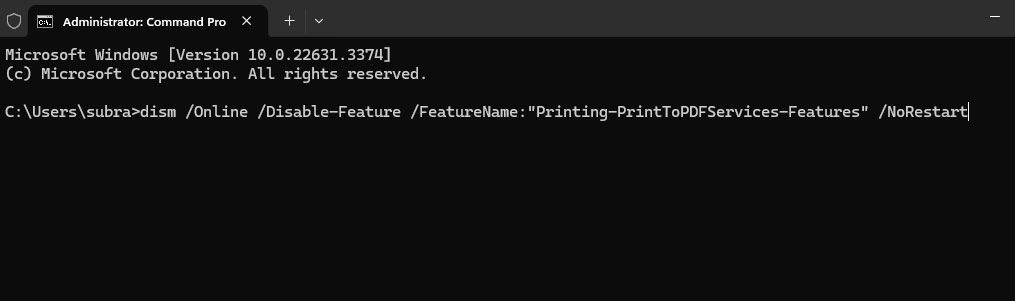
- After you have successfully stopped the Print to PDF services, type the following command to disable it:
dism /Online /Disable-Feature /FeatureName:"Printing-PrintToPDFServices-Features" /NoRestart
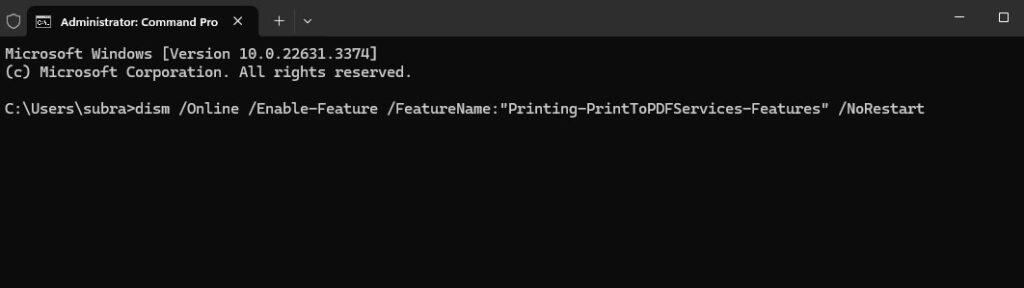
- To enable the feature again, type the following command and press enter after the Operation is complete message appears:
dism /Online /Enable-Feature /FeatureName:"Printing-PrintToPDFServices-Features" /NoRestart
- Afterwards, you will see the message Operation completed successfully if it was successfully installed.
- Now that Windows has the Print to PDF feature, you should be able to save documents in PDF format.
Fix 4: Add Print to PDF Via Add Printer Wizard
You can also add a new printer from the Settings tab if the Print to PDF option is missing. If you choose the Print to File option when adding a new printer, you will be able to choose the Print to PDF option as well. However, to manually add the Print to PDF printer, follow these steps:
- To open Settings , press Win + I .
- Go to the left pane and click Bluetooth & Devices .
- On the left side, click Printers & Scanners .
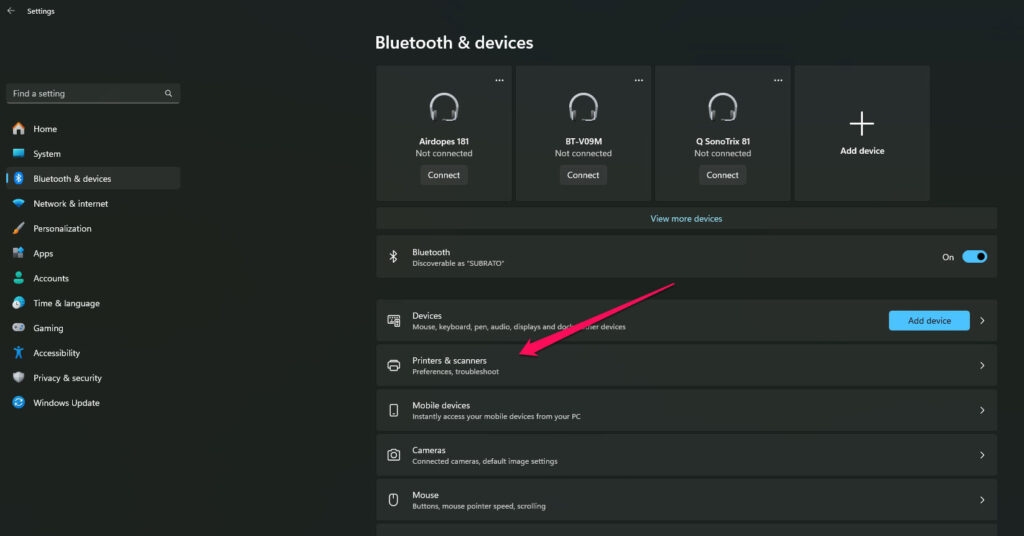
- Thereafter, in the top right corner, click the Add Device button. When a printer is connected, Windows automatically starts scanning for it.
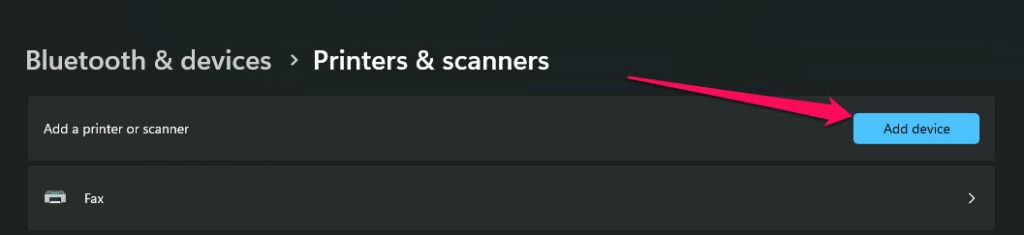
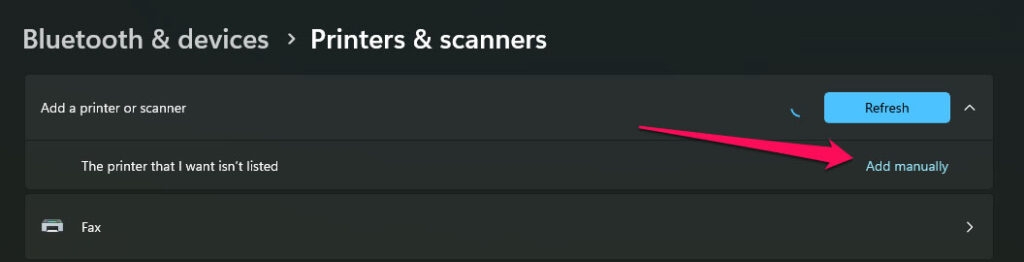
- Suppose the printer you are looking for isn’t listed there, then click Add manually .
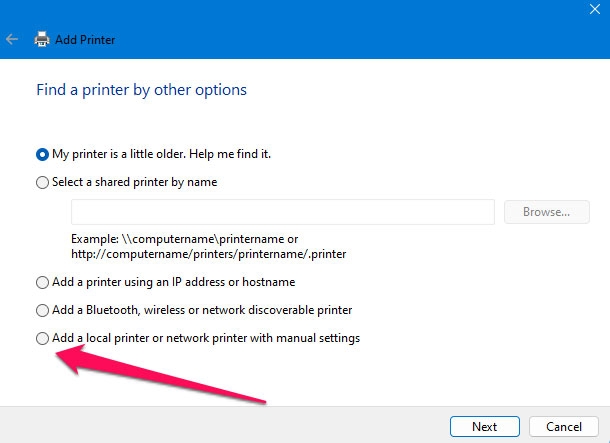
- Afterwards, select Add a local printer or network printer with the manual settings option in the Add Printer dialog.
- Click on Next .
- Choose Use an existing port from the drop-down menu. Select File: (Print to File) . When Print to File isn’t available or doesn’t work, try PORTPROMPT (Local Port) or PDF (Local Port) . You can also use this with older versions of Windows 10.
- To continue, click Next .
- Afterwards, on the Install the printer driver screen, select Microsoft from the Manufacturer drop-down menu. Under Printers , select Microsoft Print to PDF .
- To continue, click Next .
- To save the changes, type your new printer’s name or leave it as it is by default and click OK .
- Afterwards, open the Print interface and check whether the Print to PDF option is available.
Fix 5: Turn Off/On The Feature
Windows 10 and 11 come with a native Print to PDF feature. Hence, if it is missing, there could be a minor problem surrounding it, which can be fixed by turning off and re-enabling the feature.
- Enter Turn Windows features on or off in the Search box.
- In the Windows features, look for “ Microsoft Print to PDF “.
- Uncheck the box and check it again. To save your changes, click OK .
- Check your printer list after restarting the PC.
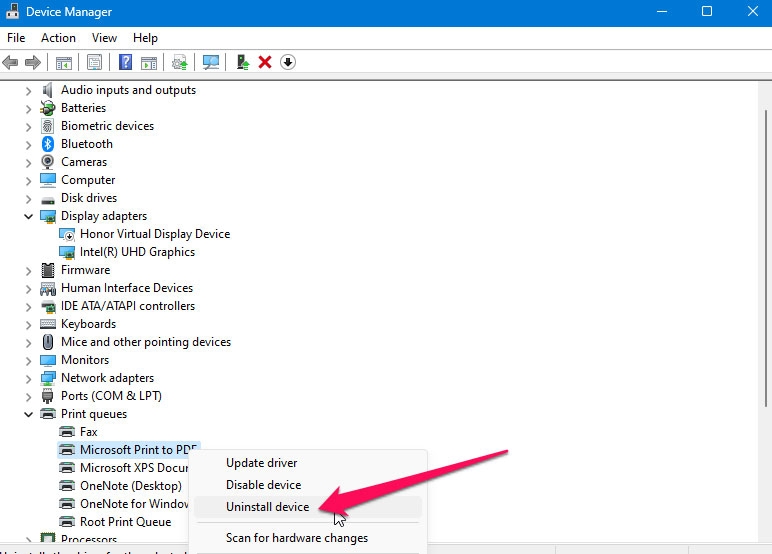
Fix 6: Reinstall Microsoft Print to PDF Using Device Manager
Microsoft Print to PDF can be reinstalled via Device Manager if the above methods do not resolve the issue “Microsoft Print to PDF missing”.
- Initially, in the Search box, type Device Manager and click Open .
- Afterwards, expand the Print queues list.
- Thereafter, right-click on the Microsoft Print to PDF option. Choose Uninstall device . Once the driver has been installed, you can use it again.
So, that’s all we have for you on how to fix Microsoft Print to PDF missing on Windows 11 or 11 PC. It is our hope that you have found this guide helpful. Feel free to comment below if you need more information.
Further Reading:
- Best Windows PC Software for Fan Speed Control
- How to Fix the “Your PC needs to be repaired” Error?
- How to Enable/Disable Memory Compression in Windows 11?
Enjoyed this article?
If TechLatest has helped you, consider supporting us with a one-time tip on Ko-fi. Every contribution keeps our work free and independent.
