Highlights
- Due to a new security patch released by Microsoft, printers shared over the network may malfunction, resulting in an 0x0000011B error.
- Computers running Windows 10 21H1 build have primarily been affected by the error. It may also occur on Windows 11 systems.
- Luckily, we have some fixes that can potentially resolve the Operation failed 0x0000011B error in this article.
If you see the “Operation Failed With Error 0x0000011b” message on your computer, don’t worry! It’s a fairly common error, and its cause is usually related to your computer’s hardware or software.
Here, we will explain what causes this error and give you some tips on how to fix it.
Don’t want to miss the best from TechLatest ? Set us as a preferred source in Google Search and make sure you never miss our latest.
Content Table
What Causes Error 0x0000011b?
<img loading=“lazy” src=“https://media.tech-latest.com/wp-content/uploads/2023/04/05095220/Windows-Printer-Error-0x000-1.jpg" onerror=“this.onerror=null;this.src=‘https://blogger.googleusercontent.com/img/a/AVvXsEhe7F7TRXHtjiKvHb5vS7DmnxvpHiDyoYyYvm1nHB3Qp2_w3BnM6A2eq4v7FYxCC9bfZt3a9vIMtAYEKUiaDQbHMg-ViyGmRIj39MLp0bGFfgfYw1Dc9q_H-T0wiTm3l0Uq42dETrN9eC8aGJ9_IORZsxST1AcLR7np1koOfcc7tnHa4S8Mwz_xD9d0=s16000';" alt=“How to Fix the “Operation Failed 0x0000011B” Error on Windows 10 & 11 - 2”>
When you try to print something using your printer, your computer may display an “Operation Failed With Error 0x0000011B” message. Common causes include:
- Hardware Failure: Your computer may display this error message if its hardware is malfunctioning, such as a broken hard drive or a malfunctioning controller.
- Driver Issues: This error message may appear if one of your computer’s drivers is corrupt or outdated.
- Malware or Virus Infection: Viruses and malware can cause a wide range of problems, including this error message.
- Registry Issues: This error message can be caused by a corrupted registry key or a problem with your computer’s registry.
How to Fix Error 0x0000011B
Now that you know what causes the “Operation Failed With Error 0x0000011B” message, let’s look at some solutions. You can try the following troubleshooting steps:
Fix 1: Run a Malware Scan
First, you should run a malware scan on your computer if you suspect it may be infected with malware. It is possible to do this with the help of a free antivirus program such as Malwarebytes or Windows Defender. You can run a full system scan once you download, install, and run the program.
Your computer will be scanned for malware and viruses, which will be removed if any are found. When the scan is complete, restart your computer and check if the error message Operation Failed With Error 0x0000011B has disappeared.
Fix 2: Update Your Drivers
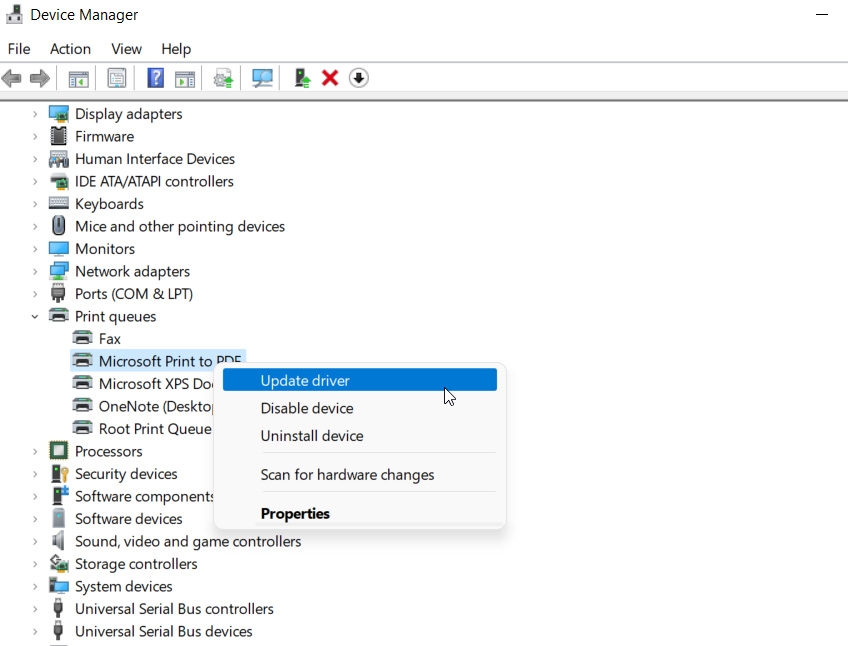
The next step you should take if you suspect a driver issue is causing the error message is to update your drivers. You can obtain the latest drivers for your computer by going to the manufacturer’s website. However, you can also update the driver manually using the steps mentioned below:
- Initially, open the Device Manager .
- Then, expand the Print Queues option.
- Finally, right-click on the hardware name, select Update Driver , and hit Search Automatically For Drivers .
Fix 3: Check Your Hardware
You should check your hardware if you suspect a hardware failure is causing the error message. Therefore, you must check your hard drive, RAM, and any other hardware components that might be causing problems.
There are many third-party applications using which you can easily able to know if any hardware is causing the Operation Failed With Error 0x0000011B issue.
Fix 4: Restart the Print Spooler Service
You can fix printer issues by restarting the print spooler service. Print jobs are sent between a computer and printer by this service. It is possible to manually start the print spooler service from the Services snap-in if it is not running. Here’s how to do it.
- To open Run, press Win + R .
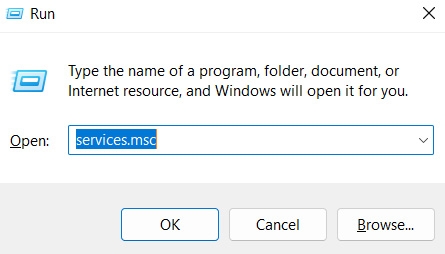
- Then type services.msc and click OK .
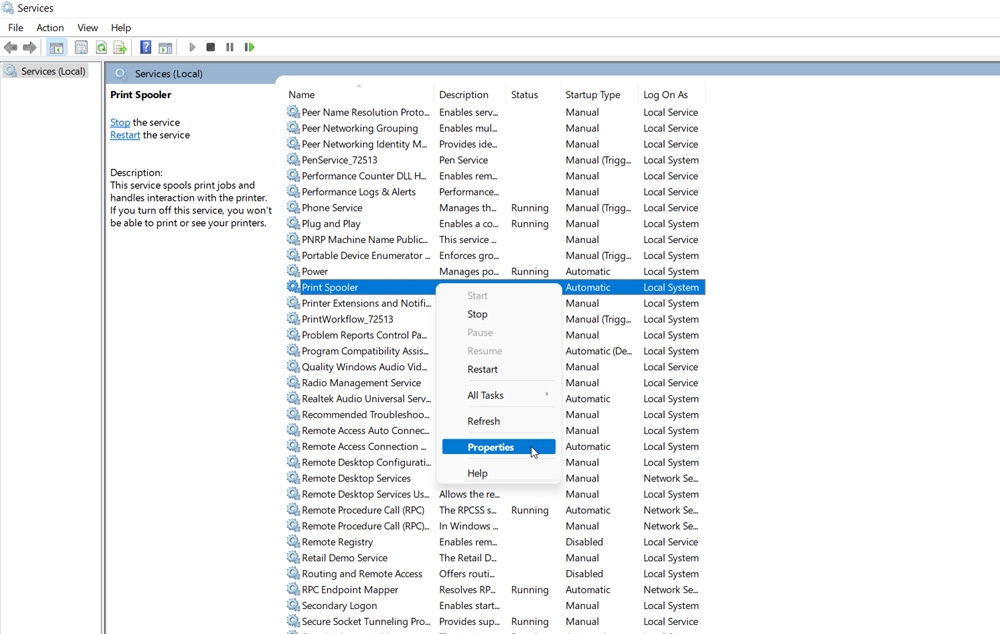
- Locate the Print Spooler service in the Service snap-in .
- Right-click the service and select Properties .
- Thereafter, select the General tab in the Properties dialog.
- Set the Startup type to Automatic in the drop-down menu.
- Now, click Apply and OK to save the changes.
- Right-click on Print Spooler again and click Restart .
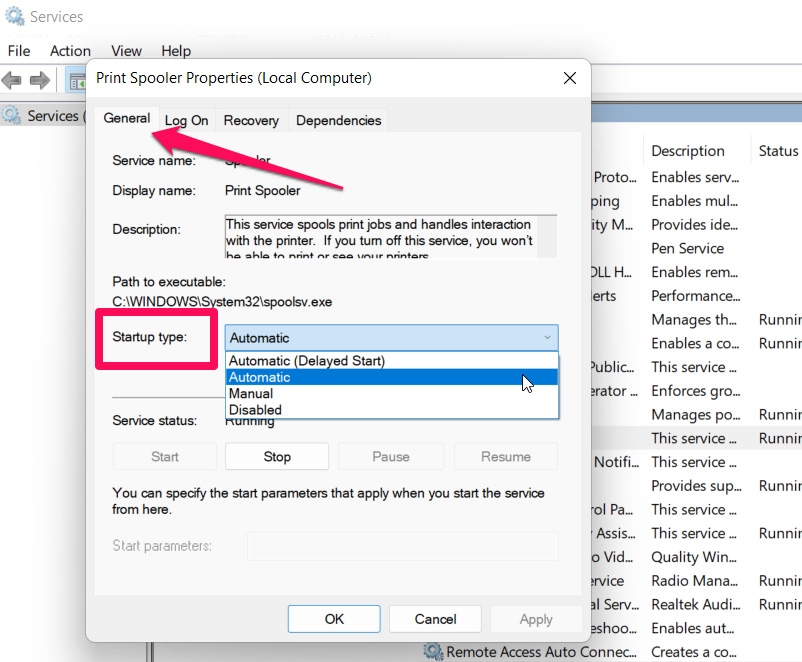
- Start Print Spooler and create a new print job to see if any improvements have been made.
Fix 5: Update Windows
It is likely that you will receive a bug fix through Windows updates if it is a widespread issue. Check if there are any new Windows updates available. It is often a small hotfix released to address a wide range of issues.
To check and install Windows updates, follow these steps:
- To open the Settings app, press Win + I .
- On the left-hand side, click Windows Update. Open Update & Security on Windows 10.
- Then click Check for updates . Whenever an update is pending, Windows will display it here.
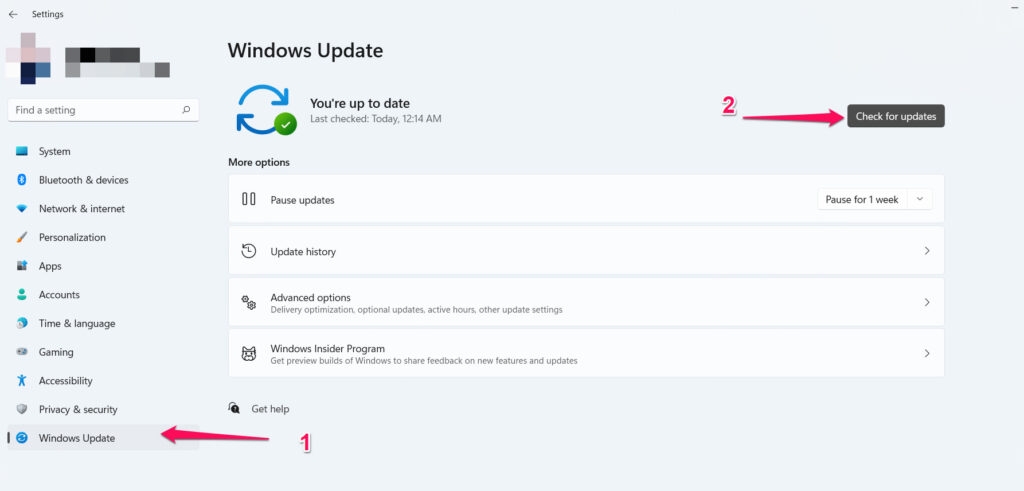
- To install the updates, click Download & Install .
- After installing, restart your PC and see if the Operation Failed With Error 0x0000011B error message gets resolved.
Fix 6: Disable the CVE-2021-1678 Registry Fix
A security update failed to patch a vulnerability dubbed CVE-2021-1678 that caused Printer Spooler Spoofing. There are, however, new changes that have triggered the operating system error 0x0000011B.
You will need to create a new registry entry in order to disable the feature without uninstalling the security update. Here’s how you can do it.
It is important to note that you are taking a risk when you modify your Windows Registry. If you would like to proceed with the steps below, we recommend backing up your Windows registry and creating a system restore. To disable mitigation for CVE-2021-1678, follow these steps:
- To open Run, press Win + R .
- To open Registry Editor, type regedit and click OK .
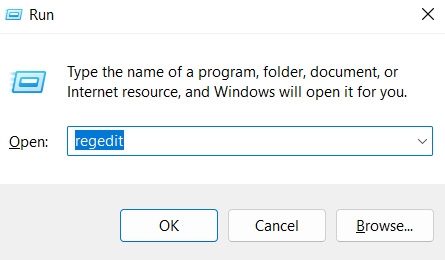
- Open Registry Editor and navigate to this location: Computer\HKEY_LOCAL_MACHINE\SYSTEM\CurrentControlSet\Control\Print
- Right-click on Print and select New > DWORD (32-bit) Value .
- You need to rename the DWORD value to RpcAuthnLevelPrivacyEnabled .
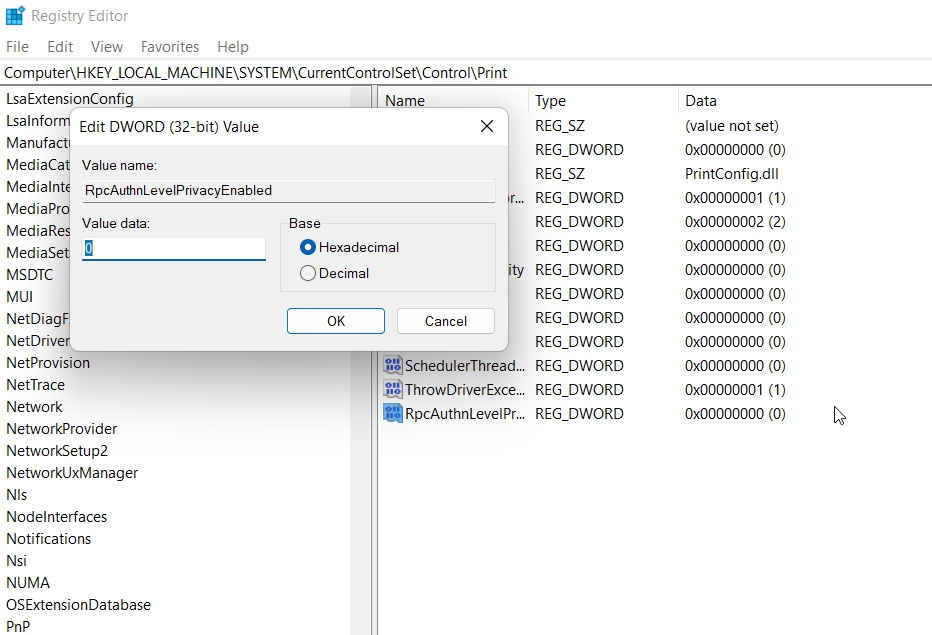
- To modify RpcAuthnLevelPrivacyEnabled , right-click on it and choose Modify .
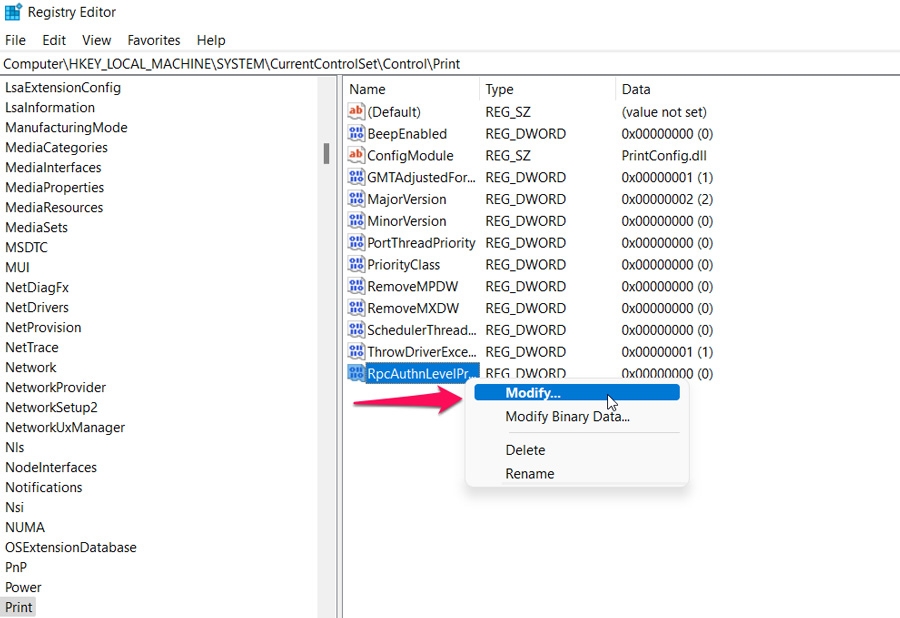
- Change the Value data field to 0 and click OK .
- To apply the changes, close Registry Editor and restart your PC.
- Once you have restarted your computer, use the shared printer to see if the error is resolved.
Fix 7: Manually install the printer via the local Port
You can manually add your printer to Windows for the local Port to resolve operation failed error 0x0000011B. Here’s how to do it.
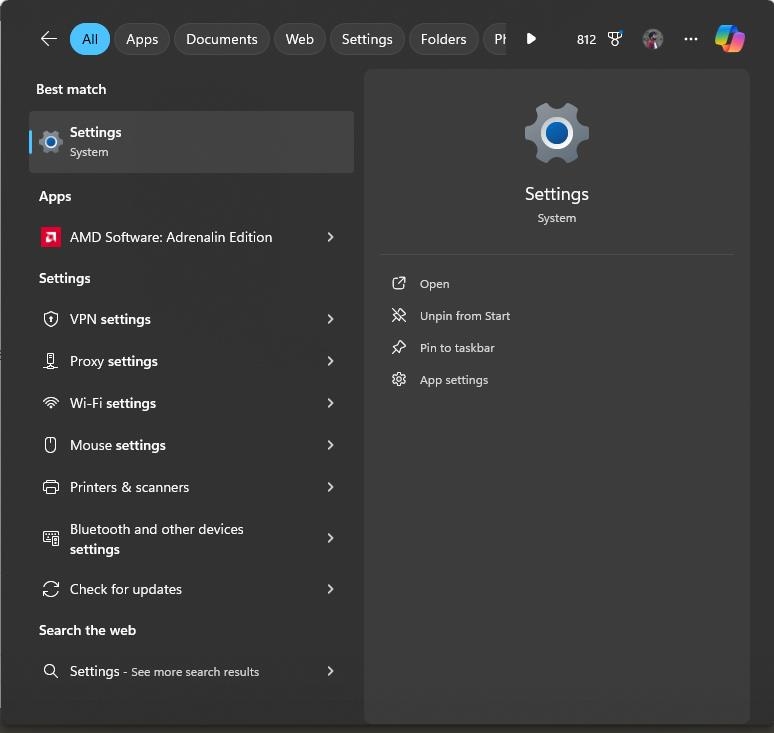
- To open Settings, press Win + I .
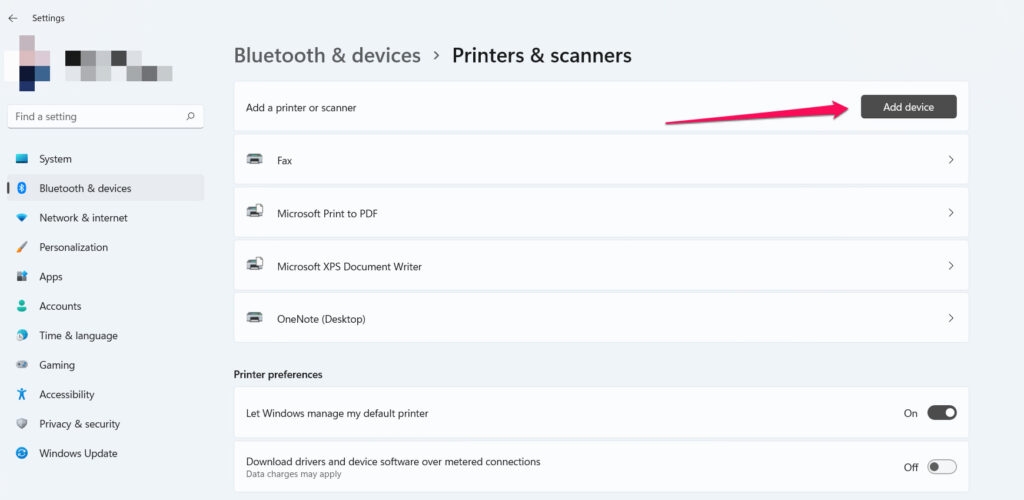
- Next, click on Devices and then on Printers & Scanners .
- On the next screen, click Add a printer or scanner . When Windows scans for printers, it will display the ones it finds.
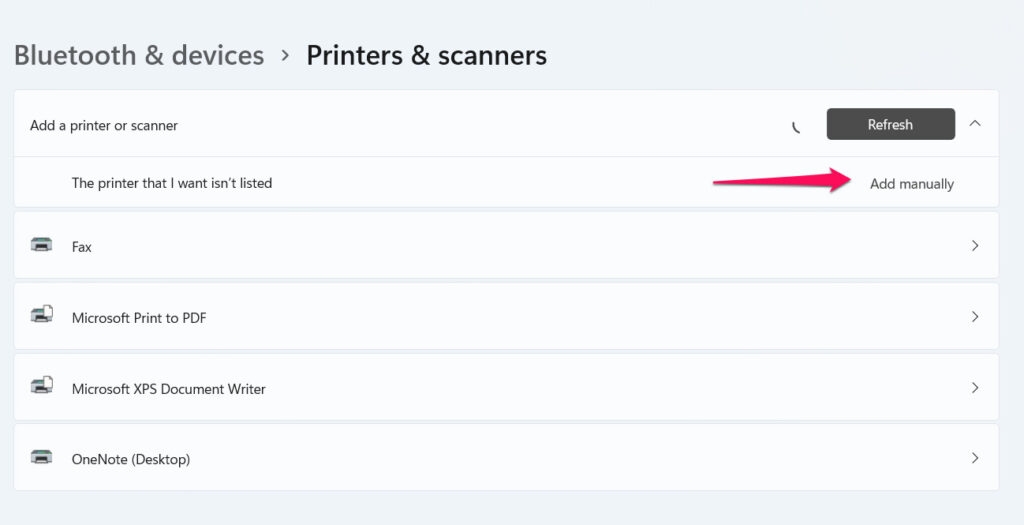
- To add a printer that isn’t listed, click on The printer that I want isn’t listed. Wait a few seconds after clicking Add a printer or scanner if you don’t see the option right away.
- Select Add a local printer or Add a network printer with manual settings from the Add Printer dialog box.
- To create a new printer port, select Create a new port under Choose a printer port .
- In the Type of Port drop-down menu, select Local Port .
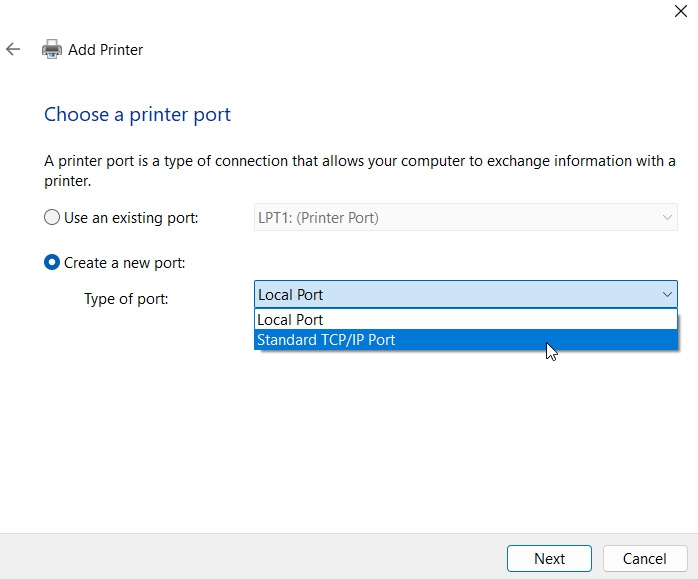
- Click Next .
- In the Enter a port name field, type your network printer’s file path and name. If you want to share a printer, you should use the computer name or IP address.
- Click OK to save the printer.
- To install the printer driver, select your printer manufacturer from the list.
- The next step is to choose the correct printer driver from the Printers column.
- Click Next .
- Select a name for your printer driver and click Install .
- Once the installation is complete, click Next .
The newly added printer will now appear under Devices and Printers in Control Panel and Settings. Try a new print job to see if the issue has been resolved.
Sum Up – Operation Failed 0x0000011B Error on Windows
So, that’s how you can easily resolve the Operation Failed With Error 0x0000011B error with your Printer on Windows 10/11 PC. We hope that this guide has helped you.
However, suppose in case you need more help, comment below and let us know if you have any doubts or queries.
Further Reading:
- 5 Best GarageBand Alternatives for Windows 10/11
- News and Interests Taking Up Memory: What is it and How To Fix?
- Top 10 Best Widgets for Windows 11 to take your PC to the Next Level
Enjoyed this article?
If TechLatest has helped you, consider supporting us with a one-time tip on Ko-fi. Every contribution keeps our work free and independent.
Highlights
- Due to a new security patch released by Microsoft, printers shared over the network may malfunction, resulting in an 0x0000011B error.
- Computers running Windows 10 21H1 build have primarily been affected by the error. It may also occur on Windows 11 systems.
- Luckily, we have some fixes that can potentially resolve the Operation failed 0x0000011B error in this article.
If you see the “Operation Failed With Error 0x0000011b” message on your computer, don’t worry! It’s a fairly common error, and its cause is usually related to your computer’s hardware or software.
Here, we will explain what causes this error and give you some tips on how to fix it.
Don’t want to miss the best from TechLatest ? Set us as a preferred source in Google Search and make sure you never miss our latest.
Content Table
What Causes Error 0x0000011b?
<img loading=“lazy” src=“https://media.tech-latest.com/wp-content/uploads/2023/04/05095220/Windows-Printer-Error-0x000-1.jpg" onerror=“this.onerror=null;this.src=‘https://blogger.googleusercontent.com/img/a/AVvXsEhe7F7TRXHtjiKvHb5vS7DmnxvpHiDyoYyYvm1nHB3Qp2_w3BnM6A2eq4v7FYxCC9bfZt3a9vIMtAYEKUiaDQbHMg-ViyGmRIj39MLp0bGFfgfYw1Dc9q_H-T0wiTm3l0Uq42dETrN9eC8aGJ9_IORZsxST1AcLR7np1koOfcc7tnHa4S8Mwz_xD9d0=s16000';" alt=“How to Fix the “Operation Failed 0x0000011B” Error on Windows 10 & 11 - 17”>
When you try to print something using your printer, your computer may display an “Operation Failed With Error 0x0000011B” message. Common causes include:
- Hardware Failure: Your computer may display this error message if its hardware is malfunctioning, such as a broken hard drive or a malfunctioning controller.
- Driver Issues: This error message may appear if one of your computer’s drivers is corrupt or outdated.
- Malware or Virus Infection: Viruses and malware can cause a wide range of problems, including this error message.
- Registry Issues: This error message can be caused by a corrupted registry key or a problem with your computer’s registry.
How to Fix Error 0x0000011B
Now that you know what causes the “Operation Failed With Error 0x0000011B” message, let’s look at some solutions. You can try the following troubleshooting steps:
Fix 1: Run a Malware Scan
First, you should run a malware scan on your computer if you suspect it may be infected with malware. It is possible to do this with the help of a free antivirus program such as Malwarebytes or Windows Defender. You can run a full system scan once you download, install, and run the program.
Your computer will be scanned for malware and viruses, which will be removed if any are found. When the scan is complete, restart your computer and check if the error message Operation Failed With Error 0x0000011B has disappeared.
Fix 2: Update Your Drivers
The next step you should take if you suspect a driver issue is causing the error message is to update your drivers. You can obtain the latest drivers for your computer by going to the manufacturer’s website. However, you can also update the driver manually using the steps mentioned below:
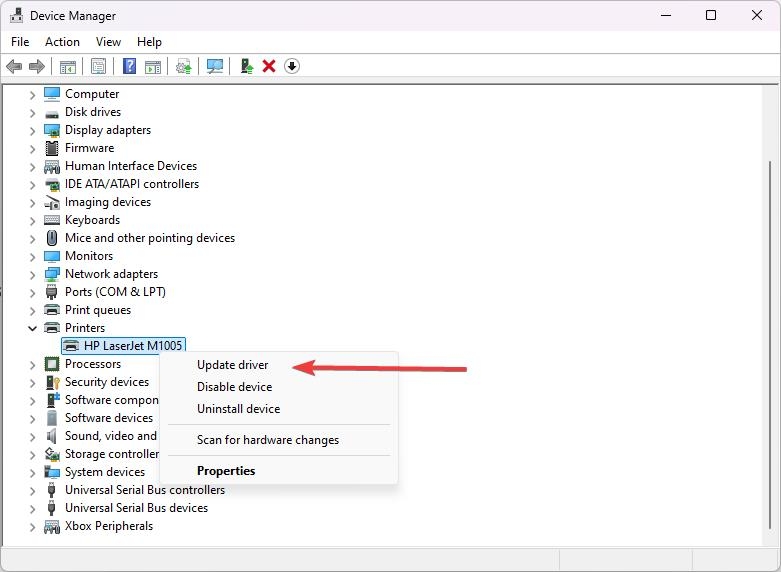
- Initially, open the Device Manager .
- Then, expand the Print Queues option.
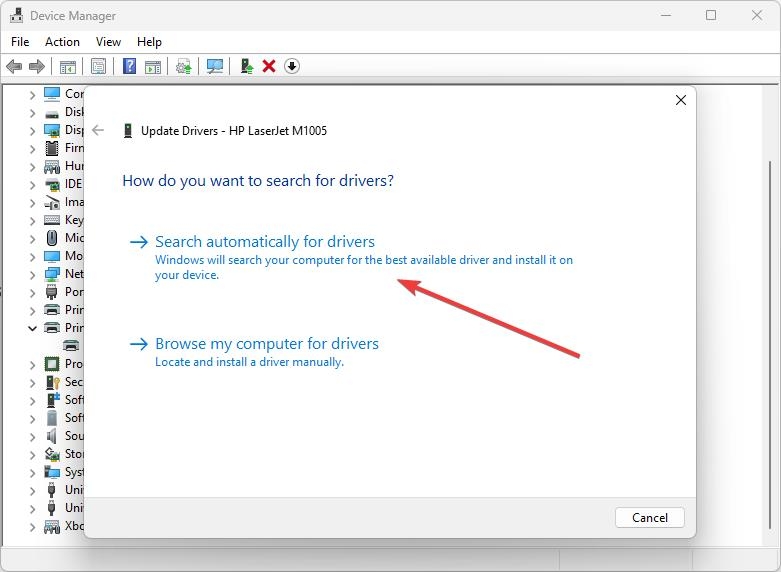
- Finally, right-click on the hardware name, select Update Driver , and hit Search Automatically For Drivers .
Fix 3: Check Your Hardware
You should check your hardware if you suspect a hardware failure is causing the error message. Therefore, you must check your hard drive, RAM, and any other hardware components that might be causing problems.
There are many third-party applications using which you can easily able to know if any hardware is causing the Operation Failed With Error 0x0000011B issue.
Fix 4: Restart the Print Spooler Service
You can fix printer issues by restarting the print spooler service. Print jobs are sent between a computer and printer by this service. It is possible to manually start the print spooler service from the Services snap-in if it is not running. Here’s how to do it.
- To open Run, press Win + R .
- Then type services.msc and click OK .
- Locate the Print Spooler service in the Service snap-in .
- Right-click the service and select Properties .
- Thereafter, select the General tab in the Properties dialog.
- Set the Startup type to Automatic in the drop-down menu.
- Now, click Apply and OK to save the changes.
- Right-click on Print Spooler again and click Restart .
- Start Print Spooler and create a new print job to see if any improvements have been made.
Fix 5: Update Windows
It is likely that you will receive a bug fix through Windows updates if it is a widespread issue. Check if there are any new Windows updates available. It is often a small hotfix released to address a wide range of issues.
To check and install Windows updates, follow these steps:
- To open the Settings app, press Win + I .
- On the left-hand side, click Windows Update. Open Update & Security on Windows 10.
- Then click Check for updates . Whenever an update is pending, Windows will display it here.
- To install the updates, click Download & Install .
- After installing, restart your PC and see if the Operation Failed With Error 0x0000011B error message gets resolved.
Fix 6: Disable the CVE-2021-1678 Registry Fix
A security update failed to patch a vulnerability dubbed CVE-2021-1678 that caused Printer Spooler Spoofing. There are, however, new changes that have triggered the operating system error 0x0000011B.
You will need to create a new registry entry in order to disable the feature without uninstalling the security update. Here’s how you can do it.
It is important to note that you are taking a risk when you modify your Windows Registry. If you would like to proceed with the steps below, we recommend backing up your Windows registry and creating a system restore. To disable mitigation for CVE-2021-1678, follow these steps:
- To open Run, press Win + R .
- To open Registry Editor, type regedit and click OK .
- Open Registry Editor and navigate to this location: Computer\HKEY_LOCAL_MACHINE\SYSTEM\CurrentControlSet\Control\Print
- Right-click on Print and select New > DWORD (32-bit) Value .
- You need to rename the DWORD value to RpcAuthnLevelPrivacyEnabled .
- To modify RpcAuthnLevelPrivacyEnabled , right-click on it and choose Modify .
- Change the Value data field to 0 and click OK .
- To apply the changes, close Registry Editor and restart your PC.
- Once you have restarted your computer, use the shared printer to see if the error is resolved.
Fix 7: Manually install the printer via the local Port
You can manually add your printer to Windows for the local Port to resolve operation failed error 0x0000011B. Here’s how to do it.
- To open Settings, press Win + I .
- Next, click on Devices and then on Printers & Scanners .
- On the next screen, click Add a printer or scanner . When Windows scans for printers, it will display the ones it finds.
- To add a printer that isn’t listed, click on The printer that I want isn’t listed. Wait a few seconds after clicking Add a printer or scanner if you don’t see the option right away.
- Select Add a local printer or Add a network printer with manual settings from the Add Printer dialog box.
- To create a new printer port, select Create a new port under Choose a printer port .
- In the Type of Port drop-down menu, select Local Port .
- Click Next .
- In the Enter a port name field, type your network printer’s file path and name. If you want to share a printer, you should use the computer name or IP address.
- Click OK to save the printer.
- To install the printer driver, select your printer manufacturer from the list.
- The next step is to choose the correct printer driver from the Printers column.
- Click Next .
- Select a name for your printer driver and click Install .
- Once the installation is complete, click Next .
The newly added printer will now appear under Devices and Printers in Control Panel and Settings. Try a new print job to see if the issue has been resolved.
Sum Up – Operation Failed 0x0000011B Error on Windows
So, that’s how you can easily resolve the Operation Failed With Error 0x0000011B error with your Printer on Windows 10/11 PC. We hope that this guide has helped you.
However, suppose in case you need more help, comment below and let us know if you have any doubts or queries.
Further Reading:
- 5 Best GarageBand Alternatives for Windows 10/11
- News and Interests Taking Up Memory: What is it and How To Fix?
- Top 10 Best Widgets for Windows 11 to take your PC to the Next Level
Enjoyed this article?
If TechLatest has helped you, consider supporting us with a one-time tip on Ko-fi. Every contribution keeps our work free and independent.
Highlights
- Microsoft Windows 10 offers a new print-to-PDF feature that lets you print anything on your computer as a PDF.
- Many users, however, complained that Print to PDF did not work on their Windows machines.
- If the Microsoft Print to PDF feature is missing on Windows 11/10, we have some fixes for you that you can easily implement
With Microsoft Print to PDF, users can convert any application that supports printing into PDF files.
However, reports have been received that Windows 11 and Windows 10 users are unable to print to PDF because the Microsoft Print to PDF option is missing from the available printer list.
Don’t want to miss the best from TechLatest ? Set us as a preferred source in Google Search and make sure you never miss our latest.
Particularly if you utilize this feature regularly for work or personal purposes, this can be frustrating.
In this article, we will explain a step-by-step guide to help you fix if Microsoft Print to PDF Missing on Windows 11/10 issue. So, let’s check out the steps.
Content Table
Why is Microsoft Print to PDF Missing?
There are several reasons why you may not be able to print to PDF on a Windows 11 or Windows 10 computer.
In order to troubleshoot and resolve the problem effectively, it is important to understand these reasons. Some of the leading causes are as follows:
- Corrupted system files
- Outdated or incompatible printer drivers
- Disabled or missing the Microsoft Print to PDF feature
- Windows update issues
How to Fix Microsoft Print to PDF Missing on Windows 11/10
So, here are some fixes that will help you fix Microsoft Print to PDF missing on Windows 11 or 11 PC:
Fix 1:Using Windows PowerShell, Reinstall Microsoft Print to PDF
Microsoft Windows Powershell can be used to complete the reinstallation process as well. Microsoft Print to PDF mission Windows 11 can be resolved with the same set of two commands.
- In Search, type powershell , right-click Windows PowerShell, and choose Run as administrator .
- After each command, press Enter .
Disable-WindowsOptionalFeature -online -FeatureName Printing-PrintToPDFServices-Features
Enable-WindowsOptionalFeature -online -FeatureName Printing-PrintToPDFServices-Features
Fix 2: Add Print to PDF Via Windows Features Dialog
There are additional features available in both Windows 11 and 10 called Optional Features. You can opt to have some of these features pre-installed, while others are available as a download or installation on demand.
If Print to PDF has been disabled on your computer, you can enable it in the Windows Features dialog. Here are a few easy steps for adding or removing Optional Features in Windows.
- Initially, open the Search box.
- Enter Optional Features and click OK to open the Dialog for Optional Features . Alternatively, you can access it through Settings > Apps > Optional Features > More Windows features .
- Find Microsoft Print to PDF in the Turn Windows features on or off dialog box.
- To install Microsoft Print to PDF, select it and click OK .
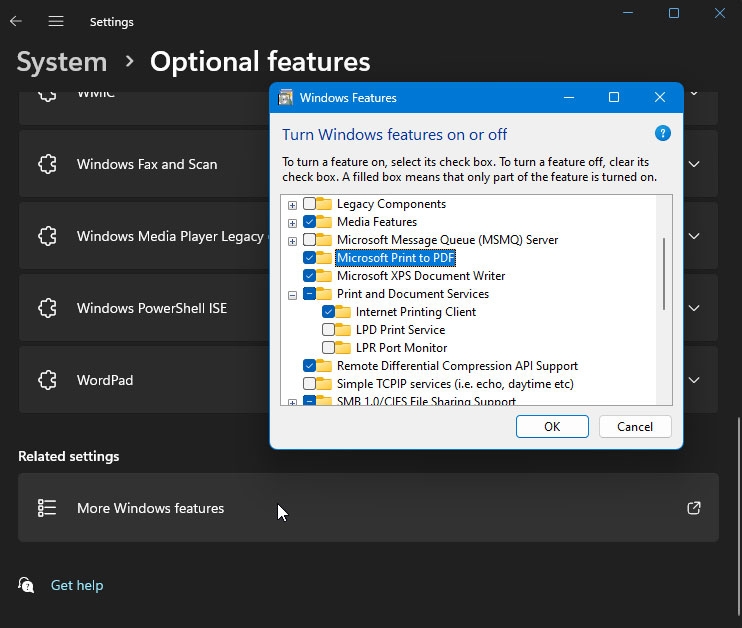
- Once the installation has been completed, click Close . In the Printer interface, check whether the Print to PDF option is restored.
Ensure that the Microsoft Print to PDF option is not already selected and uncheck it. In this way, the OS will be prompted to uninstall the feature correctly.
Once the driver has been uninstalled, launch the Windows Features dialog and enable the Print to PDF option.
You can solve the problem by turning off the feature in the Windows Features dialog box and restarting your computer.
If the Print to PDF option is not restored after the restart, try enabling the feature again in Optional Features.
Fix 3: Disable/Enable the Print to PDF Feature Via Command Prompt
You can disable or enable optional Windows features with the Deployment Image Service Management (DISM) command-line tool if you prefer.
To install Print to PDF using the Command Prompt, follow these steps:
- To open Run , press Win + R .
- Enter cmd, then press and hold the Ctrl + Shift keys and click OK. This opens the Command Prompt as an administrator .
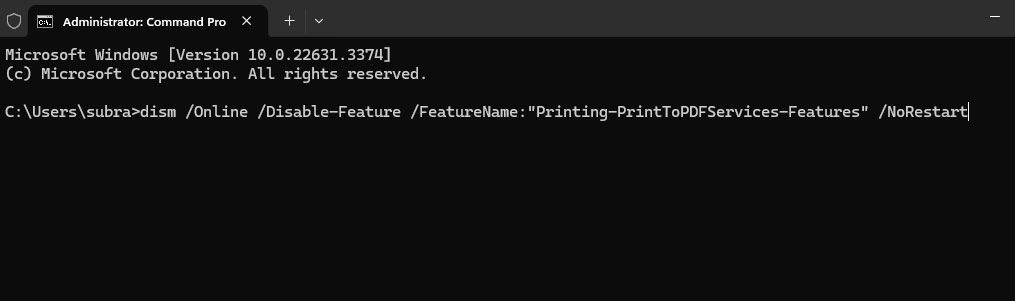
- To stop the spooler service, type the following command at the Command Prompt. net stop spooler

- After you have successfully stopped the Print to PDF services, type the following command to disable it:
dism /Online /Disable-Feature /FeatureName:"Printing-PrintToPDFServices-Features" /NoRestart
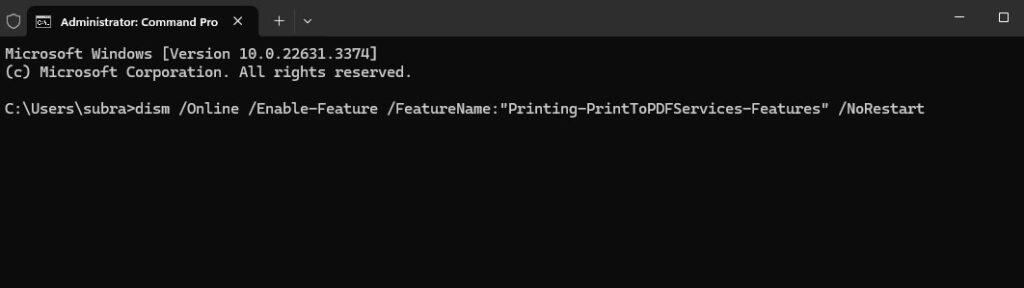
- To enable the feature again, type the following command and press enter after the Operation is complete message appears:
dism /Online /Enable-Feature /FeatureName:"Printing-PrintToPDFServices-Features" /NoRestart
- Afterwards, you will see the message Operation completed successfully if it was successfully installed.
- Now that Windows has the Print to PDF feature, you should be able to save documents in PDF format.
Fix 4: Add Print to PDF Via Add Printer Wizard
You can also add a new printer from the Settings tab if the Print to PDF option is missing. If you choose the Print to File option when adding a new printer, you will be able to choose the Print to PDF option as well. However, to manually add the Print to PDF printer, follow these steps:
- To open Settings , press Win + I .
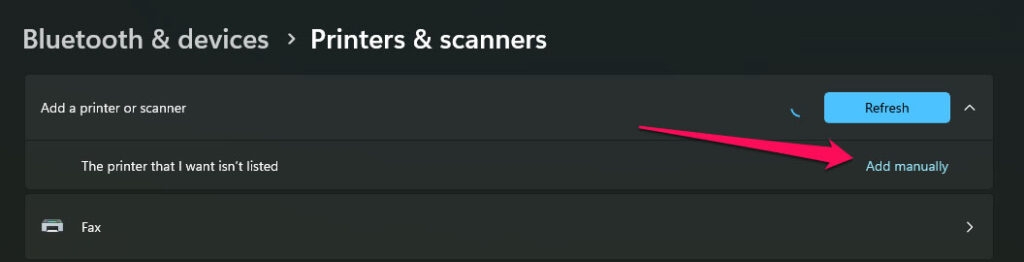
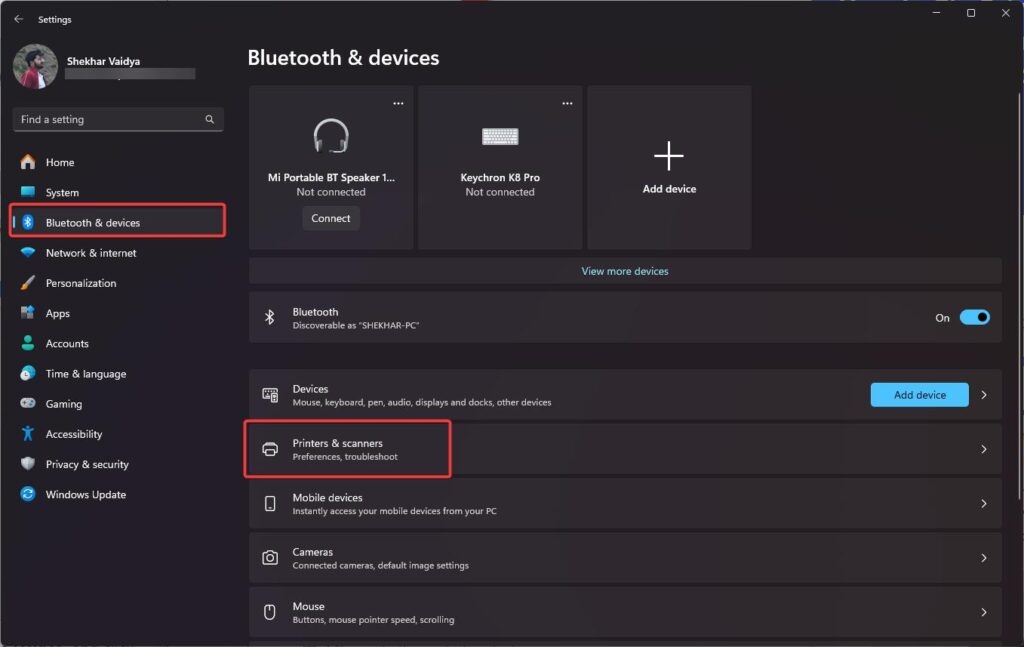
- Go to the left pane and click Bluetooth & Devices .
- On the left side, click Printers & Scanners .
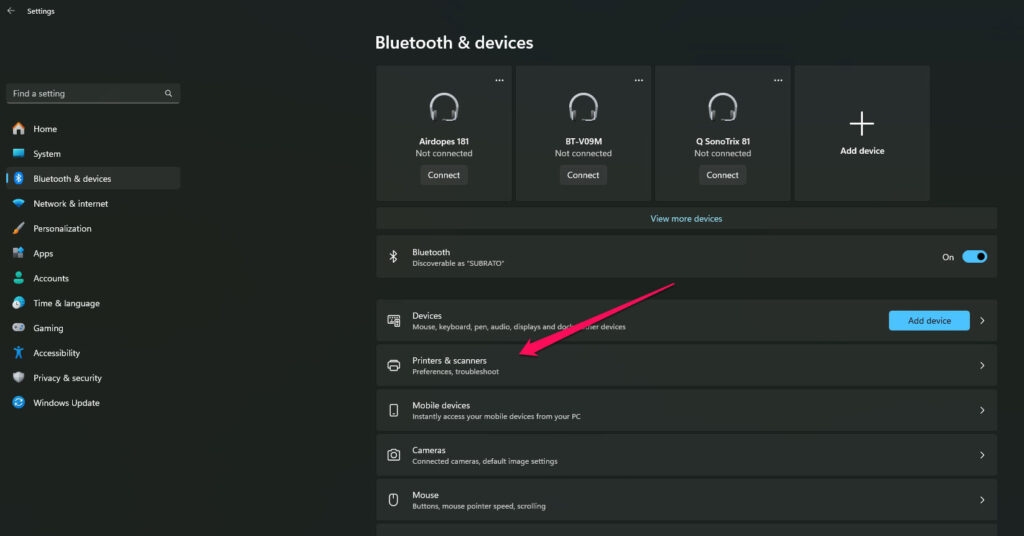
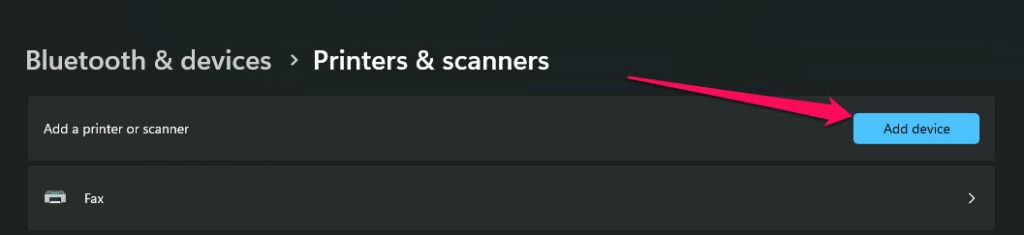
- Thereafter, in the top right corner, click the Add Device button. When a printer is connected, Windows automatically starts scanning for it.
- Suppose the printer you are looking for isn’t listed there, then click Add manually .
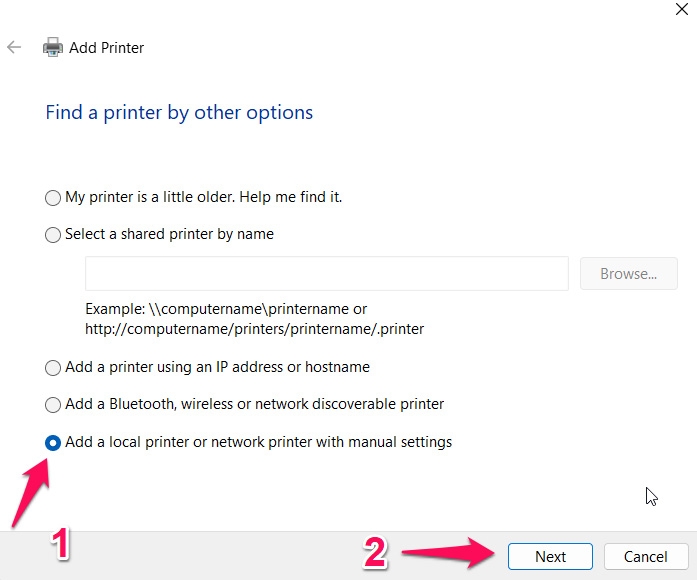
- Afterwards, select Add a local printer or network printer with the manual settings option in the Add Printer dialog.
- Click on Next .
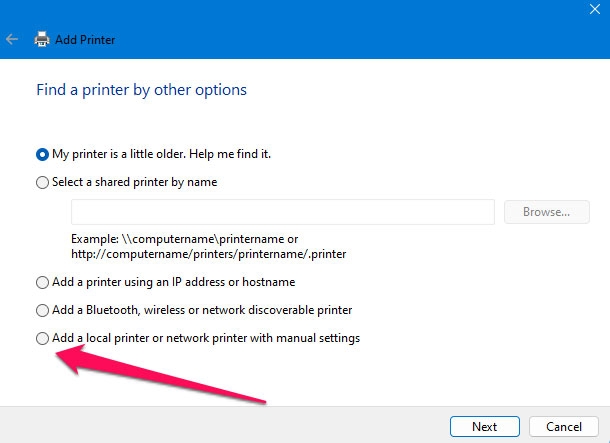
- Choose Use an existing port from the drop-down menu. Select File: (Print to File) . When Print to File isn’t available or doesn’t work, try PORTPROMPT (Local Port) or PDF (Local Port) . You can also use this with older versions of Windows 10.
- To continue, click Next .
- Afterwards, on the Install the printer driver screen, select Microsoft from the Manufacturer drop-down menu. Under Printers , select Microsoft Print to PDF .
- To continue, click Next .
- To save the changes, type your new printer’s name or leave it as it is by default and click OK .
- Afterwards, open the Print interface and check whether the Print to PDF option is available.
Fix 5: Turn Off/On The Feature
Windows 10 and 11 come with a native Print to PDF feature. Hence, if it is missing, there could be a minor problem surrounding it, which can be fixed by turning off and re-enabling the feature.
- Enter Turn Windows features on or off in the Search box.
- In the Windows features, look for “ Microsoft Print to PDF “.
- Uncheck the box and check it again. To save your changes, click OK .
- Check your printer list after restarting the PC.
Fix 6: Reinstall Microsoft Print to PDF Using Device Manager
Microsoft Print to PDF can be reinstalled via Device Manager if the above methods do not resolve the issue “Microsoft Print to PDF missing”.
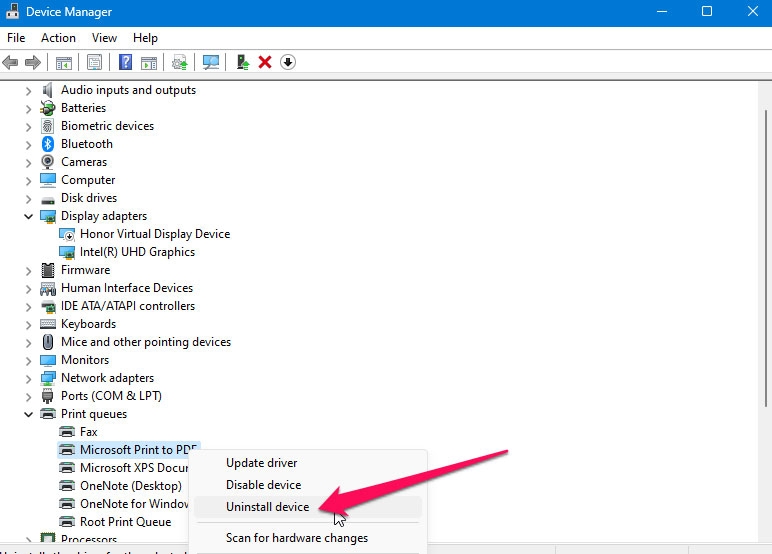
- Initially, in the Search box, type Device Manager and click Open .
- Afterwards, expand the Print queues list.
- Thereafter, right-click on the Microsoft Print to PDF option. Choose Uninstall device . Once the driver has been installed, you can use it again.
So, that’s all we have for you on how to fix Microsoft Print to PDF missing on Windows 11 or 11 PC. It is our hope that you have found this guide helpful. Feel free to comment below if you need more information.
Further Reading:
- Best Windows PC Software for Fan Speed Control
- How to Fix the “Your PC needs to be repaired” Error?
- How to Enable/Disable Memory Compression in Windows 11?
Enjoyed this article?
If TechLatest has helped you, consider supporting us with a one-time tip on Ko-fi. Every contribution keeps our work free and independent.
Highlights
- “Driver is unavailable” is a common issue people face with their printer on a Windows PC.
- The issue occurs due to various reasons like the driver is not properly installed or is corrupted, etc.
- We’ve given a number of solutions that can help you resolve the issue in no time and you can get back to your daily chores.
Printing is one of the most common tasks people do on a daily basis. Nowadays there are a ton of printers available on the market, and every one of them requires a different driver to operate.
Hence, you might see a very common error while you try to print any document or photo, i.e., Driver is Unavailable. Since it is a common issue, solutions are also very easy to implement.
Don’t want to miss the best from TechLatest ? Set us as a preferred source in Google Search and make sure you never miss our latest.
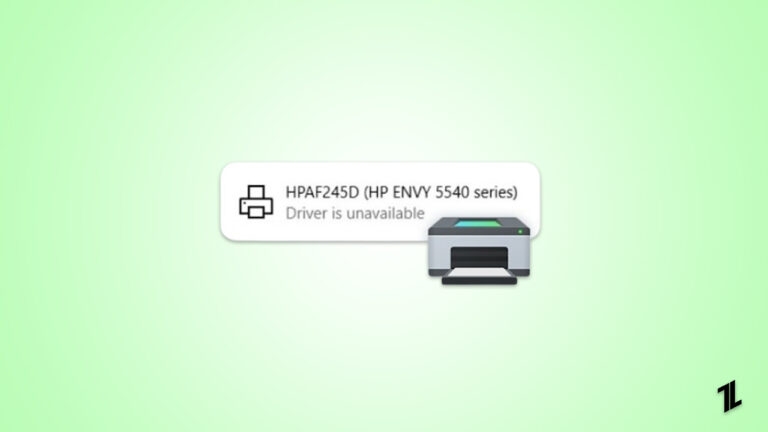
“Driver is unavailable” simply means that your system is trying to find the right driver for your printer to operate but can’t find any and halts the printing of any document or photo.
As mentioned earlier, the solutions are simple but before that, we would like to tell you the reason why you get the “Printer Driver is unavailable” error on Windows.
Content Table
Why do you get the “Printer Driver is unavailable” error on Windows?
This is a very common error among Windows 10 users as so many have complained to us that they get the Driver is Unavailable on their Printer devices.
Talking about why you get this error, there is no single reason why this error could pop up on your PC. There are multiple reasons why this error could occur on your PC, and we have listed them down below. You could be facing an error due to any of them.
Here are the reasons:
- Your Printer’s driver is missing or not installed properly
- Your Printer’s driver is corrupted
- Your Printer’s driver is not compatible with your PC
- Your Printer’s driver is outdated
- Windows Update needs to be installed
Now that we have told you about the possible reasons you are getting the “Printer Driver is unavailable” error, we will talk about how to fix the “Printer Driver is unavailable” error.
How do we fix the “Driver is unavailable” error on Windows?
These are some of the ways to fix the “Printer Driver is unavailable” error on Windows, and they are as follows:
1. Reconnect the Printer Device
The first thing you need to do is simply reconnect the Printer Device so that you can check if it works or not. It is quite possible that this could fix all the things, and you don’t need to do anything else to fix the issue.
To reconnect your Printer device, follow these steps:
- Press the Windows + S key on your keyboard and then type Settings in the window that opens.
- Launch the Settings window, click on Bluetooth & devices , and then Printers & scanners .
- Click on the Printer that is troubling you, select Remove Device, and click Yes if you are prompted.

- After this, your Printer will be removed from your PC, and then you can reconnect your Printer as you would normally do.
If this doesn’t work, you can try the other troubleshooting methods mentioned below.
2. Update your Printer Driver via Device Manager
If your method of reconnecting the Printer did not work, then you can try to update your Printer’s drivers because outdated drivers could also cause problems with the functioning of any device.
To update your Printer’s drivers inside Windows, follow these steps:
- Press the Windows + X key, click on Device Manager , and then expand the Printers menu.
- Right-click on the Printer listed in the menu and then click on Update Driver to update its drivers.
- Select the Search Automatically for drivers option and allow Windows to search for existing drivers inside the system as well as online.
- Wait for the driver installation to complete, and then restart your PC for changes to take effect.
3. Install Printer Drivers manually
It is quite possible that Windows cannot find the Printer Drivers, so you may need to install them manually.
- For this, you need to go to Device Manager once again by clicking Windows + X.
- After that, you need to go to Printers and Expand the list, right-click on your Printer, and click on Update Driver .
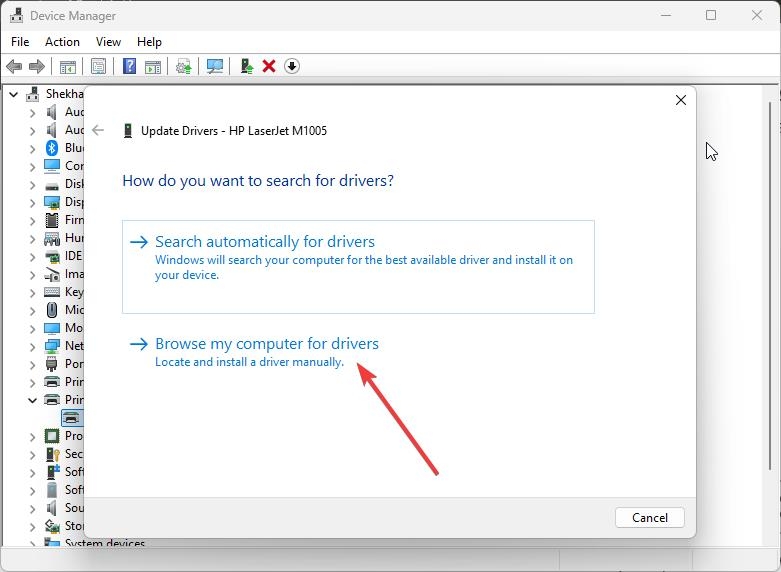
- Now comes the part where you need to concentrate because you will need to click on Browse my computer for drivers.
- Download the Printer Driver for your respective printer, depending upon its manufacturer. We have given links to some of the top printer manufacturers down below: Canon Driver Download HP Software and Driver Downloads Epson Downloads Brother Driver Downloads Sharp Driver Downloads Samsung Printer Software Installer
- Download the correct driver, remember the file path where you have downloaded the drivers, and then select and install them on your PC.
4. Install Generic Printer Driver
Users say installing generic printer drivers instead of those specific to their device manufacturers has also done the job for them. This could be because generic drivers are compatible with each and every printer out there unless there is something specific that needs to be changed.
So, we will try and install a generic driver on our Printer and see if it works.
- To do that, go to Device Manager by pressing the Win + X key once again.
- Expand the Printers menu, right-click on your Printer, and click on Update Driver .
- Then click on Browse my computer for drivers and then click on Let me pick from a list of available drivers on my computer .
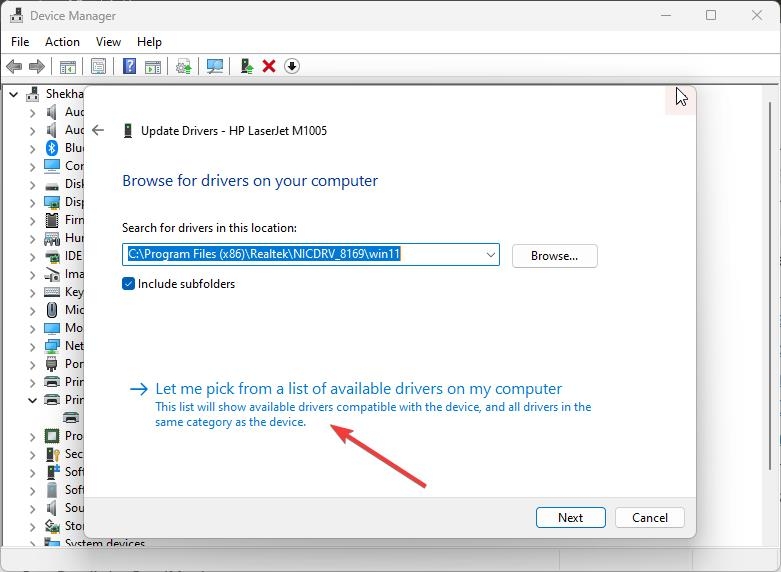
- Click on Generic Software Device as seen above and then click on Next.
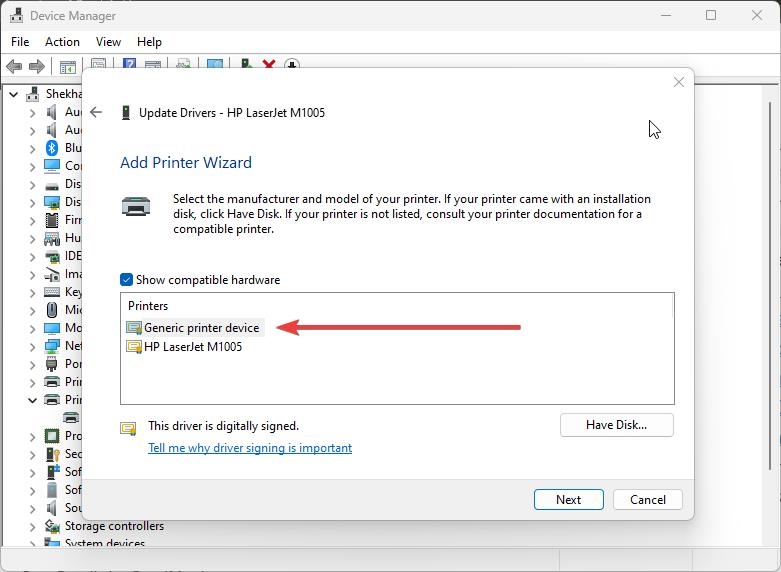
- Now, your Generic drivers will be installed, and you can restart your PC after that.
5. Update Windows 10
While we know that the problem of the Printer Driver being unavailable is related to the drivers of your Printer, it is possible that your Windows being outdated could also be the issue.
We have noticed this issue in users who did not update their Windows 10 and were running an outdated version.
So, make sure to check and update your Windows if you have an update pending because it could bring bug fixes that could fix the “Printer Driver is unavailable” issue.
- To check for Windows updates, press Win + I simultaneously to open Settings .
- Now, click on Windows Update .
- Click on the Check for Updates button and then wait for Windows to check if any update is available.
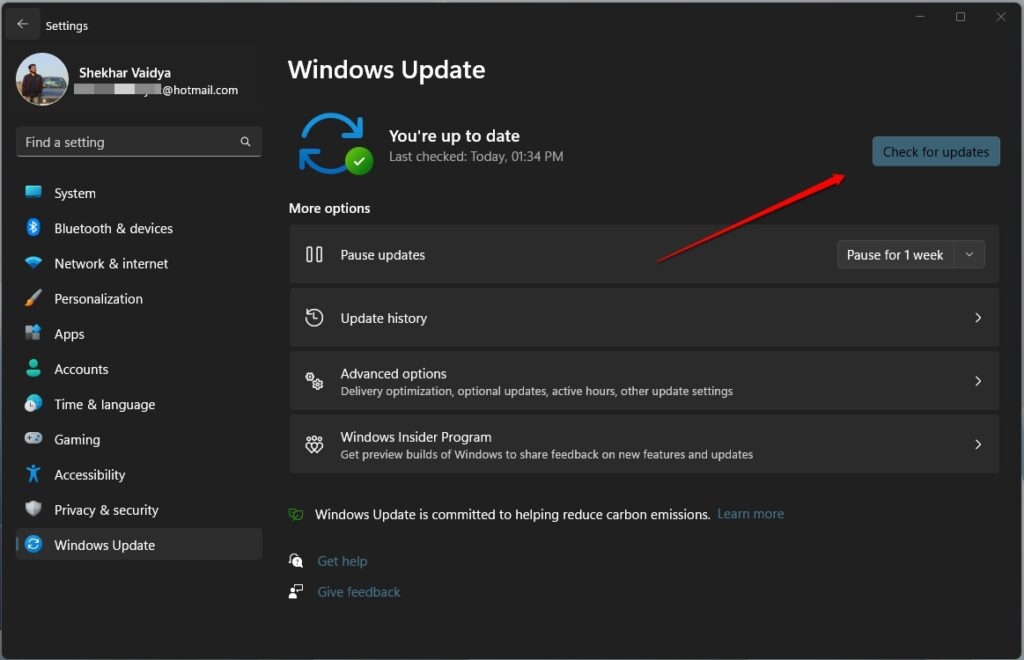
- If any update is available, click on the Download and Install Now button and then wait for it to be installed on your PC.
6. Fix Corrupt Windows Files
There can be errors related to “Driver is unavailable” when system files are corrupted.
You can make these files work again with the System File Checker (SFC) and Deployment Imaging Service and Management Tool (DISM).
Run SFC
- Run Command Prompt as an administrator.
- Then type sfc /scannow and hit Enter.
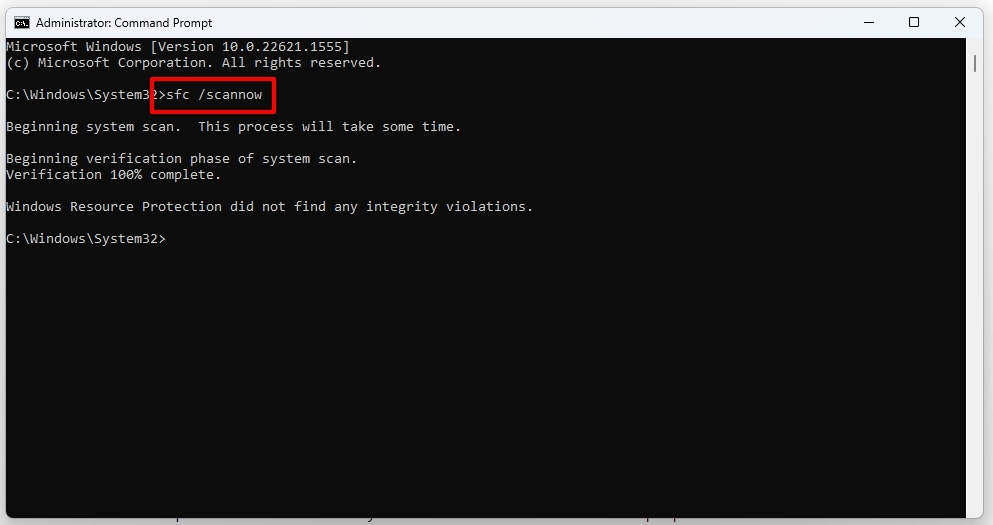
- Wait until the Scan is complete. Whenever it finds corrupted system files, it automatically fixes them.
Run DISM
- You will need to open Command Prompt as an administrator.
- Enter DISM /Online /Cleanup-Image /RestoreHealth .
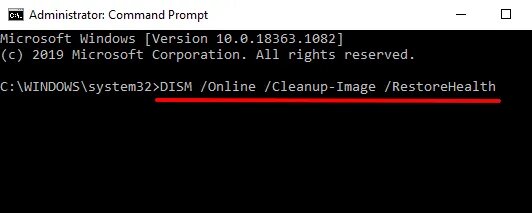
- Let the process run its course. Be patient; it may take some time.
7. Don’t Let Faulty Drivers Install
Sometimes the issue of “Driver is unavailable” is because of the driver’s latest update. Usually in the latest Windows editions like 10 or 11, Windows tends to update the driver automatically when available.
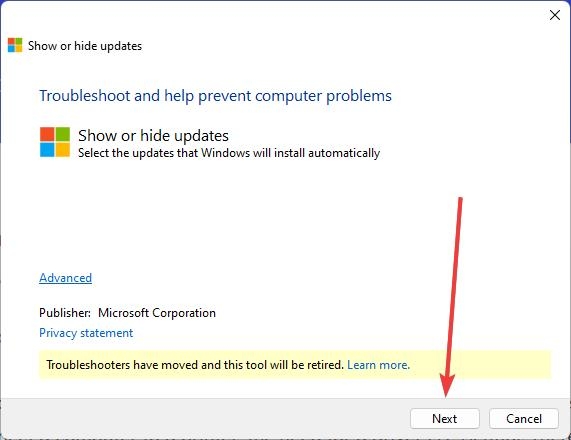
We can stop this phenomenon by using Microsoft’s Show or hide updates tool. Follow the below instructions step-by-step to do so,
- Download the Microsoft Show or hide updates tool using this link .
- Open the app by single/double clicking the wushowhide.diagcab file.
- Click on the Next button located in the down section of welcome windows.
- From the two options available, click on the Hide updates option.
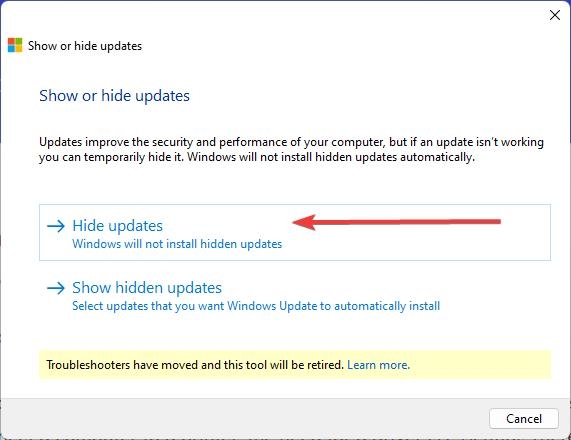
- Check the boxes of the faulty printer and click on the Next button.
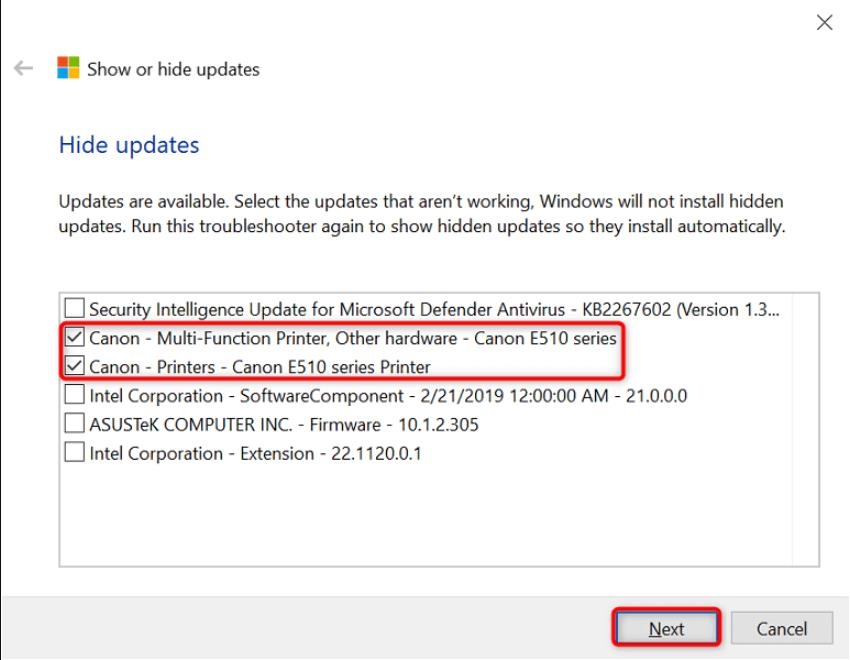
- Finally, select Close the troubleshooter .
By doing this, Windows will ignore any updates available and prevent installing any faulty drivers.
Conclusion
There you go. We have mentioned everything there is to know about the “Printer Driver is unavailable” error, from how it is caused to knowing how you can fix it.
Some part of this article is contributed by Abhishek Jariwala .
Further Reading:
- Why is My Computer Slow All of a Sudden?
- Windows was Dominant, But Now It’s Not: What Happened?
- Winpilot (BloatyNosy): Debloat Your Windows 11 PC (Remove Bloatware)
Enjoyed this article?
If TechLatest has helped you, consider supporting us with a one-time tip on Ko-fi. Every contribution keeps our work free and independent.
Highlights
- Windows 11 widgets provide users a quick and personalized method to obtain crucial data and functions.
- There is a widget for any requirement, whether you want to keep track of your daily duties or check the functioning of your system.
- Use these top 10 widgets for Windows 11 to increase productivity, maintain organization, and maximize your desktop experience.

The periodic upgrades from Microsoft enhanced the Windows UI by introducing additional features and customizations.
The classic Windows interface has undergone significant changes with Windows 11, including an updated Start menu, a centered taskbar, and additional personalization choices.
Don’t want to miss the best from TechLatest ? Set us as a preferred source in Google Search and make sure you never miss our latest.
Adding widgets to your desktop, giving you instant access to crucial information and practical tools, is one of Windows 11’s most helpful innovations.
These Windows 11 widgets can be accessed from the taskbar.
Here, we’ll examine the top 10 best widgets for Windows 11 that can elevate your computer’s digital experience.
Content Table
Best Widgets for Windows 11
1. CPU and RAM Widget
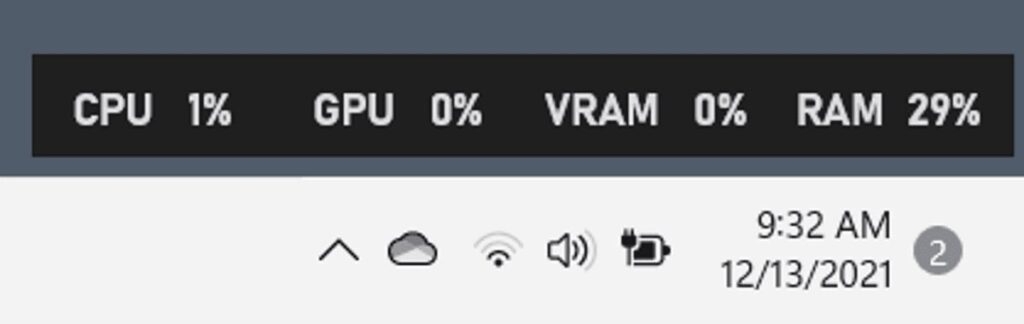
One of my favorite widgets for Windows 11 is the CPU and Memory widget, which lets users see how much CPU and RAM their machine is using in real time.
You may access this widget by clicking on the widget icon on the taskbar or by holding down the Windows key and A.
The CPU and RAM widget enables users to quickly and easily discover any performance issues that could harm their system by displaying real-time utilization data for the CPU and Memory.
The widget displays the amount of CPU and Memory being used in real-time and their % usage.
The widget may also be expanded by clicking on it, allowing users to see more precise data, such as the exact programs currently using the CPU and Memory.
This can be helpful for locating any processes that might be impairing computer performance or slowing it down.
Overall, the CPU and RAM widget is a useful tool for Windows 11 users who want to monitor their computer’s performance and ensure it is operating effectively.
This widget can assist users in quickly and easily identifying any performance issues by offering real-time use data and comprehensive information about particular processes.
2. Sticky Note Widget
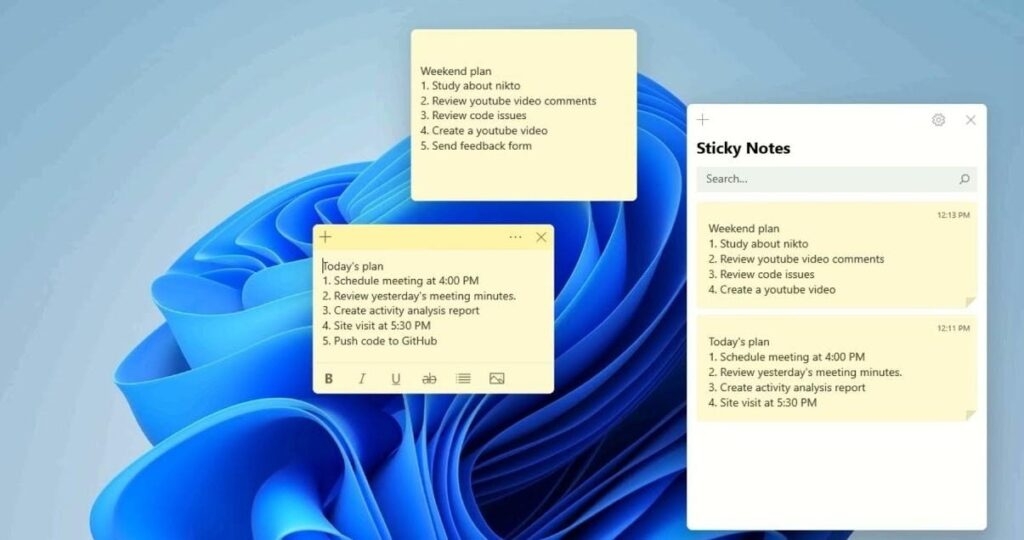
Users may make and arrange virtual sticky notes on their desktops with the Sticky Note widget in Windows 11.
Users may easily record notes, to-do lists, reminders, and other critical information that they want to keep track of with the Sticky Note widget.
Users do not need to download or install any additional software in order to utilize the Sticky Note widget because it is already included in the Windows 11 operating system.
The Sticky Note widget offers a blank note when accessed, which users may then edit with text, formatting, and even photos.
Also, users can add new notes, remove old ones, and pin significant notes to their desktops, so they are always accessible.
The Sticky Note widget’s compatibility with various Microsoft products, like OneNote and Outlook, is one of its best features.
Users may quickly send a sticky note to someone by email, for instance, or copy and paste content from a sticky note into an email or other document.
Overall, the Sticky Note widget is a handy tool for anyone who wants to keep track of important information on their desktops.
Its ease of use, customization options, and integration with other Microsoft apps make it a great addition to the Windows 11 operating system.
3. Traffic Widget
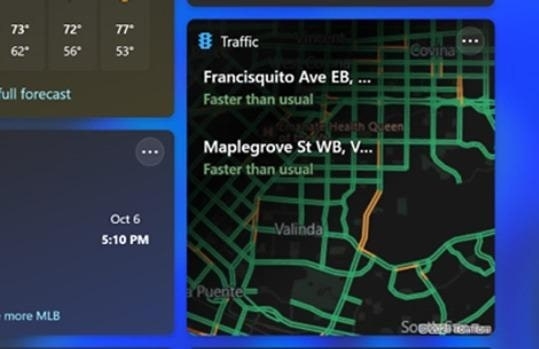
Windows 11 has a new traffic widget feature that gives users access to real-time traffic updates.
The widget is a tiny, resizable panel that can be put anywhere on the desktop and shows data on the traffic conditions right now where the user is.
Using data from Bing Maps, the widget provides information about traffic conditions, such as accidents, road closures, and congestion.
In order to help customers avoid traffic, it may also display projected journey times for various routes and propose alternate routes.
Users of the Traffic widget have complete control over the information presented, as well as the size and positioning of the panel.
Users may observe traffic conditions in several locations by selecting where the widget is focused.
Users must have location services enabled on their devices in order to utilize the Traffic widget. The widget will automatically determine the user’s location and present details on the local traffic patterns.
4. Entertainment Widget
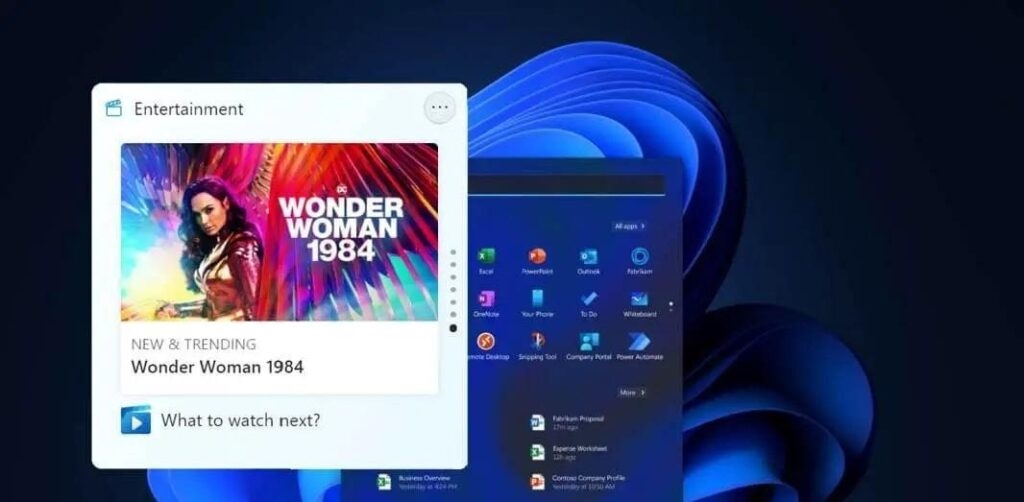
A little application called the Entertainment Widget gives users easy access to various entertainment materials, including games, music, movies, and TV shows.
Once activated, the widget will present a range of materials, such as suggested films and television programs, top games, top songs, and more.
Users may engage with the widget by clicking on the material they are interested in by being sent to the appropriate app or service.
The Entertainment Widget’s flexibility enables users to personalize it to their tastes. Users can view just certain sorts of material or exclude any stuff in which they have no interest.
The widget’s size and placement on the screen may change by the user.
The Entertainment Widget offers various helpful functions and gives consumers rapid access to entertainment information.
For instance, it can show alerts for upcoming events like movie releases or game updates. In order to make it simpler for consumers to locate what they’re searching for, it also has a search box that enables users to hunt for material across several services.
5. Esports Widgets
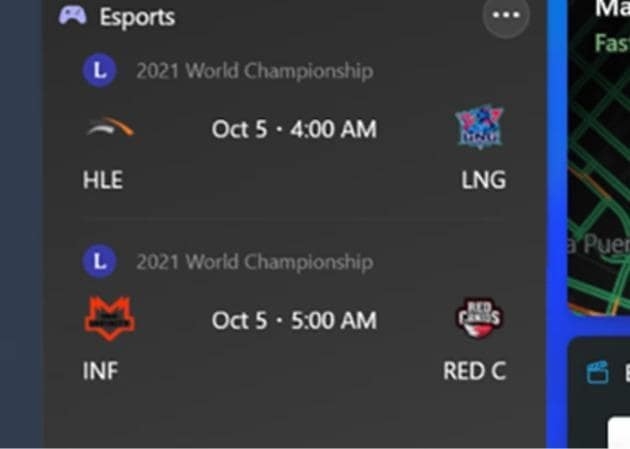
Users may quickly and easily access information on esports events, teams, players, and more by adding an esports widget, a tiny program, to their taskbar or desktop.
These widgets are becoming increasingly well-liked among gamers and esports enthusiasts as esports and competitive gaming gain popularity.
Microsoft could add an esports widget among its pre-installed widgets and gadgets in Windows 11.
This can provide players with an easy method to remain current on the most recent esports news and events without switching between different websites or applications.
6. To Do Widget

With Windows 11, users can easily manage their jobs and increase their productivity using the To Do Widget.
The new Windows 11 interface, which includes this widget, was created to give users a more simplified and natural experience.
Users may simply organize their projects, set reminders, and prioritize their work with the To Do Widget, accessible from the Windows 11 Start menu.
The task management tool Microsoft To-Do, available for free download from the Microsoft Store, is also integrated with the widget.
Users may add new tasks to the To Do Widget by clicking the “Add task” button and entering the assignment’s specifics.
The To-Do Widget’s ability to show a summary of the user’s chores and reminders on their desktop is one of its most helpful capabilities.
As a result, it is simple to stay on top of crucial due dates and impending events without having to move between applications or comb through several displays.
7. Watchlist Widget for Stock Market
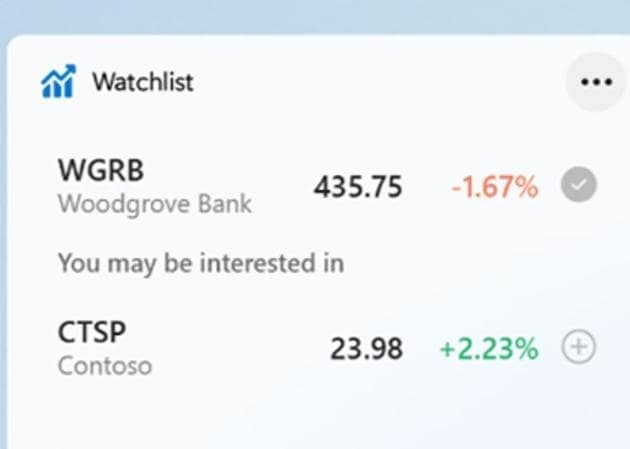
A new feature in Windows 11 called the Watchlist widget enables users to add a customized list of stocks on their desktops.
The widget allows users to effortlessly follow the performance of their favorite companies, check real-time stock quotations, and access pertinent news items and financial information.
Users only need to click the Widgets button on the taskbar and choose the Watchlist widget to add the widget to their desktop. The names of the stocks they want to follow may then be added, allowing them to modify the widget.
Users may examine each stock’s real-time price, price change, and percentage change after the stocks have been uploaded.
Also, by clicking on each stock, they may examine more details like market size, dividend yield, and earnings per share.
The Watchlist widget offers users stock information, pertinent news stories, and financial data on the stocks they have chosen.
To give users the most recent news and analysis, this data is continuously updated from a number of financial news sources.
8. Calendar Widget
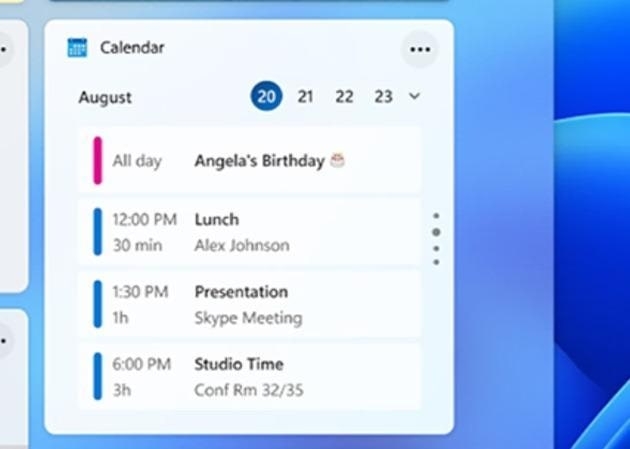
The user’s forthcoming appointments and events, together with the event’s name, time, and location, are shown in the Calendar Widget.
The schedule for the day is also briefly summarized, along with the number of activities planned and the proportion of “busy” events.
When a user clicks on an event, they may change it in their calendar app or view additional information about it.
Birthdays and holidays can be shown on the Calendar Widget according to your preferences. Users can select to view events from different calendars, such as their personal and professional calendars.
One advantage of the Calendar Widget is that it offers a simple and practical method to keep track of crucial events and appointments without requiring you to check a different program often.
It also interacts perfectly with the Windows 11 operating system, making it easy to access and utilize.
9. Photos Widget

Users may construct a gallery of their favorite images on their desktops using the Photos widget in Windows 11.
Without having to look for manually and open individual images, the widget offers a handy method to highlight cherished occasions and often refreshes with fresh photographs.
A rotating collection of images from the user’s local Photos app library and any synced OneDrive folders will be shown after the added widget.
Users may select the albums or folders they wish to see in the widget and change options like the frequency of photo updates, how the images are displayed, and whether or not captions should be shown.
The Photos widget may give a personalized touch to the desktop and act as a helpful record of previous experiences and events.
Users may enjoy scrolling through their photo collection anytime they need a break from work or other duties, or use the widget to spark their memory and reflect on significant events.
10. Weather Widget

A variety of meteorological data, such as the current temperature, precipitation, wind speed, and humidity, will be displayed by this widget.
By default, it shows the user’s local weather conditions, but users may alter it to show weather data for other areas by adding other locations to the widget.
In order to help users plan ahead and stay ready for forthcoming weather conditions, the widget also offers users a five-day prediction.
High and low temperatures, anticipated precipitation, wind speed, and relative humidity are all included in this prediction.
The Windows 11 weather widget provides users with meteorological data and a button that directs visitors to the MSN Weather website, where they can get more specific weather data as well as news and articles on weather and climate.
Wrapping it All
In conclusion, Windows 11 widgets provide users a quick and personalized method to obtain crucial data and functions.
There is a widget for any requirement, whether you want to keep track of your daily duties or check the functioning of your system.
Use these top 10 widgets for Windows 11 to increase productivity, maintain organization, and maximize your desktop experience.
Further Reading:
- Windows 11 Tips and Tricks all Students Need to Know
- [Fixed]Snip and Sketch Not Working on Windows 11
- News and Interests Taking Up Memory: What is it and How To Fix?
Enjoyed this article?
If TechLatest has helped you, consider supporting us with a one-time tip on Ko-fi. Every contribution keeps our work free and independent.
