If you are one of those people whose computer is used by many others including family members or office colleagues then there are some files and folders that you do not want them to access.

Don’t want to miss the best from TechLatest ? Set us as a preferred source in Google Search and make sure you never miss our latest.
Content Table
Steps to Restrict Access to Drives in Windows 10
You need to make some changes in the Local Group Policy Editor of Windows 10 to restrict access to drives in My Computer. Here is How:
Step 1: Open the Run Dialog Box by pressing Windows Key + R.

Step 2: Enter ‘gpedit.msc’ and click OK or press Enter.
Step 3: You are now in the Local Group Policy Editor.

Step 4: Go to User Configuration/Administrative Templates/Windows Components/ File Explorer.

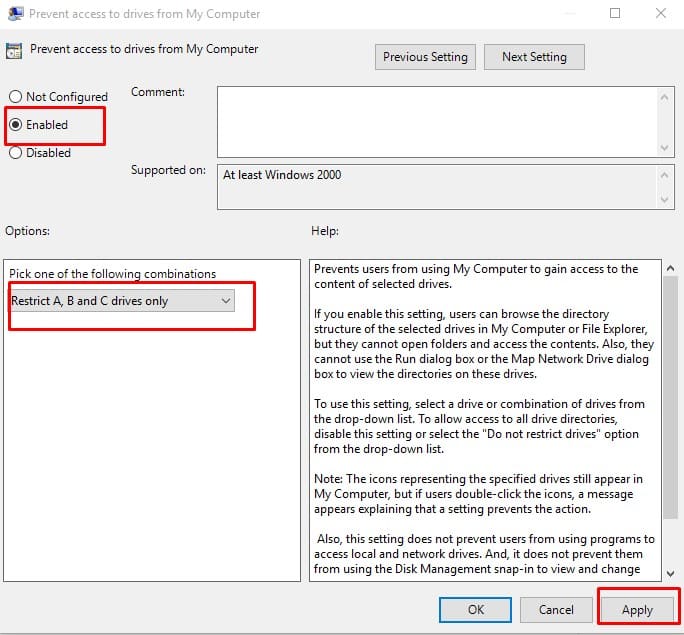
Step 5: Double click on the ‘Prevent access to drives from My Computer’ on the right-side panel.

Step 6: Click on the ‘Enabled’ button and select the drive which you want to restrict access to from the ‘Options’ and click on OK.
You are done. Now if anyone tries to access the restricted drive they will get an error message.
Steps to Enable back the Access?
Step 1: Open the Run Dialog Box by pressing Windows Key + R.
Step 2: Enter ‘gpedit.msc’ and click OK or press Enter.
Step 3: You are now in the Local Group Policy Editor.
Step 4: Go to User Configuration/Administrative Templates/Windows Components/ File Explorer.
Step 5: Double click on the ‘Prevent access to drives from My Computer’ on the right-side panel.
Step 6: Select the option ‘Do not restrict drives’ from the ‘Options’ and then click OK.
Step 7: Select ‘Disabled’ option in the same window and click OK.

That is, it, you are all set. Everything is back to normal user permissions.
- How to Lock Drive with Password in Windows 10?
- How to Add Guest Account in Windows 10?
- How to Reset Login Password in Windows 10?
Enjoyed this article?
If TechLatest has helped you, consider supporting us with a one-time tip on Ko-fi. Every contribution keeps our work free and independent.
