Highlights
- Battlefield 6 open beta early access has been released, and a lot of players are setting up to have the best possible gaming experience in the game.
- The most efficient way to make your system run better with Battlefield 6 and other modern games is just by enabling Secure Boot, but not everyone knows how to do that .
- However, with this guide, you will be able to enable Secure Boot on Windows 10 and Windows 11 to ensure smooth gameplay and protection against unauthorized software.

The Battlefield 6 Open Beta is heading to early access on August 7; the first full-access weekend follows on August 9, and tons of PC gamers are getting their systems up to security and performance snuff.
Secure Boot is the big standout; basically, if you’re reading this and you want to play nice with EA’s Javelin anti-cheat system- Secure Boot.
Don’t want to miss the best from TechLatest ? Set us as a preferred source in Google Search and make sure you never miss our latest.
This guide will show you how to verify the status of Secure Boot, switch from Legacy BIOS to UEFI or convert a boot drive from MBR to GPT and activate Secure Boot on Windows 10 and Windows 11 computers.

Image Credits: Battlefield
Content Table
What is Secure Boot, and Why Does It Matter?
Secure Boot is a security function that prevents your system from booting malware. It means your PC loads only that software and those drivers that are trusted by the system.
In addition to security measures, it is also needed for a number of recent cheat systems, like EA’s Javelin anti-cheat system (what everyone will have to install in order to play Battlefield 6).
Secure Boot is necessary for Windows 11, but it might not necessarily be on by default. While not a system requirement for Windows 10, you’ll definitely want one to play Battlefield 6 properly.

Step 1: Check if Secure Boot Is Already Enabled
- Press Windows + S and type msinfo .
- Thereafter, click on System Information from the search results.
- In the right-hand pane, look for: Secure Boot State – This should read On . BIOS Mode – This should read UEFI .
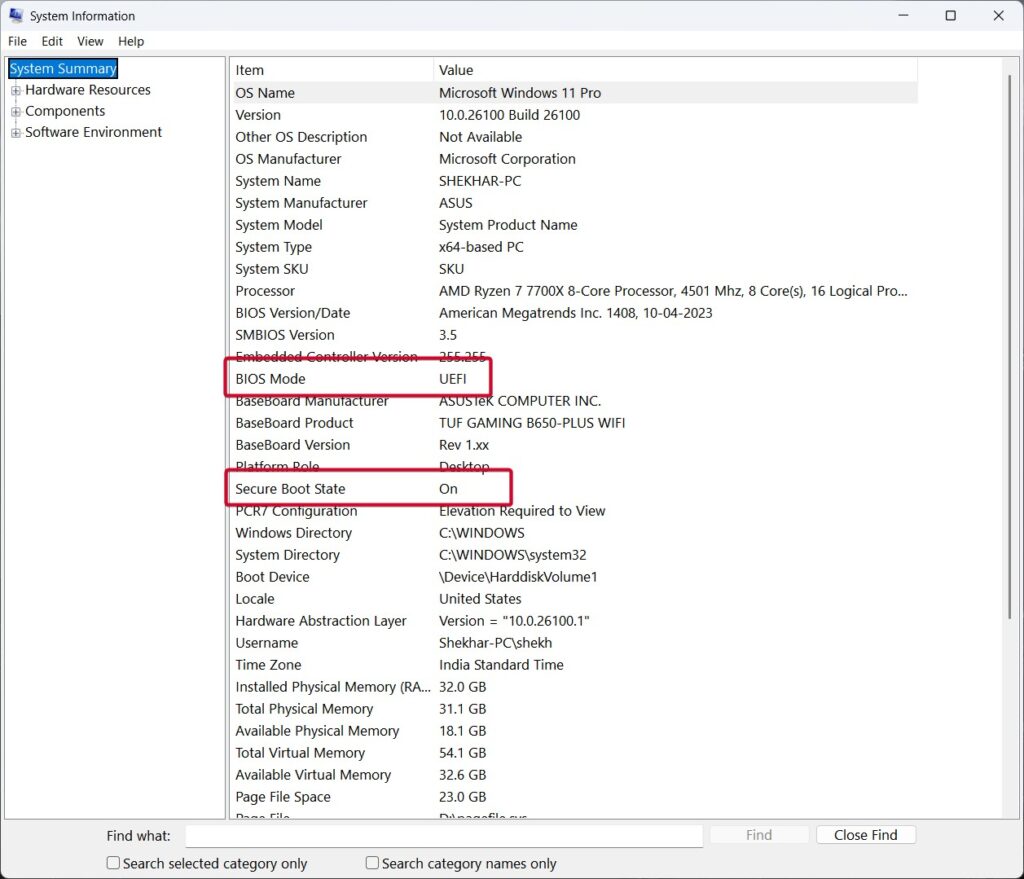
What your results mean:
- If Secure Boot is on and BIOS Mode is UEFI , then ready to start.
- If Secure Boot is off , and BIOS Mode says UEFI, then scroll right to Step 5.
- If BIOS Mode is Legacy, you will have to switch it first to UEFI .
- In the case where Secure Boot says unsupported, see if the motherboard and BIOS support these.
Step 2: Check If TPM 2.0 Is Enabled
Windows 11 needs a Trusted Platform Module (TPM) 2.0 for Secure Boot in several cases.
To check TPM:
- Press Windows + R , type tpm.msc , and hit Enter .
- In the middle pane, check if it says: “The TPM is ready for use.”
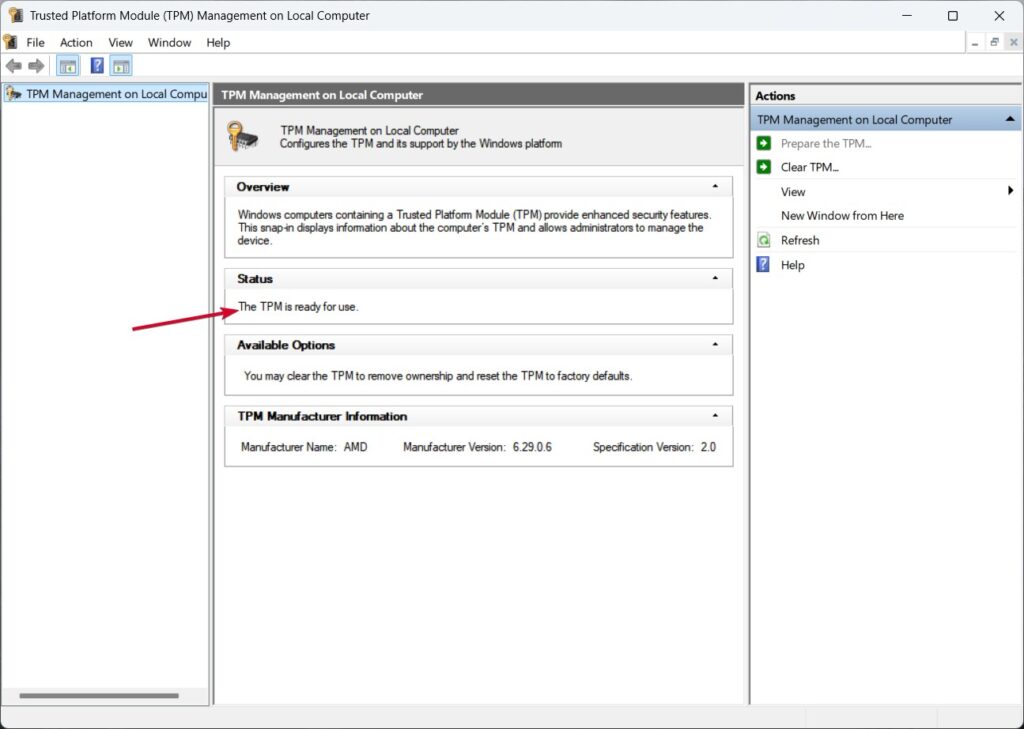
If it is not there, please go to your BIOS settings and enable TPM. Consult your motherboard manual or vendor website.
Step 3: Check If Your Drive Uses MBR or GPT
Your system drive must also be GPT (GUID Partition Table) instead of MBR (Master Boot Record) to switch over to UEFI.
Here’s how to check:
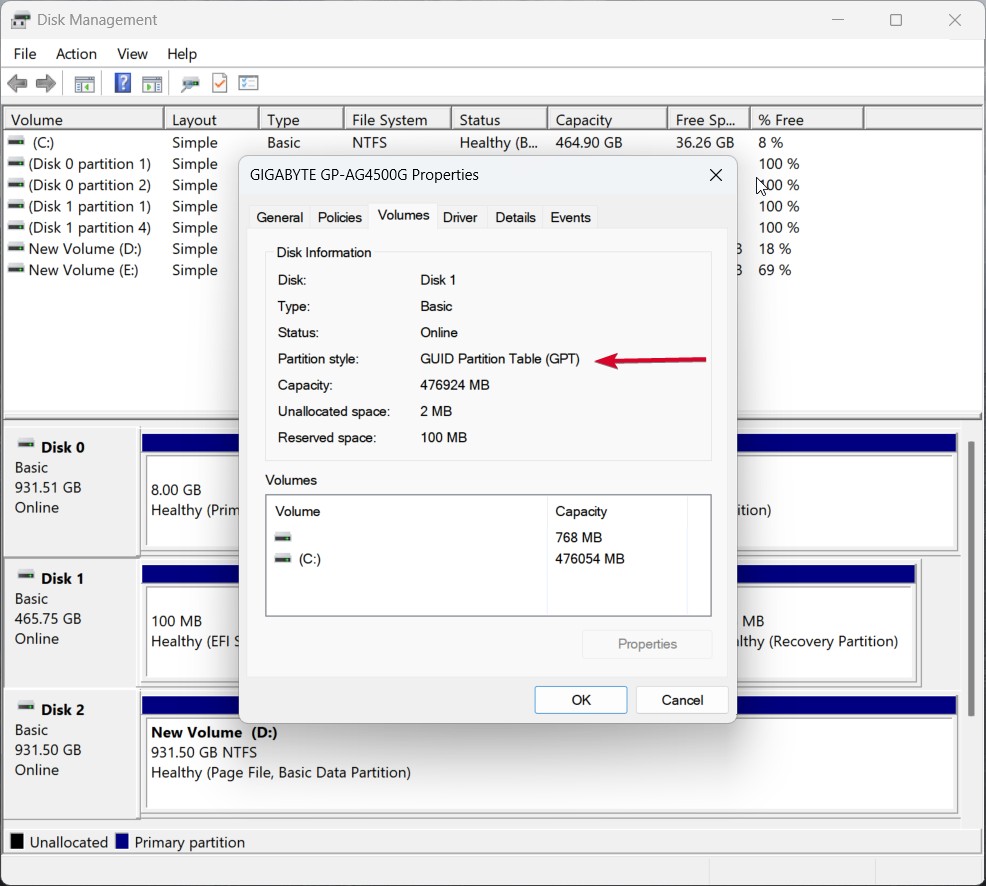
- Go to Disk Management from the Start menu.
- Find your system disk (which is usually marked as Disk 0 ).
- From the Disk Management Console, right-click on it and select Properties , then click the Volumes tab.
- Look for Partition Style. If it shows GPT , you can move on to the BIOS step . If you see MBR , go on to Step 4 in order to convert it.
Step 4: Convert Your Drive from MBR to GPT (Without Data Loss)
Make sure to back up your data before converting, just in case. Then:
- Open Command Prompt as Administrator :
- Run command: mbr2gpt /validate /disk:0 /allowFullOS
Replace 0 with the appropriate disk number if different.
- If validation is successful, run: mbr2gpt /convert /disk:0 /allowFullOS
- If the command runs successfully, your drive is now set as GPT .
But if the conversion failed due to wrong BIOS settings, you will need to change to UEFI mode in the BIOS.
Note: We are demonstrating the BIOS steps on a PC with an Asus Tuf Gaming motherboard, so in your case the steps could be a little different, so proceed accordingly.
Step 5: Change BIOS Mode from Legacy to UEFI
If your PC still uses Legacy BIOS, here’s how to switch to UEFI :
- Turn off your PC and Boot Into BIOS (Commonly, Press F2, F11, F12 , or the Delete button during Boot)
- Enter Advanced Settings
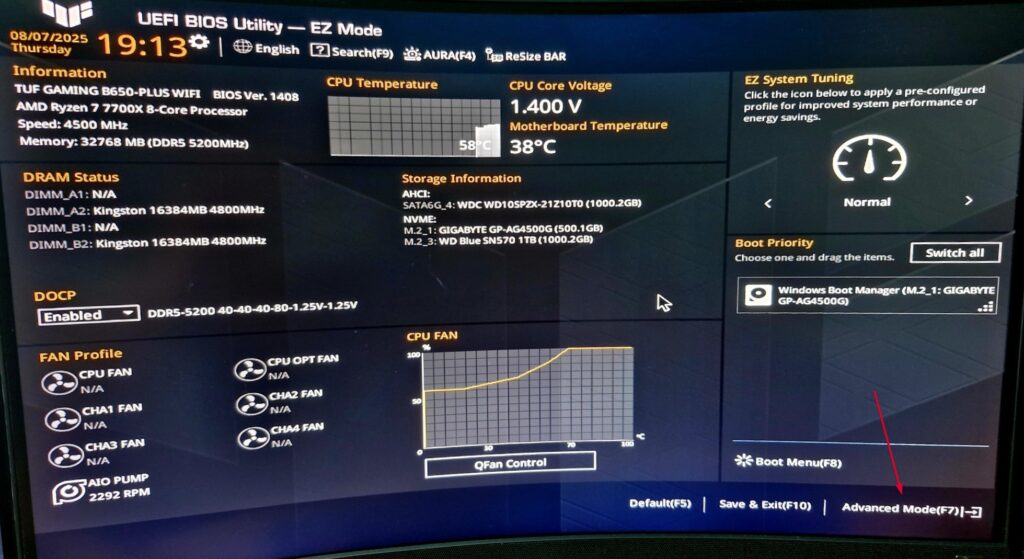
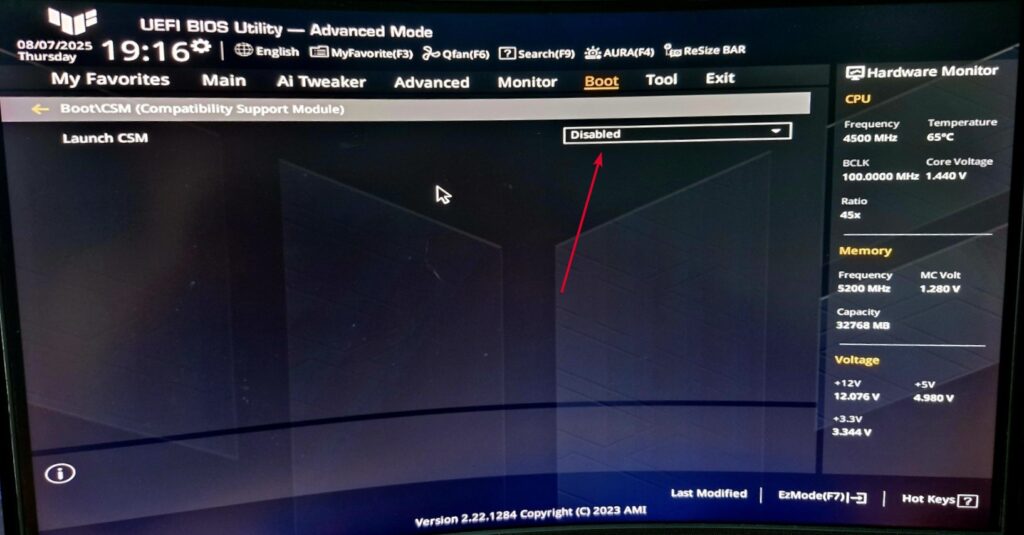
- And then navigate to Boot Settings/Menu.
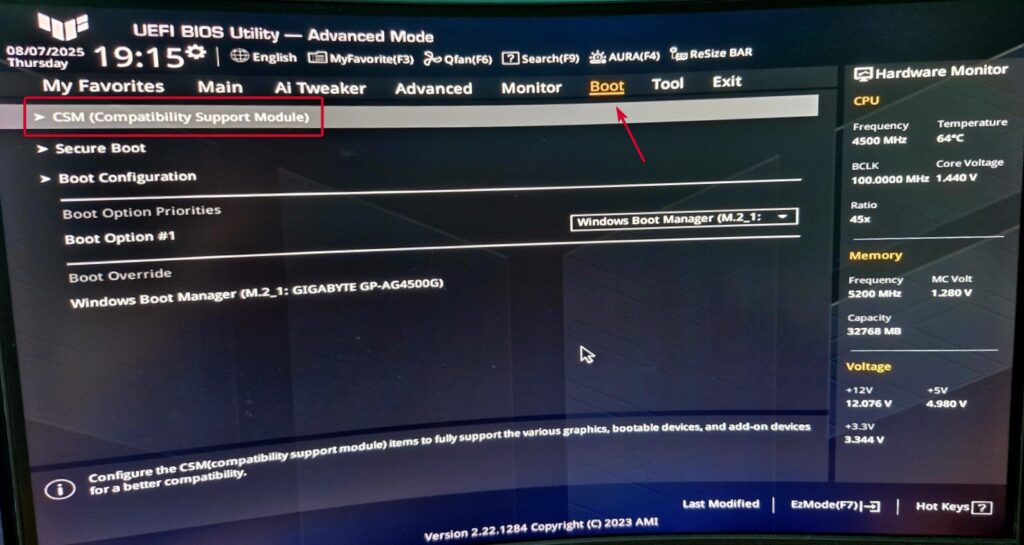
- Locate CSM (Compatibility Support Module) and set it to Disabled .
- Save and exit BIOS.
By disabling CSM, you are putting the system in UEFI mode.
Step 6: Enable Secure Boot in BIOS
After you have your system on and running in UEFI, and your boot drive set up in GPT, turn on Secure Boot:
- Now you can reboot your pc and again enter in BIOS.
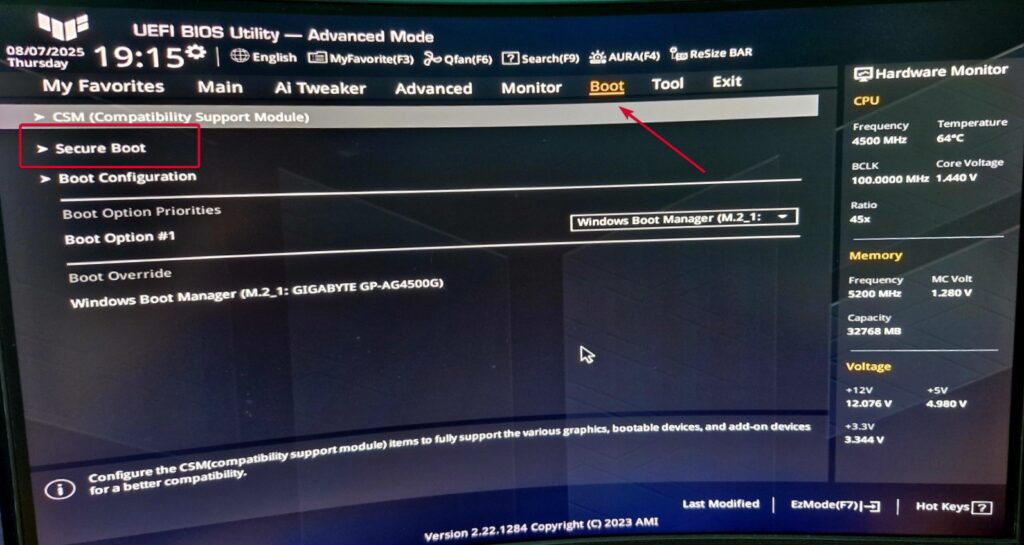
- Go to Secure Boot (option could be found in Boot- if not, try Security).
- Enable Secure Boot (or Windows UEFI mode)
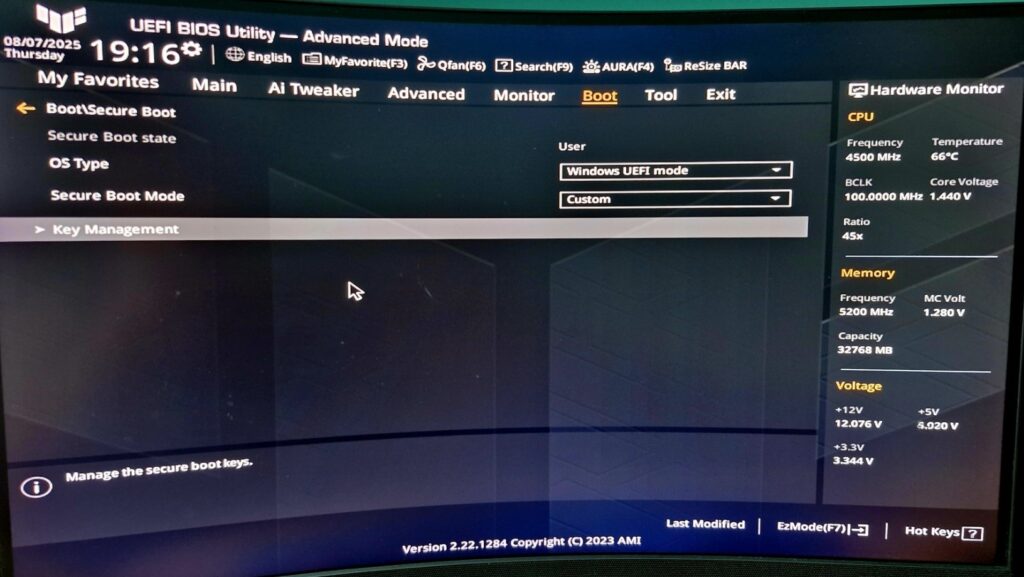
- Save changes and exit BIOS.
Ready to Join Battlefield 6
That’s it. Now, your PC should be all set for Secure Boot, UEFI and TPM 2.0 compliance; this guarantees full usability with EA’s Javelin anti-cheat and keeps the troubles away while playing Battlefield 6.
If you experience any BIOS problems or Secure Boot errors, that’s where your motherboard manufacturer’s doc in hand (or website) comes into play.
Is Secure Boot required for Battlefield 6 on PC?
Yes. The Javelin anti-cheat system that Battlefield 6 runs on requires Secure Boot to be working.
How do I know if Secure Boot is enabled?
Go to your system information summary using msinfo32. Search for “Secure Boot State” and “BIOS Mode.”
Can I enable Secure Boot without reinstalling Windows?
Yes, as long as your system uses GPT and UEFI. Convert it by using mbr2gpt if necessary.
Does Windows 10 require Secure Boot?
No, but some games and anti-cheat systems do.
Enjoyed this article?
If TechLatest has helped you, consider supporting us with a one-time tip on Ko-fi. Every contribution keeps our work free and independent.
