Highlights
- chrome://net-internals/#dns is an internal Chrome page for DNS.
- We can clear the DNS cache, perform DNS lookups, and more for DNS and troubleshooting connectivity issues.
- Clearing the DNS cache may help some common browsing problems, and fetches new website data for Chrome.

Have you ever clicked on a website to have nothing happen, or worse, to see a message stating that the site cannot be reached? Usually, when that happens, the problem isn’t the website, but a much more basic step that happens behind the scenes, called DNS resolution.
DNS (Domain Name System) operates much like the Internet’s telephone book, translating easy-to-remember names like Google.com into IP addresses, which computers can read. If this system malfunctions, your browsing can grind to a halt or break altogether.
Don’t want to miss the best from TechLatest ? Set us as a preferred source in Google Search and make sure you never miss our latest.
To assist users with issues like this, Google Chrome is equipped with a hidden (but rather powerful) tool: chrome://net-internals/#dns. Although it looks technical at first, it can be a lifesaver when you need to clear your DNS cache or diagnose connection problems.
Content Table
What is chrome://net-internals/#dns?
Chrome://net-internals/#dns is a built-in page that serves as a DNS diagnostics page within Google Chrome. It provides access to DNS information present in Chrome, such as cached domain names and their associated IP addresses.
It’s like how you can pull back the curtain on what Chrome is doing in the background as it looks up domains. Mostly, it also allows you to purge the DNS cache with a single click, a maneuver that frequently addresses annoying site-loading glitches.
It was built with developers and pro users in mind, but anyone can open it. Whether you’re tracking down slow sites, connection problems, or various “site can’t be reached” type messages, this page can help.
Why Does DNS Cache Matter?
Before we go through the motions, let’s briefly talk about why the DNS cache can be important.
When you visit a website, Chrome does this so that it doesn’t have to bother the DNS server for the IP address of the same website every time you visit it. So it caches it. When you go to that site next time, Chrome just snags the saved record, which makes the page load more quickly.
But there’s a twist—if a website changes its IP address, Chrome may try to use an older IP cached in the DNS and fail to connect to the website. This is when you will get error messages such as:
- DNS_PROBE_FINISHED_NXDOMAIN
- This site can’t be reached
- The server DNS address could not be found
By clearing the cache, you make Chrome fetch new DNS records, and the problem is often fixed immediately.
How to Clear DNS Cache Using chrome://net-internals/#dns (Desktop)
If you are running Windows, macOS or Linux and are using Google Chrome, you may clear the DNS cache this way:
- Open your Google Chrome browser like you usually do.
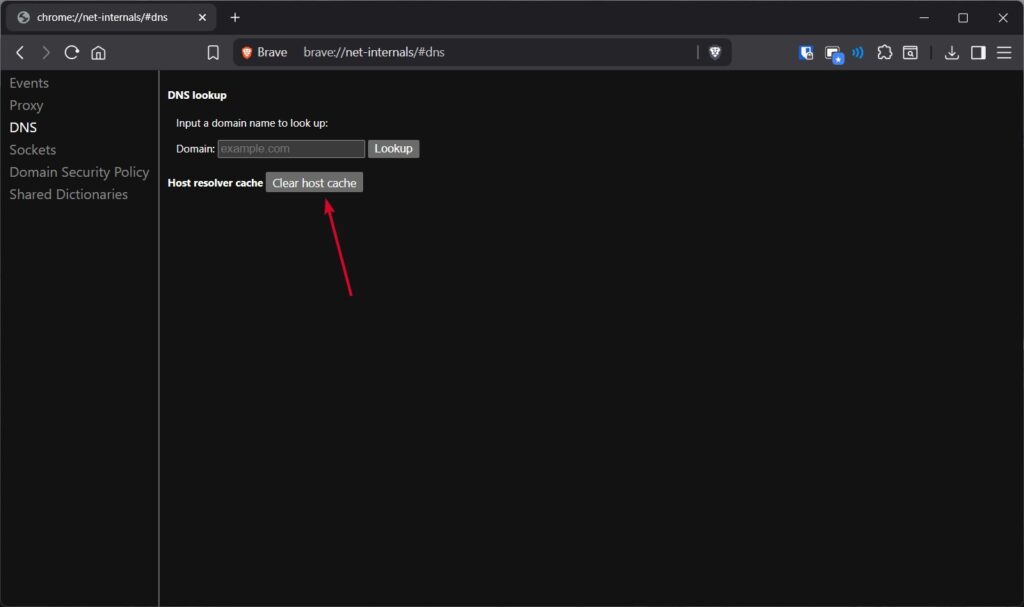
- Type chrome://net-internals/#dns in the address bar and press Enter .
- You’ll notice a button that says “ Clear host cache .” Click it once.
- Check chrome://net-internals/#sockets after clearing the host cache and click “ Flush socket pools .”
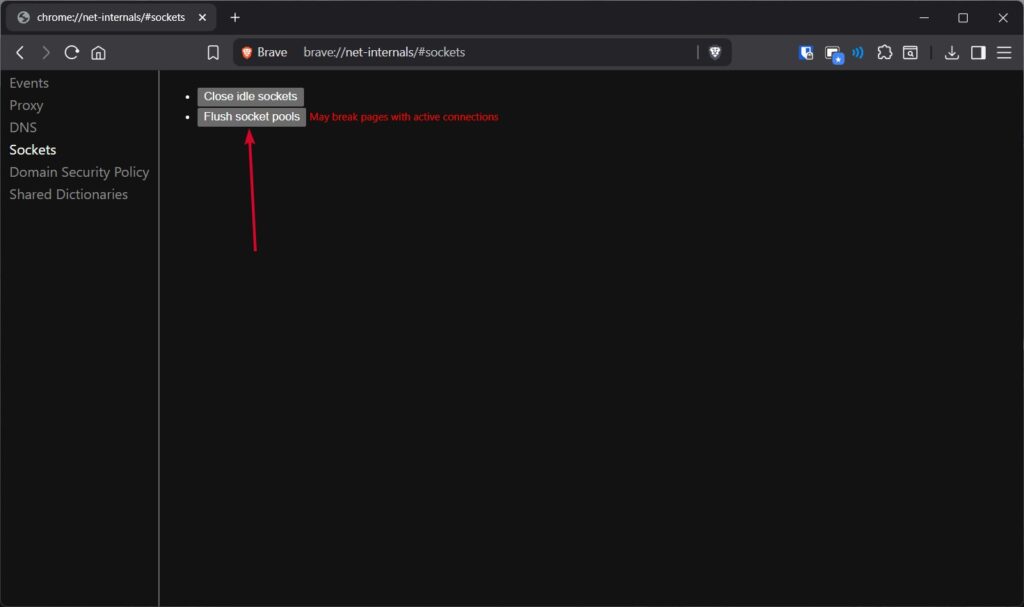
This is to clear any connections with old DNS information. That’s it. You’ve now cleared Chrome’s DNS cache. You can now try to visit the offending website, and it will load fine.
Clearing DNS Cache on Chrome Mobile (Android & iOS)
The good news is that you can do the same thing on a mobile device.
Method 1: Using chrome://net-internals/#dns
- Initially, open the Chrome app on your Android or iPhone.
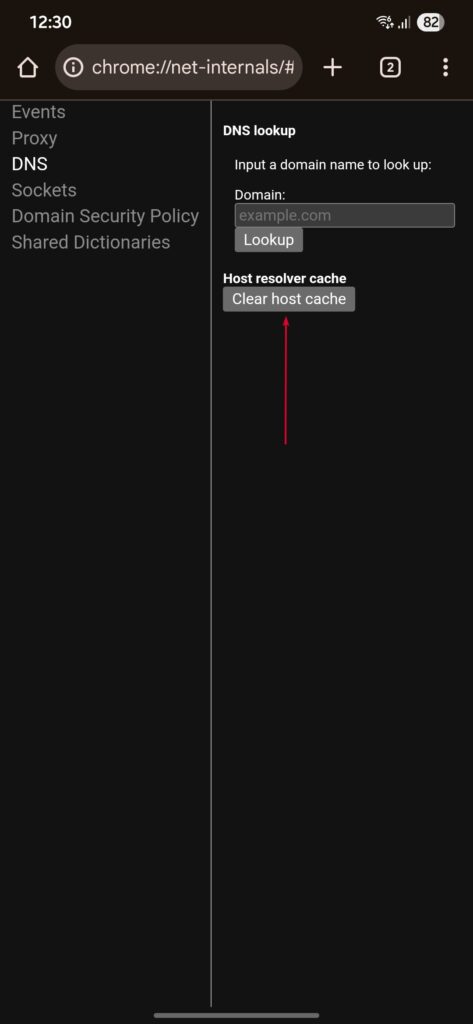
- Thereafter, type chrome://net-internals/#dns in the address bar.
- Tap the “Clear host cache” button.
- Restart Chrome and try visiting the site again.
Method 2: Clear Cache Data
It’s true, Chrome mobile won’t always act exactly like a desktop. In that instance, you can always clear the browsing data yourself:
- At first, open Chrome and tap the three dots menu (top-right).
- Go to Clear browsing data.
- Select “All time” in the time range.
- Thereafter, check Cookies and site data , and Cached images and files.
- Tap Clear data.

This indirectly flushes the cached DNS and usually resolves the problem.
What if chrome://net-internals/#dns doesn’t work?
This tool is helpful, but it doesn’t always correct DNS trouble. If you continue to receive errors, attempt one of the following alternate methods:
1. Flush DNS via Command Line
For Windows:
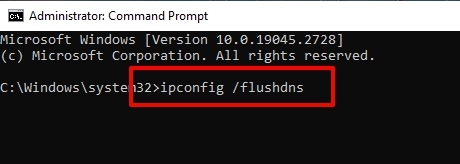
- Open the Command Prompt as Administrator.
- Type: ipconfig /flushdns
- Hit Enter. You’ll see a confirmation message.
For macOS:
- Open Terminal from Spotlight.
- Type: sudo dscacheutil -flushcache; sudo killall -HUP mDNSResponder
- Enter your password when prompted.
For Linux:
- Open a terminal window.
- Run: sudo systemd-resolve –flush-caches
- To confirm, type: sudo systemd-resolve –statistics
Look for “ CacheHit ” count, it should reset.
2. Restart DNS Client Service (Windows Only)
- Press Win + R , type services.msc, and hit Enter.
- Scroll to DNS Client.
- Right-click > Restart.
Alternatively, in Command Prompt:
net stop dnscache net start dnscache
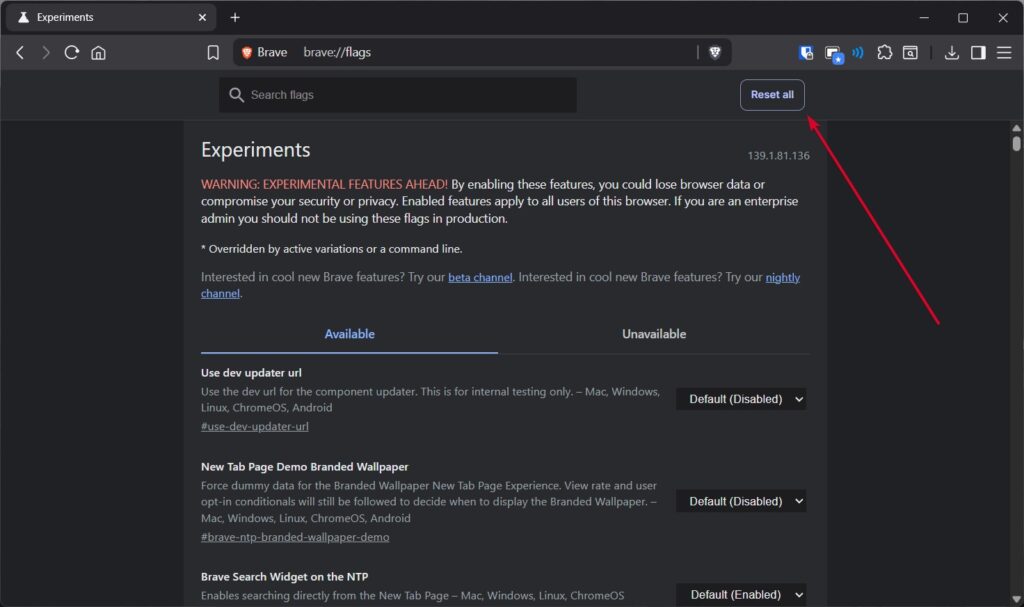
3. Reset Chrome Flags
Sometimes experimental Chrome settings (in the form of flags) interfere with DNS. Resetting them might help:
- Type chrome://flags in the address bar.
- Click Reset all.
- Relaunch Chrome.
Key Features of chrome://net-internals/#dns
The DNS page in Chrome has friends beyond the “Clear host cache” button. Here are its major features:
- DNS Lookup Tool lets you run queries for specific domains.
- DNS Resolver Cache shows cached entries with their expiration time (TTL).
- DNS Prefetching gives Chrome the power to predict and preload DNS queries.
- Socket Pools displays active network sockets and their states.
These are especially useful for developers who want to observe in real-time the ability of Chrome to manage connections.
Why You Might Need This Tool?
Some of the more typical occasions you need to clear the DNS cache are:
- A website recently updated its server, and you’re still being redirected to the old one.
- DNS-related error codes on Chrome.
- Your webpages are loading really slow, and it isn’t your iInternet
- You’ve changed local DNS settings, or you switched VPN providers.
In these cases, flushing the cache allows Chrome to fetch fresh and accurate DNS information.
Conclusion
The chrome://net-internals/#dns tool may appear hidden and a bit technical, but it is actually one of the easiest methods to resolve browsing issues due to DNS. Whether you’re on desktop or mobile, clearing the host cache can fix slow-loading websites, connection errors, and DNS problems.
If, for whatever reason, the tool doesn’t work, don’t worry: You still have lots of options, from flushing DNS via command line to resetting Chrome flags.
At the end of the day, DNS is the foundation of the way we get to websites, and knowing how to control it is like being one step ahead in dealing with some of the most common Internet-related issues.
So the next time a site is refusing to load, you’ll know exactly what to do: jump over to chrome://net-internals/#dns, clear the cache, and get back online without the hassle.
Enjoyed this article?
If TechLatest has helped you, consider supporting us with a one-time tip on Ko-fi. Every contribution keeps our work free and independent.
