Highlights
- BIOS Flashback is a feature of many modern motherboards that allows you to refresh, and sometimes even recover the BIOS/UEFI firmware.
- This is great for when your PC refuses to boot because the BIOS has been corrupted or the CPU just isn’t compatible.
- Luckily, in this guide, we have explained everything that you need to know about BIOS Flashback.
Updated on 29-Aug-2025 : Added the steps to do BIOS Flashback in Gigabyte motherboards.
Updated on 19-12-2021 : Added the list of supported motherboards with BIOS flashback and also added the steps to BIOS flashback on ASRock motherboards.
Don’t want to miss the best from TechLatest ? Set us as a preferred source in Google Search and make sure you never miss our latest.
If you are in the world of building and troubleshooting PCs, then BIOS updates are an important part and often intimidating for even seasoned users.
However, if your system fails to boot and you can’t even access the BIOS setup menu to do a traditional update, then? Enter BIOS Flashback.
When things go wrong (and they will, at one point or another), BIOS Flashback is a lifesaver that lets you update your motherboard’s firmware with nothing but a USB drive; no CPU, RAM, or GPU required.
This is a unique tech, which is only found in a few motherboards, that offers the ability to get your motherboard functional again from a bad BIOS update or solve boot-related issues even without the main power on the system.
So, in this step-by-step guide, you will learn about what BIOS flashback is, how it works and how you can use it efficiently.
Content Table
What is BIOS Flashback?
BIOS Flashback is a feature on many motherboards that allows users to update the firmware or to recover data in case other protection mechanisms fail.
What makes this approach unique is that it doesn’t even need the CPU, RAM, or even a graphics card to work.
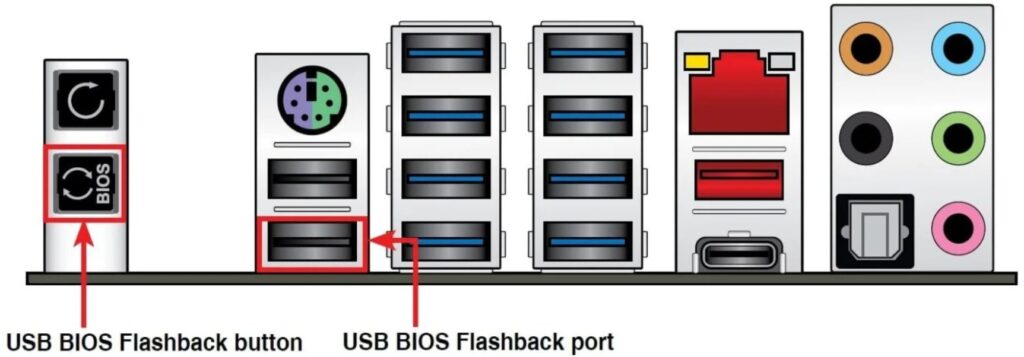
The motherboard powers up to a minimal level so you can flash the BIOS with just the dedicated USB BIOS Flashback port and a hardware button.
This is incredibly useful when:
- Your PC won’t boot after a failed BIOS update.
- You just installed a new CPU, and the card’s BIOS does not know how to use it.
- System powers on (LEDs/fans spin), but the screen remains blank (BIOS corruption).
Sadly, in these cases, you are unable to perform a typical BIOS update via the BIOS setup screen.
In another interesting development, ASUS has also gone ahead and added a BIOS Flashback feature on these boards, which presumably means that you will be able to update the BIOS firmware without having to do so from within the system.
Requirements for Using USB BIOS Flashback
There are a few prerequisites that you need to have ready before starting to update.
1. USB Flash Drive:
- Minimum Capacity: 1GB or higher .
- Format: FAT16 or FAT32 (MBR partition scheme, single partition) .
- If you are not sure how to do that properly, you can use Windows Disk Management or a third-party tool such as Rufus.
2. BIOS File:
- The appropriate BIOS version for the exact motherboard you are using.
- Download from the official ASUS Support/Download Center or your motherboard brand.
3. Disable ErP Function (if possible):
- If you can still boot to BIOS setup on your PC, you should disable the ErP function in the first place. This power setting has an impact on how the motherboard handles power consumption, and it must be turned off in order for BIOS Flashback to work.
GPT to MBR
- Back up or move all volumes on the basic GPT disk you want to convert into an MBR disk.
- Open an elevated command prompt by right-clicking Command Prompt and then choosing Run as Administrator .
- Type diskpart. If the disk contains no partitions or volumes, skip stepping 6.
- At the DISKPART prompt, type list disk. Note the disk number that you want to delete.
- At the DISKPART prompt, type select disk
. - At the DISKPART prompt, type clean.
- At the DISKPART prompt, type convert mbr.
Format USB as FAT32
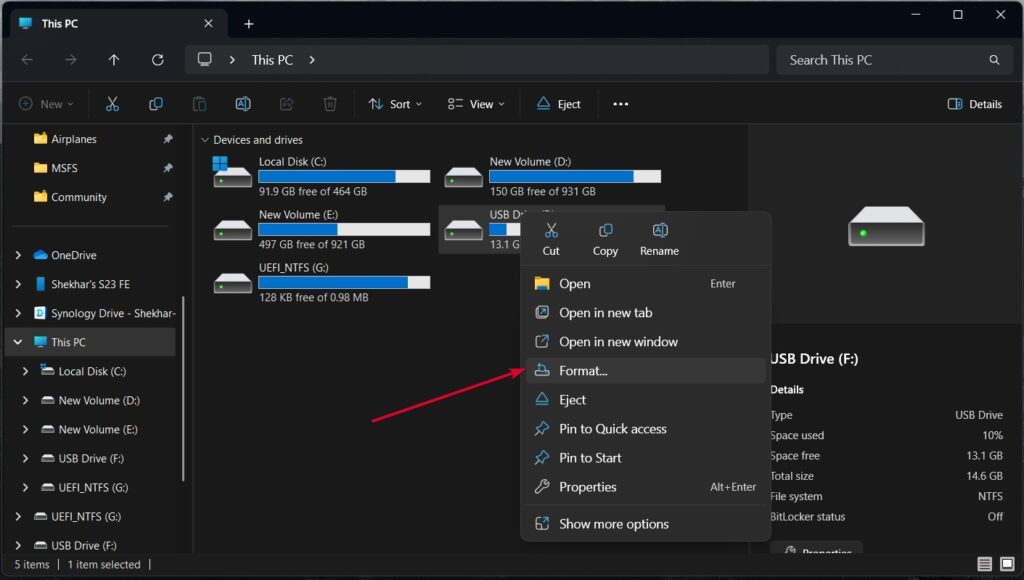
- On the USB flash drive, right-click and select Format
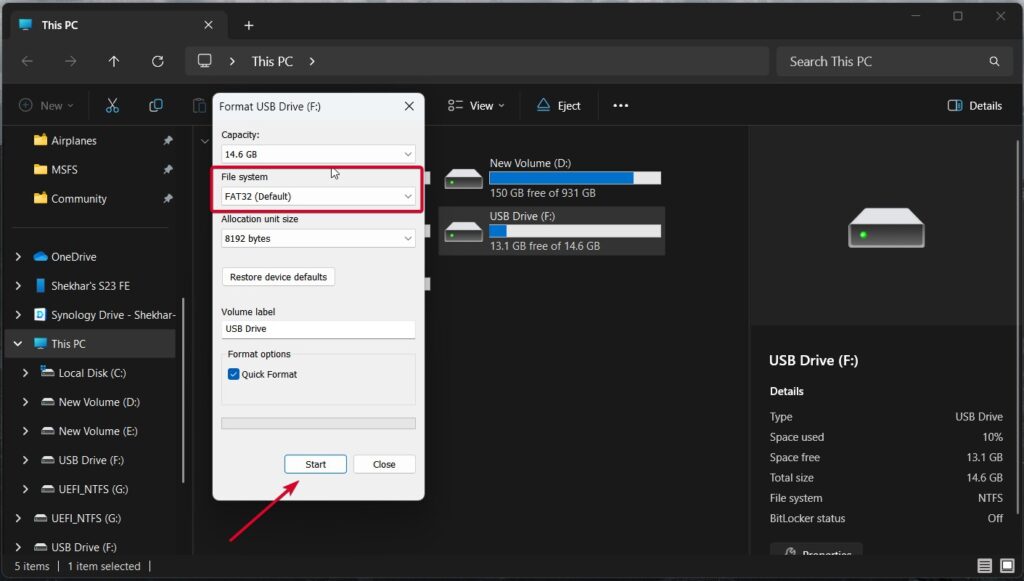
- File system format, select FAT32
- And then click start.
- Formatting is complete.
Here is the list of all the BIOS Flashback supported motherboards from ASUS, MSI, ASRock and Gigabyte.
Step-by-Step Guide: How to Use USB BIOS Flashback to Update BIOS
Let’s now go through the detailed steps on how to update your BIOS with USB BIOS Flashback.
Step 1: Downloading the Right BIOS Flash File and Rename it
First and most important step is to download the right BIOS flash file from the right provider, as if you get the wrong flash file, the next set of steps are not useful at all.
ASUS Motherboards
- Official Download Page : Download From Here
- Example Downloaded Zip Name : TUF-GAMING-B650-PLUS-WIFI-ASUS-3281.zip
- Example Extracted File Name: TUF-GAMING-B650-PLUS-WIFI-ASUS-3281.CAP
- Renamed File Name : Rename the file with the BIOSRenamer.exe tool inside the zip.
MSI Motherboards
- Official Download Page: Download From Here
- Example Downloaded Zip Name: 7D08v2A.zip
- Example Extracted File Name: E7D08IMS.2A0
- Renamed File Name: MSI.ROM
ASRock Motherboards
- Official Download Page: Download From Here
- Example Downloaded Zip Name: B650E Steel Legend WiFi(3.30)ROM.zip
- Example Extracted File Name: B650ESL3.30.ROM
- Renamed File Name: CREATIVE.ROM
Gigabyte Motherboards
- Official Download Page: Download From Here
- Example Downloaded Zip Name: mb_bios_z890-a-elite-wifi7_8aarl007_f17e.zip
- Example Extracted File Name: Z890AELITEWIFI7.F17e
- Renamed File Name: gigabyte.bin
Step 2: Formatting the USB Drive to Compatible Format
For moving forward to the BIOS flashback process, you need a USB flash drive, and that too in the FAT32 file system.
And why do we need the FAT32 file system? Because most embedded UEFI firmware modules only read the File Allocation Table (FAT) file system.
- Insert the USB flash drive into the PC, and then right-click on the drive and click on “Format.”
- Change the file system to FAT32 and click on the start button.
Step 3: Move the BIOS Flash File
Now is the easy step; just move the renamed BIOS flash file to the root directory of the USB flash drive and eject the USB drive from the PC safely.
Step 4: Power-up the Motherboard using Appropriate PSU
- Connect 24-pin ATX and 8-pin CPU power cables from PSU.
- No CPU, RAM, or GPU required.
Warning: Do not press power button on the case. Only provide standby power through PSU switch.
Step 5: Connect the USB Flash Drive to the Motherboard and Start BIOS Flashback
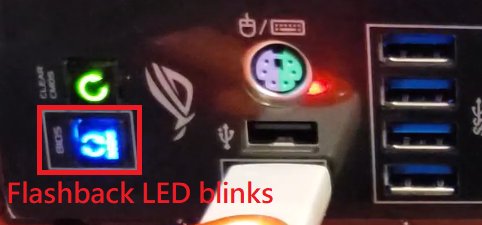
ASUS BIOS Flashback
ASUS’s BIOS flashback is one of the easiest to do, as ASUS motherboards come with a dedicated USB BIOS flashback port and button.
Insert the USB flash drive, which contains the flash file, into the USB BIOS flashback port (indicated with white border and BIOS text) and press the USB BIOS flashback button for at least 3 seconds until you see the flashback LED start blinking (to be precise, it will blink 3 times).
Wait until the LED stops glowing; as soon as it stops, you can safely remove the USB drive, as the BIOS updating process is successfully completed.
Here is a YouTube video showing the steps to do BIOS Flashback in ASUS motherboards.
Note: If the LED doesn’t start with blinking and is constantly lit, that means the BIOS image couldn’t be found on the USB flash drive. You need to recheck everything (like USB file system, correct flash file, correct flash file name, etc.) and start again.
MSI BIOS Flashback
For the BIOS flashback in a MSI motherboard, you need to insert the USB flash drive containing the MSI.ROM file in the root directory to the dedicated BIOS flashback usb port labebed BIOS.
Press the Flash BIOS button, as soon as you press the button, the LED indicator will starting blinking frequently.
Wait until the LED stops glowing; as soon as it stops, you can safely remove the USB drive, as the BIOS updating process is successfully completed.
Here is a YouTube video showing the steps to do BIOS Flashback in MSI motherboards.
Note : If for some reasons, the BIOS flashback fails, you need to first remove the USB drive. And then locate the CMOS Battery, which is a button cell battery. Either short the two pins beside the battery labelled BAT1 for 5 to 10 seconds or remove the battery and wait at least 20 minutes before reinserting.
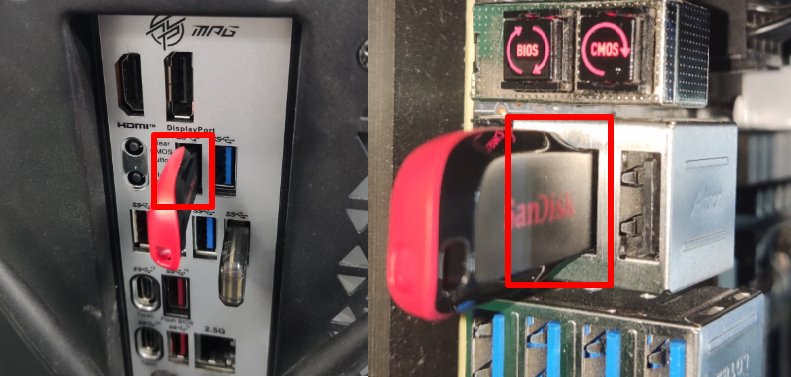
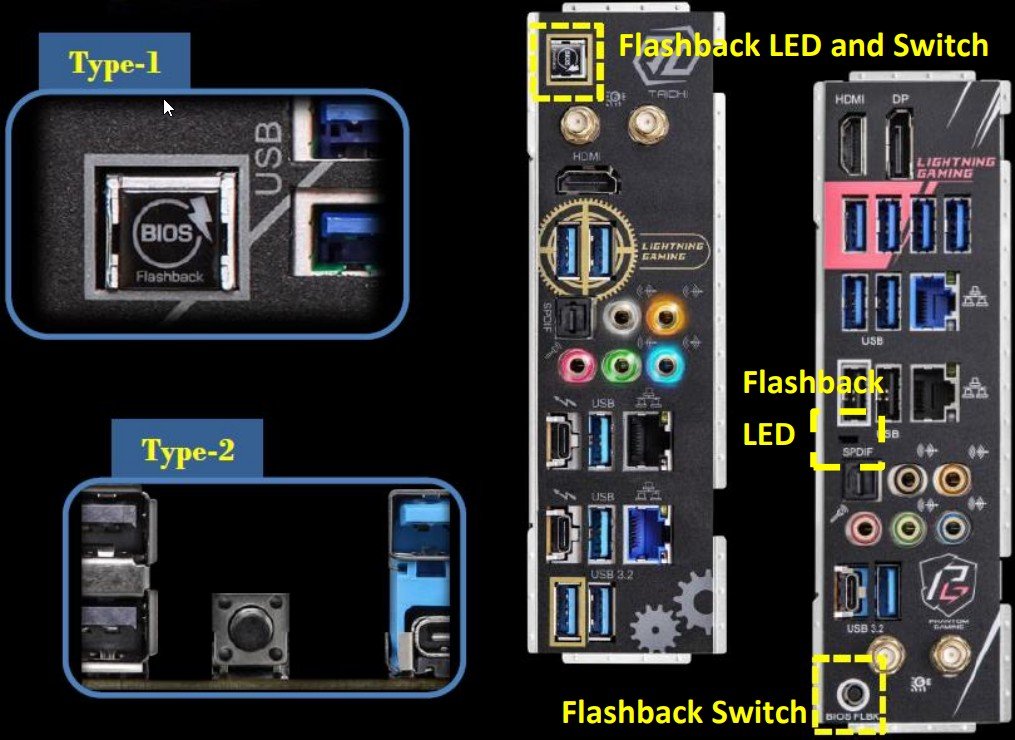
ASRock BIOS Flashback
Differentiating the BIOS flashback usb port on an ASRock motherboard can be a bit tricky as unlinke ASUS and MSI, it is not the nearest port by the BIOS button.
The thumb rule to find out the correct USB port is that the BIOS Flashback USB port will always be outlines wiht the same color border as the “BIOS” labeled flashback button.
Now, insert the USB flash drive containing the CREATIVE.ROM file in the root directory, and press the BIOS button for three seconds.
As soon as you press the button for 3 seconds, the LED indicator will starting blinking. Wait until the LED stops blinking, means the ASRock BIOS Flashback is successfully completed. You can remove the USB drive.
Note : If instead of blinking, the LED is constanly lid green that means the BIOS flashback isn’t operating properly. You need to recheck everything (like USB file system, correct flash file, correct flash file name, etc.) and start again.
Gigabyte BIOS Flashback
The Gigabyte BIOS Flashback, otherwise known as Q-Flash Plus, is rather simipler than expected. As both BIOS Flashback button and port will be labeled as Q-FLASH PLUS and BIOS, respectively.
Now, insert the USB flash drive containing the gigabyte.bin file in the root directory, and press the BIOS button for two-three seconds.
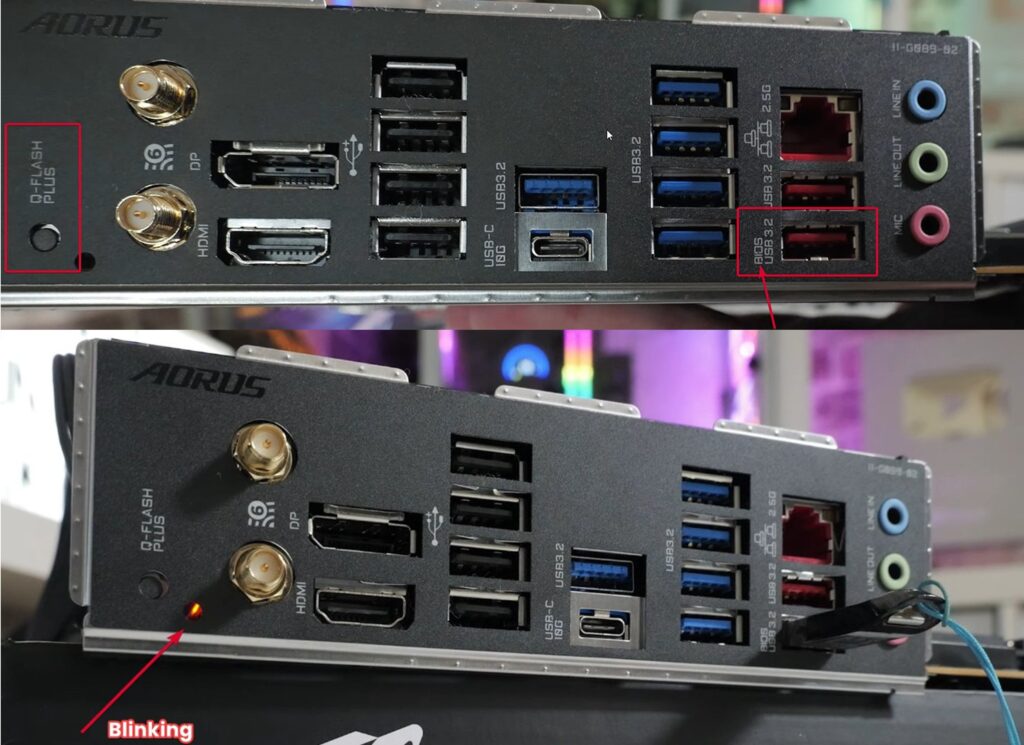
As soon as you press the button, the LED indicator will starting blinking (initally rapidly and then slowly). Wait until the LED stops blinking, means the Gigabyte BIOS Flashback is successfully completed. You can remove the USB drive.
Step 6: Verify BIOS Update Success
One the process is completed and you have removed the USB drive from the motherboard. Do the following,
Connect CPU, RAM, GPU to the motherboard and assemble the other necessary components like Monitor, Keyboard and Mouse (optional).
Power On the CPU and press the BIOS key continously to boot into BIOS settings.
Check the BIOS version number displayed on the main screen and cross-check it with the downloaded version.
Troubleshooting BIOS Flashback Failure
When BIOS Flashback fails, common problems and solutions:
- Incorrect BIOS File Name/Extension: Please make sure that you named the BIOS file according to your motherboard’s specification (AS or. CAP).
- Wrong USB Port: Double-check that you’re using the dedicated USB BIOS Flashback port.
- Incompatible USB Drive: The solution is to use a different USB flash drive that is formatted in FAT32 MBR with only 1 partition.
- File Structure Issue: The BIOS file should be directly in the root of your USB, inside any folder.
- LED Stays On (Fails to Blink/Flashes 5+ seconds): It means there’s a file mismatch or error. So, to resolve this, revisit the download and renaming steps.
You should seek professional advice by contacting the customer support and service centers of ASUS in case all your workarounds still fail to make the issue go away after multiple attempts.
What is ErP and Why Disable it for BIOS Flashback?
ErP (Energy-related Products) is a power-saving feature built into the BIOS that forces the system to use less power when turned off or in standby mode.
But this setting can impact the power delivery mechanisms needed for BIOS Flashback to work correctly.
Thus, turning ErP off allows the motherboard to draw sufficient standby power in order to allow USB BIOS update.
What is clear CMOS?
Clearing the CMOS on your motherboard will reset your BIOS settings to their factory defaults.
Can BIOS Flashback fix a bricked motherboard?
Yes, if FLASHBACK can save itself, as long as it has a motherboard that supports this function and the power supply line is not cut off.
Does BIOS Flashback require CPU or RAM?
No. BIOS Flashback is great in that it works outside of the CPU and the RAM.
What if my motherboard doesn’t have BIOS Flashback?
In that case, you will have to get the BIOS updated with regular means or visit a service center to do it.
What is the “BIOS-FLBK” button for?
This enables you to update to new motherboard UEFI BIOS versions even without a CPU or DRAM installed. This is used in conjunction with a USB drive and the flashback USB port on your rear I/O panel.
Does My MoBO Support BIOS Flashback?
As of now BIOSTAR Motherboards don’t have BIOS Flashback. If you have an Asus or MSI Motherboard, then follow the below link to get the list of supported Motherboards.
Do you need BIOS Flashback?
As I mentioned earlier, if you want to roll back or update to any BIOS version but you don’t have access to the GUI updater, then BIOS Flashback comes in handy.
How long does a BIOS Flashback take?
The USB BIOS Flashback process usually takes 1-2 minutes and maximum 3-5 minutes. The light staying solid means the process has completed or failed.
What is the BIOS USB port?
The BIOS USB port is the port that is used for BIOS Flashback.
Final Thoughts
BIOS Flashback allows you to update BIOS with only the power supply and a USB stick, no CPU or memory required.
Now you can update your BIOS easily without requiring a working CPU or RAM in the socket with confidence by following the steps above.
Enjoyed this article?
If TechLatest has helped you, consider supporting us with a one-time tip on Ko-fi. Every contribution keeps our work free and independent.
